WPLift is supported by its audience. When you purchase through links on our site, we may earn an affiliate commission.
Divi 4.0 Review – A Powerful, Multipurpose Theme That Makes Your Life Easier
If you’re reading this Divi Review, you’ve probably been looking at a mind-numbingly high number of WordPress themes trying to find the absolute perfect design for your site.
Limited Time Offer: Get Divi 4.0 Now with a discount
Trust me, I know the struggle…
There are tens of thousands of themes out there, but so many of them fall flat in one or more of these areas:
- They don’t let you make your site look exactly how you want it to look
- They’re bloated and take forever to set up
- They make you install a separate page builder if you want your pages to look as good as your theme
- They require too much technical knowledge to make big changes
And that’s why so many people love Divi…it solves all those problems.
I know that’s a high bar to set, but Divi really does offer a truly multi-purpose theme that’s feature-rich but doesn’t feel bloated. And it doesn’t stop at just a theme, Divi sets you up with the ability to design and optimize nearly every aspect of your site, down to the individual pages and posts. You get one of the best page builders, excellent use of the WordPress Customizer, and easily implemented split-testing all in one package. Throw in Divi layout packs and life just gets better.
With Divi 4.0, you also get access to powerful new features like full theme building, which we’ve updated our Divi review to include in December 2020.
If you’re interested in learning more about how this powerful theme can make your WordPress experience better, join me as I Review the Divi 4.0 WordPress theme from Elegant Themes.
Limited Time Offer: Get Divi 4.0 Now with a discount
Divi Review: Advantages of Divi Theme
- Truly multi-purpose – Divi can work with almost any niche.
- Drag and Drop Page Builder – Divi Builder lets you easily create beautiful pages with front-end and back-end editors.
- Easy front-end customizations – Divi utilizes the WordPress Customizer so you can preview your changes in real-time.
- Full theme builder – As of Divi 4.0, Divi offers full theme building support so that you can use the visual editor to design your actual theme templates (e.g. your header, blog template, etc.).
- Divi layout packs – Layout packs let you import fully functioning designs into Divi.
- Simple split-testing – Divi Leads makes WordPress split-testing stupid simple.
- Divi Library – Divi Library saves you time by letting you save frequently used designs.
Two Ways to Build Websites With Divi
Let’s start at the beginning…
One of the most powerful things about the Divi theme is that it gives you multiple ways to build your website, depending on your preferences and how much design flexibility you want.
First off, there’s the “original” way, which is using Divi kind of like a regular WordPress theme. When we originally wrote our Divi theme review, this was your only option. You’ll use settings in the WordPress Customizer to control your sitewide layouts such as your header, footer, sidebars, etc.
Then, for your content itself, you have the option to use the visual, drag-and-drop Divi Builder. For example, if you’re designing your homepage, you could use the Divi Builder to control all the stuff that goes in between your header and your footer.
The second way is the “new” way. At least new as of Divi 4.0.
Now, you also get access to full theme building functionality. If you’re not familiar with theme building, it’s basically the idea that you can design 100% of your site using a visual, drag-and-drop editor.
With theme building, you’re actually designing the “templates” for your theme, not individual pieces of content. For example, you could design the template for all your blog posts or the template for your sitewide header. You can also use different templates in different situations, like creating a special template for a certain category of blog posts.
You can also mix-and-match the two approaches, which opens up some neat possibilities. For example, you could use the regular header but still use Divi Theme Builder to design your blog post templates.
Divi Review: What Does the Divi Theme Look Like?
Divi is incredibly versatile. There’s no single “look” for the theme. For example, if you go to the official Divi Theme demo, it will look like this:

But it can also look like this…

Or like this…

Or even like this…

With a little elbow grease, you can essentially turn Divi into whatever you want.
Divi Builder – Create Beautiful WordPress Pages
One of the most powerful tools included with the Divi Theme is the Divi Builder. Divi Builder makes it so that literally anyone can create beautiful pages. All you need to do is drag and drop some of the 46 included “elements” and you’ll be creating pages in no time.
And with Divi 3.0, you now get access to a brand new visual editor. This visual editor allows you to edit exactly what your readers see. No guessing what your page will look like!
If you’re interested you can read our ‘old’ Divi review of version 2.4 to see the differences.
Essentially, the Divi Builder enables anyone, even those with no coding skills, to create beautiful pages.
The only thing to note is that Divi Builder is grid-based. This is pretty standard for page builders, but you should know that you won’t be able to drag elements wherever you want like with a solution such as Headway Theme Builder. You’ll be confined to the grid you set up.
Entering the Divi Builder
Lets’ start the Divi 3.0 review: Once you have Divi 3.0 installed, you’ll see an option to set your page layout and enter Divi Builder whenever you create a new post or page:

Once you click, you can choose to enter the visual front-end editor or the back-end editor.
What’s the difference?
- Front-end: You edit from the exact same view your readers will see.
- Back-end: You edit by dragging abstract boxes around that represent design elements.
Both editors are helpful at different points. The back-end editor is great for arranging a basic page layout, while the front-end is perfect for editing the visual aspects of your page.
Here’s what the back-end editor looks like:

And here’s a shot of the new front-end editor:

Divi Builder Elements – Everything You Need for Beautiful Pages
Divi Builder includes 46 content modules or elements. As far as WordPress page builders go, that’s pretty dang competitive.
Naturally, they’ve got all the essentials like text, images, buttons, etc. But Divi Builder really stands out with the included extras:
It includes specific elements like pricing tables, portfolios, number counters, and much more!

Using the Divi Builder
Designing with Divi is super simple. When you create a new page, you just need to start by adding rows or columns. I’ll show you by using the visual editor, but the process is essentially the same for the default editor.
All you do is click on the “+” button to bring up the “Add Row” window:

Click on your desired configuration. Then, you’ll see your new row in the interface. I opted for a 2-column row:

Once you’ve got your row, you need to insert a “Module”. Whereas rows organize everything, modules are the actual content that will display to your users. You can use modules to add images, pricing tables, buttons, and tons more.
Once you add a module, Divi will prompt you to enter the relevant information for that module. For example, if you add a pricing table, Divi will prompt you to enter the different pricing options:

And after you hit save, you’ll see the exact design that your readers will see:

You can also customize colors and fonts to change up the design.
It might take a few minutes to get the hang of the interface, but once you do, you’ll be designing detailed pages in no time.
Divi Theme Interface – Simple and Intuitive Site Setup
Now that you’ve got a look at the Divi Builder, let’s dig into the actual theme part of Divi.
After you install the Divi theme, you’ll see a new “Divi” option on your sidebar. These links are the gateway to all your Divi customizations.
Divi Theme Options – Set Up the Basics for Your Site
Divi’s new “Theme Options” menu is a big improvement from previous versions. Unlike most themes, even the theme options are beautifully designed:

These options allow you to set up the basic details about your site. You won’t need to do anything super visual here – most of the meaty modifications are saved for the WordPress Customizer so you can preview them in real-time.
Divi Theme Builder – Design Your Entire Theme With the Visual Builder
In the past, you could only use the visual drag-and-drop Divi Builder to design the content of your individual posts and pages. That’s certainly useful, but it was still limited because you still couldn’t use the visual builder to design your header, footer, or templates for your blog posts.
That all changed in Divi 4.0. With version 4.0, the Divi team introduced drag-and-drop theme building to Divi.
This is a super powerful feature. Essentially, it lets you take the same visual interface that you saw above and apply it to your theme template files including your:
- Header
- Footer
- Single templates (e.g. the template that all of your blog posts use or that a custom post type uses)
- Archive templates (e.g. the template that lists all of your blog posts or custom post type items)
- WooCommerce single product pages
- WooCommerce shop pages
If you’re not familiar with what a theme builder is, let me explain the difference between using Divi to design one-off posts/pages and using it to design theme templates.
With the regular Divi Builder, you could create a new blog post and use Divi to design a custom layout for that post. However, that layout would only apply to that single post. If you wanted to use it for another post, you’d need to manually copy over the same layout and edit the content.
The Divi Theme Builder works differently. With Theme Builder, you can create one template that automatically applies to some/all of your blog posts. So once you create your template one time, you could just add content via the regular WordPress editor and that content would automatically use the template that you defined with Divi.
The really cool thing is that you can create different templates for different content. For example, you could create one template for blog posts in the “Tutorials” category and a different template for blog posts in the “Reviews” category.
Creating Templates
If you’re using Divi Theme Builder, you can first create a global header, global body, and global footer. These are the “default” templates that your site will use.
Then, you can also create your own custom elements that only apply to specific situations. For example, you could create a different body template for certain post types, categories of posts, etc.
You can manage all of these options by going to Divi → Theme Builder:

For your custom templates, you get a ton of options for controlling where to assign custom templates.
You can target your templates by:
- Post type – e.g. posts, pages, or custom post types
- Specific posts, pages, or custom post types
- Categories of content
- Tags of content
- Author archives
- Date archives
- Specific author pages (including by role)
- Search results page
- 404 page

This gives you a ton of flexibility because you can create optimized templates for every unique situation. And remember – your content will automatically inherit these templates – you don’t need to lift a finger.
For example, if you create a special template for posts in the “Reviews” category, every time you publish a new review then that post will automatically use the review template.
Designing Templates With Dynamic Content
To design your templates, you’ll use the same visual Divi Builder interface. The key difference is that you get access to dynamic content modules.
These modules let you dynamically pull in the content for the template.
For example, let’s say you’re designing the template for a blog post. Each blog post will have a different title, so you can’t just add static text where you want the blog title to be. Instead, you would add the Post Title module, which automatically pulls in whatever the title of each blog post is:

The really powerful thing is that you aren’t just limited to dynamic content that comes from the core WordPress software. You can also pull in dynamic content from any custom fields that you’ve created, which opens up a ton of possibilities for building custom WordPress sites.
For example, here’s what it looks like to insert custom field information from the popular Advanced Custom Fields plugin into a regular text module (you can also use other plugins like Toolset or Pods):

You can see that you also get lots of options to insert dynamic content directly from your WordPress site.
Theme Builder for WooCommerce, Too
If you’re using WooCommerce to create an online store, Divi Theme Builder also includes a built-in integration so that you can design your shop and single product templates. For example, you’ll get new modules to display a product’s price, the add to cart button, etc.
Divi Theme Customizer – See Changes in Real-Time
Whether or not you’re using Divi theme builder, you also get plenty of options to control the Divi theme using the real-time WordPress Customizer.
You can always enter the Divi Theme Customizer by clicking on the “Theme Customizer” link in your dashboard.
If you’re familiar with the WordPress Customizer, you’ll know how to navigate this interface:
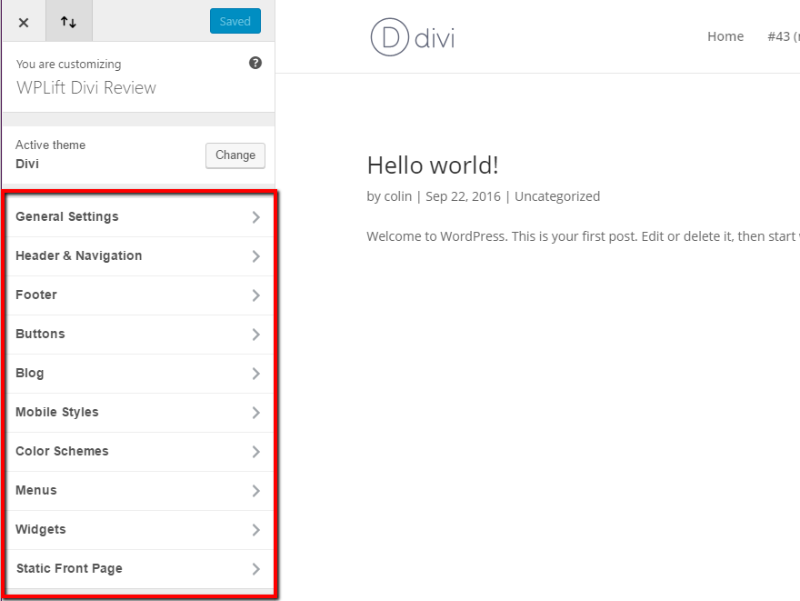
Here, you can customize literally every aspect of your site without needing to know a single line of code.
Say, for example, you don’t want to display your logo. What do you do? Dig into your theme’s code any remove the line that displays the logo? No, all you have to do is click into your “Primary Menu Bar” and check the box that says “Hide Logo Image”:

Or, say you want to give your site a boxed layout instead of the default full-width layout. All you need to do is go into “Layout Settings” and check that box:

Get the idea? It’s very powerful. And it’s great that you can preview your changes in real-time. A lot of premium themes like to create their own admin panel. With a custom admin panel, you have to save and refresh your site every single time to see your changes.
But because Divi uses the WordPress Customizer, you don’t have to do that. Just make all your changes in the intuitive interface and hit “Save” when you’re happy with how everything looks.
Divi Module Customizer – Easily Customize Modules for Divi Builder
Remember those modules/elements I talked about with the Divi Builder? Well, you can also customize them with the WordPress Customizer. It’s pretty dang awesome and, as far as I know, unique among WordPress page builders.
You can access this by clicking on “Module Customizer” inside your dashboard.
For example, if you wanted an easy way to edit the appearance of the pricing table from the earlier example, you would navigate to the “Pricing Table” option:

After clicking on it, you can easily manipulate the appearance of all the pricing tables on your pages.
With a few clicks, you can change text sizes, bold relevant parts, and otherwise edit basic appearance details for your modules:

You can do this for most of the modules available in the Divi Builder. This is a really nice feature of the theme. You can make site-wide changes in a simple, familiar interface. It will save you a ton of time!
Divi Leads – Split Test Your Content to Optimize Performance
Divi Leads is an incredibly powerful tool for optimizing your content via split testing. If you’re doing anything commercial with your Divi site, this tool will literally put more money in your pocket. I’m not exaggerating – split-testing is incredibly important to optimize your site.
If you’re not familiar with split-testing, it basically involves comparing two different versions of your page. For example, you could change the text on a button but leave everything else the same. You then show 50% of your visitors one button, and the other 50% of your visitors the other button. Through this testing, you find which variation gets more clicks.
Imagine if you were testing the button that subscribes people to your newsletter. If you could increase the number of people who click that button, that would directly lead to a bigger, more successful newsletter, right? That’s what this feature helps with.
Divi Leads makes split-testing easy, even for beginners. When you’re building a page with the Divi Builder, all you need to do is right-click inside Divi Builder and choose “Split Test”:

Then, all you need to do is click on the specific module you want to split test:

Once you’ve selected your module, Divi Leads will automatically create a new testing variation:

If you want to test more than just two variants, you can always add more:

It’s one of the easiest ways to split test with WordPress. Usually, you have to try to integrate a third-party tool or plugin to get the benefits of split-testing. But with Divi, it’s all built-in. If you’re doing any kind of marketing, you will absolutely love this feature.
Divi lets you test different goals like clicks, CTR, bounce rate, etc. So you can make sure you’re maximizing the right actions.
And once your page starts getting some traffic, Divi will collect all the statistics for you:

Divi Library – Save Design Elements to Reuse
Because you’ll probably want to reuse certain design elements across different pages on your site, Divi lets you save designs to something called the Divi Library.
For instance, you could save just a single row from a page design:

Then, if you ever want to recreate that row, all you need to do is import it from the library:

Trust me, this feature will save you a ton of time. You’ll definitely have common elements, like footers, which you’ll want to use over and over again. With Divi Library, you won’t need to waste time duplicating work you’ve already completed – just save to the library and import whenever you need.
Undo/Redo – Never Worry About Making Mistakes
Mistakes happen. That’s just a fact of life. But if there’s one thing Microsoft Word has taught us, it’s that there’s no mistake that can’t be remedied by the undo button.
Elegant Themes understands that which is why they’ve included undo/redo buttons in Divi.
If you ever make a mistake while using the Divi Builder, you can easily move backward or forwards by clicking the undo/redo buttons. And if you want to move back even further, Divi saves an edit history for your page so you can easily move between different versions:

These features make editing worry-free in Divi. When you inevitably mess up, it’s not a catastrophic situation. Just move back to the latest working version and you’re good to go!
Premade Layouts – Save Time Creating Your Designs
If you don’t want to customize your designs from scratch, Divi ships with over 1,400 pre-made layouts that you can start using instantly. These templates are also organized into different “layout packs”, which gives you access to a bunch of templates all built on the same basic design.
Whenever you create a new page, you can opt to start with one of these layouts instead of a blank page. Then, all you need to do is add your own content and you have a beautiful site with very little work:

Divi Support and Documentation
Elegant Themes, the company behind Divi, offers an incredible level of self-help support for the theme. Not only do they include a massive knowledge base, but they also publish regular Divi tutorials on their blog.
And if you need to talk to a real person, they offer a support forum available to all paying customers. Honestly, forcing subscribers to use a support forum is one of my least favorite parts of Divi’s support system. But, between the support forum and the huge self-help knowledge base, you should be able to always find answers to your questions.
Divi Theme Review: Pricing
Divi Theme isn’t for sale as a standalone theme. Instead, it’s part of the complete Elegant Themes package. Is this a bad thing? I personally don’t think so. With plugins like Monarch and Bloom, Elegant Themes offers a ton of value beyond just Divi.
You can either pay a yearly membership fee for access to Elegant Themes or purchase a more expensive, one-time membership. Here’s what you can expect to pay for the different levels:

If you can swing it and know you’re going to be using Divi for a long time, the one-time $249 fee might make economic sense.
Sure, it’s a big amount to eat upfront, but you get unlimited updates and support for life. So, as long as you think you’ll use Elegant Themes’ products for more than ~3 years, you’ll come out ahead.
Divi Alternatives
If you’re still not sure about Divi, there are plenty of alternatives that you can choose from, with Elementor probably being your best option. We already have posts on Motopress vs Divi, and Elementor vs Divi which you can check out. Or, browse our collections of the best page builder plugins or best theme builder plugins, depending on your needs.
Divi Review: Final Thoughts
Divi is the king of multi-purpose themes for a good reason. If you’re a regular WordPress user, I don’t think there’s an easier way to create such a broad range of beautiful designs.
Divi Builder and Divi Leads are incredibly valuable tools by themselves. Divi Builder is already one of the best page builders out there. To have it built into the theme is a huge bonus.
Divi Leads also completely eliminates the need to try to integrate a third-party split-testing service, which will save you a ton of time. Because it’s integrated with the page builder, I think it’s one of the easiest ways to split test with WordPress.
Finally, with the addition of Divi Theme Builder in Divi 4.0, you get access to a huge new feature to help you build custom sites. The dynamic content integration also lets you really tap into WordPress’ flexibility as a CMS.
I know there are cheaper themes out there, but when you compare the value you’re getting for the money you spend, I don’t think those cheaper themes are actually saving you money/time.
So, if you’re looking for a versatile theme with heaps of page building goodness, give Divi a try for your next project.


Very solid review of Divi 3.0.
Thanks, Luke!
I am using divi builder from last one year and i am quite satisfied with its features.
I’m a graphic designer and have been using Divi for almost two years. Divi allows me to simply and easily create great visual presentations without knowing much about code. It’s the perfect tool for my needs. Great article. Great product. Check out Divi Nation!!!!!!!!