WPLift is supported by its audience. When you purchase through links on our site, we may earn an affiliate commission.
WooCommerce Tutorial: How To Start An eCommerce Store On WordPress
If you’re thinking of starting an eCommerce store on WordPress, you’re probably considering using WooCommerce, right?
Not only is WooCommerce the most popular WordPress eCommerce plugin, it’s also the most popular eCommerce solution for all sites. Period. According to BuiltWith, WooCommerce powers a whopping 42% of eCommerce stores on the entire Internet, which is pretty dang impressive.
So if you’re looking to start selling things with the world’s most popular eCommerce solution, you might be in need of a WooCommerce tutorial to help you get up and running…
That’s what this post is:
A beginner-friendly WooCommerce tutorial to help you configure your store, add your first product, and start accepting payments in no time.
Because it’s the de facto standard, I’m not going to waste time convincing you to use WooCommerce. Instead, let’s just jump right into the guide!
Step 1: Choose WooCommerce-Friendly Hosting
If you’re planning to just have a small store with a few products, you can probably run WooCommerce on pretty much any hosting.
But if you’re planning to have hundreds of products, you’re going to need quality hosting to avoid having both the frontend and backend of your site running like molasses.
Why? Because your WooCommerce site is going to be making all kinds of database calls and external calls that regular WordPress sites don’t have to do.
And that means you need hosting that won’t buckle when using those extra resources.
Not only is a slow-loading eCommerce site bad for user experience, it can flat out tank your conversion rate, which means less money in your pocket (that’s not good for running a successful eCommerce store!).
So if you’re planning to start a WooCommerce store, make sure you build it on a strong foundation. You can see some of our recommended hosts here – in general, we’re partial to SiteGround and WP Engine.
Step 2: Pick A WooCommerce-Compatible Theme
If you want your WooCommerce store to look good, it pays to pick a theme that’s specifically designed to work with WooCommerce.
Such themes ensure that all your important pages look great. I’m talking about things like:
- Product listings
- Checkout pages
- Customer account pages
Where can you find such a theme? You’re in luck! We’ve actually already collected some of the best WooCommerce themes. And if you’re looking for something a little more on the free end of things, we’ve also collected a bunch of free WooCommerce themes.
For this WooCommerce tutorial, I’ll use the official (and free) Storefront theme.
Step 3: Install WooCommerce And Complete Setup Wizard
Ok, so you’ve got your WooCommerce hosting and theme set to jet. Now, you’re ready to actually install and configure the WooCommerce plugin.
To get started, install and activate the WooCommerce plugin from WordPress.org:
- Go to Plugins → Add New
- Search for WooCommerce
- Click Install Now
- Wait for the Install Now button to change to Activate
- Click Activate

Run The WooCommerce Setup Wizard
As soon as you click the Activate button, WooCommerce should display a prompt asking you to Run the Setup Wizard. Go ahead and click that button to configure the basics for your store:

Below, I’ll go through the various tabs of the Setup Wizard…
1. Store Setup Tab
When you launch the wizard, the first tab that you see is the Store setup tab. You need to enter three important pieces of information here:
- Your store’s address
- The main currency that your store will use
- Whether you plan to sell physical or digital products (or both)

Once you’ve entered the information, click Let’s go! to continue.
2. Payment Tab
In the Payment tab, you need to choose the payment methods that you want to accept on your store.
While you can always add more payment gateways later, here are the default options:
- Stripe – convenient and user-friendly way to accept credit and debit card payments
- PayPal – accept payment via both credit card or a user’s PayPal balance
- Offline Payments – configure various offline payment methods

Personally, I’m a big fan of Stripe because it’s so easy to use, but you can pick whichever payment method appeals to you.
You’ll still need to complete some further setup to start accepting payments, through (more on that in a second!).
3. Shipping Tab
In the Shipping tab, you can set up how to calculate shipping rates and which dimensions to use.
If you choose the default Live Rates option, WooCommerce will automatically install the official Jetpack and WooCommerce Services plugins.
These two plugins allow you to dynamically calculate USPS shipping rates (if you’re in America) for your orders to ensure that you always have accurate rates.
In fact, WooCommerce offers some more advanced shipping setup options (like weight-based rates or custom shipping zones).
If you’re just getting started, I think it’s a good idea to leave these as the default, though you can change the Weight unit and Dimension unit if needed:

4. Extras
Depending on where your store is located, you might need to collect different taxes depending on where a shopper lives. Doing this manually can be a pain, but by enabling the Automated Taxes option, WooCommerce can do this for you via WooCommerce Services and Jetpack:

Again – this won’t apply to everyone, so I can’t tell you 100% whether or not you should activate this feature.
5. Activate
Assuming you’re using live shipping calculations or automatic tax calculations, you’ll need to connect your store to Jetpack in the Extras tab:
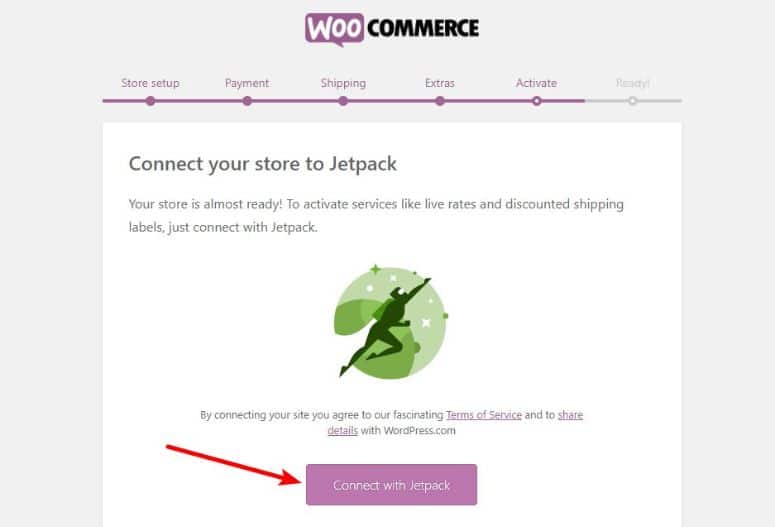
If you already have a WordPress.com account, you just need to sign in. If you don’t, you’ll need to create a new account:

And that’s it! Now you’re ready to create your first WooCommerce product.
Step 4: Add Your First Product
To add the first product to your WooCommerce store, go to Products → Add New in your WordPress dashboard.
At the top of the screen, you can enter:
- Product name
- Product long description
- Categories
- Tags

And if you scroll down, you can add:
- Product data – this is where you specify product type, pricing, inventory, and lots more.
- Product image – the main image for your product.
- Product short description – kind of like an excerpt (in comparison to the long description)
- Product gallery – a gallery of product images

A Deeper Look At The Product Data Box
Because it’s so important, the Product data meta box deserves a deeper look.
The first thing that you want to do is select the product type from the drop-down and/or the two checkboxes. Depending on what you select, you’ll see different options underneath:

For a deeper look at the WooCommerce product types, check out this help doc at WooCommerce.
Generally, if a product is always the same no matter what, it’s going to be a Simple product. And simple products are what you’ll use most of the time.
But if you’re selling something like a t-shirt (with different sizes and/or colors), it’s going to be a Variable product.
Once you choose the product type, you’ll want to go through the various tabs and configure the product information:

Here are the tabs for Simple products:
- General – regular price and sale price (if applicable)
- Inventory – stock status, SKU, and more
- Shipping – dimensions for shipping calculations
- Linked products – lets you set up upsells and cross-sells to promote other products
- Attributes – lets you add custom data that’s unique to the product
- Advanced – lets you add purchase notes and enable/disable customer reviews
How All That Looks On The Frontend
Once you finish setting up your product, all you need to do is click Publish to make it live. Here’s how the information in the backend looks on the frontend:

Step 5: Finish Configuring Payment Gateways
Once you’ve added your products, you need to complete one more step before you’re ready to start accepting orders:
Finish configuring your chosen payment gateway(s)
To do that:
- Go to WooCommerce → Settings
- Click on the Checkout tab
- Choose the payment gateway you want to configure

How do you actually configure the payment gateway? Well, the process varies depending on the specific payment gateway that you want to use.
For example, with Stripe you’ll need to enter your:
- Live Publishable Key
- Live Secret Key

You can find both of these keys at this page in your Stripe account.
For more detailed instructions for the various payment gateways, check out these support docs:
- Stripe
- PayPal Standard
- PayPal Braintree
Step 6: Consider WooCommerce Plugins To Further Extend Your Store
At this point, you should have a working WooCommerce store. But as is the case with any WordPress site, you’ll probably want to extend your store with additional functionality via plugins.
To find such plugins, the official WooCommerce Extensions library is a good starting point.
And we also put together a massive list of 50 quality WooCommerce plugins that includes tons of helpful options.
That Wraps Up My WooCommerce Tutorial
And with that – we’ve reached the end! I can’t say I’ve shown you every single feature in WooCommerce because that would take up much more than the 1,500 words in this post.
But at this point, you should know everything you need to launch your WooCommerce store.
Going forward, I encourage you to explore things like coupons and analytics (both available under the WooCommerce menu in your WordPress dashboard).
But for now, enjoy your new WooCommerce store! And leave a comment if you have any questions.





Very complete and detailed tutorial, congratulations!