WPLift is supported by its audience. When you purchase through links on our site, we may earn an affiliate commission.
How To Add Custom CSS To WordPress: Here Are 4 Methods
Need to add custom CSS to WordPress? As you become more familiar with WordPress, you’ll almost certainly want to add at least a little bit of custom CSS to your site. I know I do – every WordPress site I launch has at least a couple of tweaks to get things just right.
But adding custom CSS to WordPress can be a bit tricky because it’s not a good idea to just edit your parent theme’s stylesheet and stick your code right there.
To help you add custom CSS to WordPress the right way, I’m going to share four different methods that you can use, each with something that makes it unique. I’ll cover everything from the WordPress Customizer to enqueuing your own custom stylesheet so that you can find the method that’s right for you.
Pssst: Would you like to easily change the CSS, live, while looking at it? Try CSS Hero
Let’s jump in.
Reasons to Add Custom CSS to WordPress
The core of the WordPress CMS is built on PHP, HTML, JavaScript, and CSS languages. Most users don’t have to be familiar with these languages to build a site because WordPress offers a broad range of customizable templates.
However, these templates have pre-built elements that don’t always match the website style you’re aiming for. You must modify the CSS stylesheet if you want to alter any of the elements a theme features.
Stylesheets contain instructions that define the site’s visual appearance and set the rules on how the code should be interpreted. Editing code you find in the theme’s stylesheet redefines the style sections and lets you introduce new functionalities.
Optionally, you can write new code and add it to a stylesheet. There’s more than one way to do this, and I’ll look at the four most common methods designers, and developers use to customize WordPress themes.
Method 1: Use The WordPress Customizer
I’m going to start with the WordPress Customizer because it’s the most accessible method, but it’s not necessarily my personal favorite method (that’s Method 2).
This method is probably your best option if you’re still learning to build WordPress sites and the CSS language because it allows you to customize a theme from the CMS dashboard.
Pros Of Using The WordPress Customizer For CSS:
- You don’t need to do any setup or install a plugin. It’s part of the WordPress core.
- You can see your custom CSS changes on a real-time preview of your site.
- It includes basic validation to ensure you don’t mess anything up.
Cons Of Using The WordPress Customizer For CSS:
- Any custom CSS that you add is tied to your theme. So if you change themes, you’ll need to copy over your custom CSS.
How To Use The WordPress Customizer For CSS:
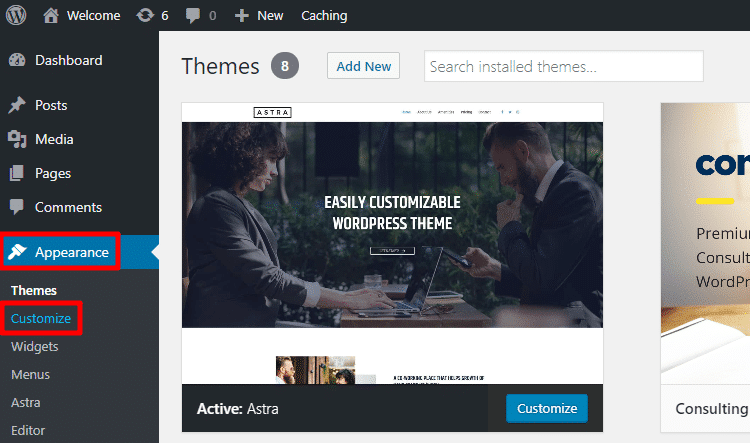
Launch the WordPress Customizer interface by going to Appearance → Customize in your WordPress dashboard:
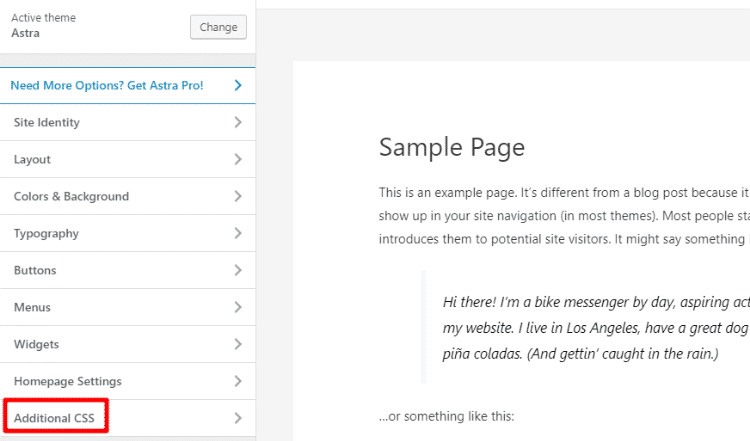
Then, click on the option for Additional CSS in the WordPress Customizer sidebar (it should be at the bottom):
Now, simply add your custom CSS to the box. If you mess up any syntax, the editor will alert you to your errors. Don’t forget to back up your site before editing the theme’s code since a minor mistake might ruin its appearance.
A popup window will appear on the screen when you attempt to make direct changes to a theme, informing you that all edits you make might be lost during the next update.
Click the I Understand button to proceed and gain access to the stylesheet, functions.php, and other theme documents.
The live preview displays the changes you make and allows you to see how they look on desktop or mobile devices.
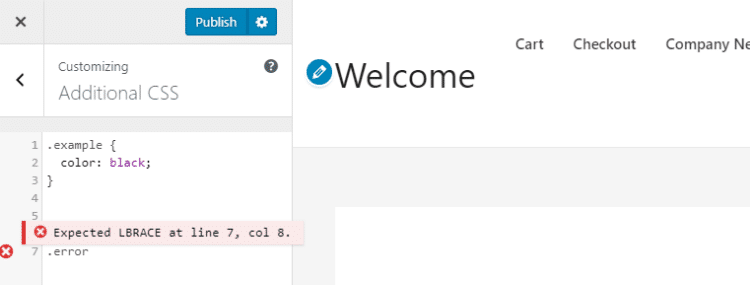
When you’re finished adding custom CSS, click Publish to make your changes live.
Method 2: Use The Free Simple CSS Plugin
Simple CSS is a free plugin from Tom Usborne, who’s also the creator of the popular GeneratePress theme (which is also the theme that we use here at WPLift).
The plugin can do almost everything from the previous method plus a lot more.
Pros Of Using The Simple CSS Plugin:
- You can still add CSS via the WordPress Customizer for real-time previews
- The plugin includes a separate full-featured CSS editor outside the WordPress Customizer
- You can add custom CSS to individual posts or pages
- All the CSS that you add is theme-independent. So even if you switch themes, your CSS will still be there
Cons Of Using The Simple CSS Plugin:
- There’s no code validation like the WordPress Customizer method
- The plugin isn’t tested for the latest three WordPress releases
How To Use The Simple CSS Plugin:
The plugin’s last update took place a year ago, and it hasn’t been tested with WordPress versions released after the 5.8.6 version.
Installing Code Snippets Pro might be a better solution for you if you’re using Gutenberg or Elementor, as you won’t have to worry about the plugin’s compatibility.
You must test the Simple CSS plugin’s compatibility with the WordPress version you’re currently using after installing and activating it. You can add custom CSS to WordPress in a few different ways in case the test goes smoothly.
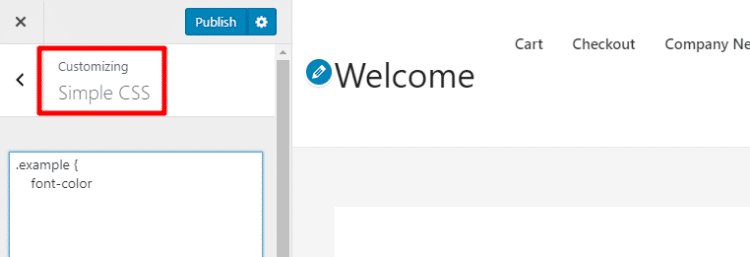
First, you can go to Appearance → Customize and use the Simple CSS option. This will give you a live preview of your CSS changes, just like the previous method:
The editor doesn’t restrict how many lines of code you can add, which enables you to redesign a theme completely.
Second, you can go to Appearance → Simple CSS to use the full editor. The code in this editor will be identical to the code in the Simple CSS area of the WordPress Customizer:
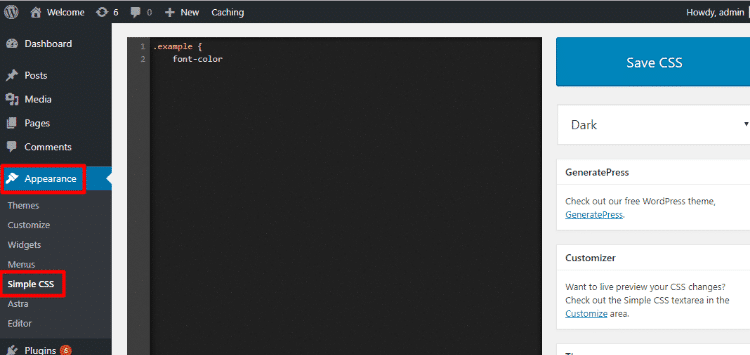
Finally, you can also add custom CSS to an individual post or page via the new Simple CSS meta box underneath the WordPress editor:
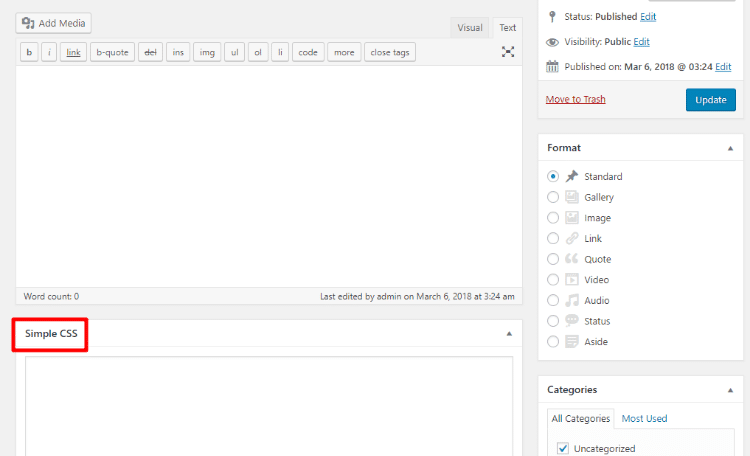
All in all, the Simple CSS plugin is my favorite method for adding basic CSS tweaks.
Method 3: Use Your Child Theme’s Stylesheet
If you need to add a lot of custom CSS rather than just a few tweaks here and there, you’ll probably be better off using your theme’s stylesheet.
But – you can’t put your custom CSS in your parent theme’s stylesheet because it will get overwritten every time you update your theme.
Instead, you need to use something called a child theme. That way, your custom CSS will stay intact even when you update the parent theme.
Pros Of Using Child Theme Stylesheet:
- Good for adding lots of custom CSS (like 1,000 lines plus)
Cons Of Using Child Theme Stylesheet:
- No live previews in the WordPress Customizer like the previous two methods
- Not as convenient as the other two methods in general
- Your custom CSS is tied to your theme, so you’ll need to move it over if you ever change themes
How To Use Child Theme For Custom CSS
You could use this tutorial to create one if the place where you got your theme from didn’t already include a child theme for you to work with.
Don’t forget to back up the website before creating a child theme so you can revert to the last functioning version of the site if something goes wrong.
The fastest way to do this is to create a copy of the website’s files and database from your web hosting account. Also, you can install a free plugin that lets you back up a website from the WordPress dashboard.
After you install and activate the One-Click Child Theme plugin, go to Appearance → Child Theme and:
- Enter the details for name, description, and author
- Click Create Child
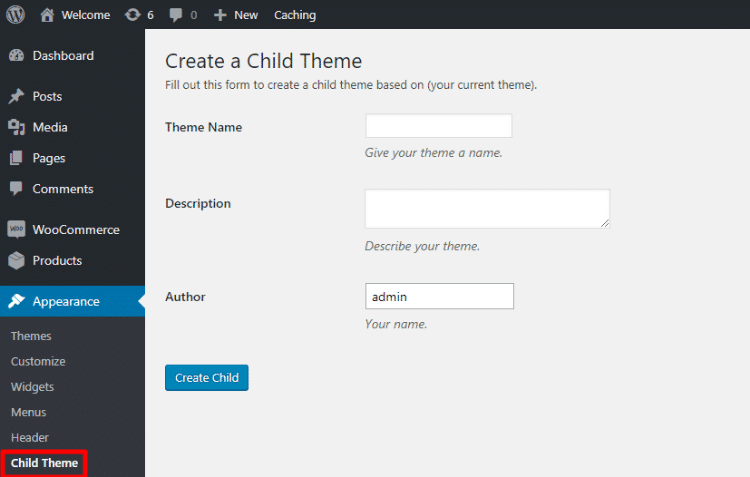
Once the plugin creates your child theme, it will automatically activate it. You can then click to jump straight to your child theme’s stylesheet:
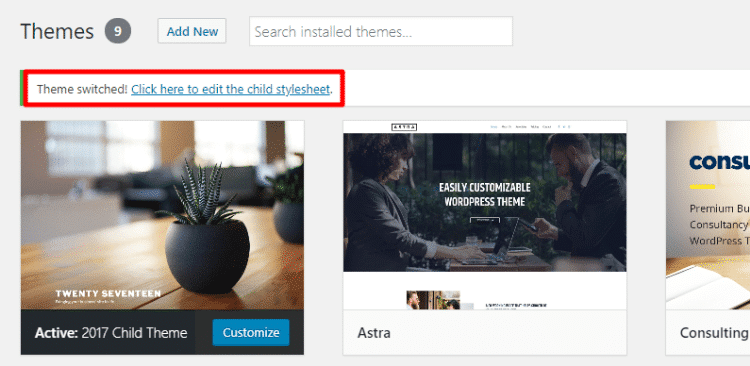
Or, you can always access this by going to Appearance → Editor:
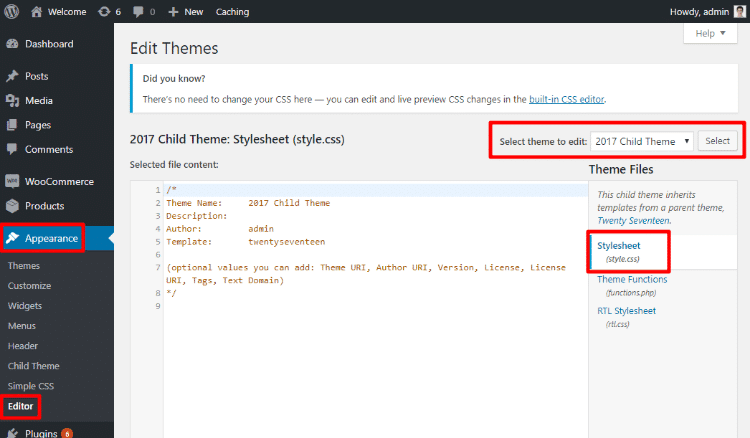
Like the WordPress Customizer method, WordPress will perform basic code validation on any CSS that you add and inform you whenever you insert an invalid syntax. This is a recently added feature that I love!
Method 4: Enqueue Your Own Custom Stylesheet
Most WordPress users will never need to use this method.
But I’m mentioning it because some people try to add their own custom stylesheet by including it directly in their <head> section like this:
<link rel=”stylesheet” type=”text/css” href=”mystyle.css”>
The above method is not the way to do it in WordPress.
Instead, you need to use wp_enqueue_style to add your stylesheets.
Moreover, you should register the CSS stylesheet using the wp_register_style function.
This step is optional if you’re enqueueing a stylesheet that doesn’t require additional code to load it. When ready, you can assign the wp_enqueue_style function to different actions.
For example, to add a stylesheet named customstyles.css that you’ve uploaded to your theme’s folder, you would add this code snippet to your functions.php file or a plugin like Code Snippets.
wp_enqueue_style( 'customstyles', get_stylesheet_directory_uri() . '/customstyles.css' );.
Frequently Asked Questions about Adding Custom CSS to WordPress
How To Add Custom CSS to WordPress?
The fastest and easiest way to add custom CSS to WordPress is to edit the theme’s code from the admin panel. All versions of WordPress published after the 4.7 release allow users to change or add custom CSS without plugins.
You must have an excellent command of the CSS language to edit the theme’s original code. However, WordPress Theme Customizer will underline incorrectly written syntaxes to prevent you from making mistakes that could jeopardize the site’s functionality and visual appearance.
Where to Add Custom CSS WordPress?
All you need to do is navigate to the dashboard’s Appearance menu and click on the Customize option.
You should click on the Additional CSS submenu once the Theme Customizer appears on the screen. Proceed to insert the code to the theme’s functions.php file or stylesheet and click Publish when done, but keep in mind that the edit you’ve made applies only to the theme you’re using.
You can add custom CSS directly into the plugin’s interface if you’re using the free version of Code Snippets. The Simple CSS plugin will be displayed in the dashboard’s Appearance menu after you install it and activate it.
How to Create Custom CSS in WordPress?
Introducing new functionalities to a WordPress theme or altering its visual appearance involves writing code in the CSS editor.
Changing the text color, expanding the widget area, or hiding the post’s metadata are among the things you can do with Custom CSS. However, you must know how to write the commands in CSS to perform any of these tasks.
CSS validators can help you check if each line of code you added to the theme is correct.
Final Thoughts On How To Add Custom CSS To WordPress
If you just want to add a few custom bits of CSS, using the WordPress Customizer or the Simple CSS plugin is definitely going to be the easiest way.
If you need to add lots of custom CSS (say, over 1,000 lines), then you might be better off using your child theme’s stylesheet.
Finally, you can always enqueue your own custom stylesheet. I’ve never had a need to do this personally, but that option is there if you want it!
Have any other questions about how to add custom CSS to WordPress? Leave a comment and we’ll try to help out!


First time I learn WP, I used with “The WordPress Customizer” .
Awesome blogs
I am really just glad not to see “add it inline with a style= tag!” because I’ve run across that advice before. And not on a one-off scenario, either. As a legit way to make stuff stand out from defaults. #cringe
Sometimes, we need to add CSS code in the theme to customize or beautify the blog. I was unaware of these options. Thanks for the writing. It’s really informative.
I’ve used all of the above mentioned options but Yellow Pencil is a must have plugin for CSS customisation
I’ve used all of the above mentioned options but Yellow Pencil its very helpful plugin .