WPLift is supported by its audience. When you purchase through links on our site, we may earn an affiliate commission.
Mapify Store Locator Plugin Review & Setup (2023)
WordPress store locator plugins can be valuable additions to your website if your company has many locations. It is a feature that you can include on one or more of your website’s pages. It allows users to look for the store that is closest to them and plan their way there.
Customers may want personal contact with a product before making an online purchase, and a visit to your store allows them to do so. In addition, compared to Internet buying, customers will have fewer queries and returns for in-store purchases.
Mapify Store Locator is a popular plugin that claims to give you complete control over your maps. In this article, you will learn more about this plugin and whether it can indeed provide an effortless user experience.
What is a Store Locator Plugin?
With a store locator plugin, you can incorporate Google Maps on your site and add store locations for any type of store directory you want to create.
Including a store locator on your WordPress site will aid in search engine optimization as well. For example, your store locations will jump up in local SEO searches if you add certain custom entry fields and other data.
If your firm has a WordPress-based website, the simplest way is to install a plugin is to add a store location map. These plugins display locations using Google Maps. As a result, you’ll be able to use all of Google Maps’ features, such as geolocation, driving directions, and several map views.
There are other store locator plugins available, however, we recommend Mapify Store Locator Plugin.
Mapify Store Locator Plugin
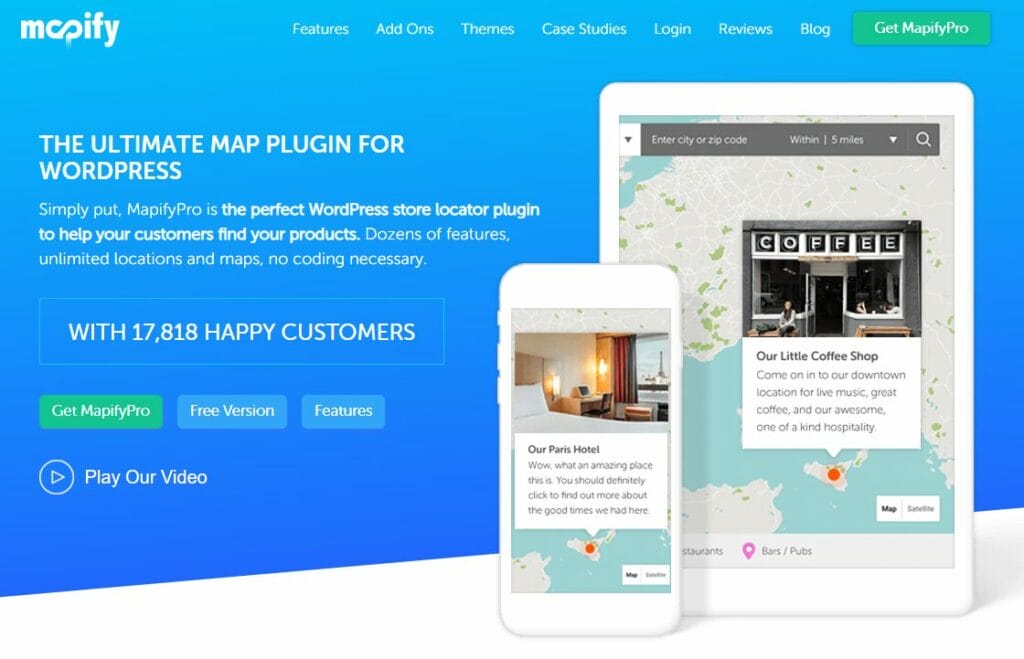
Mapify is a premium WordPress plugin that allows you to add Google Maps and create highly customizable map-oriented features, such as store locators, to your website with ease. In fact, it bills itself as the “best WordPress store locator plugin.” You can use the plugin to add two types of maps to your website: a conventional mode for regular maps or a flashy picture mode for illustrative maps with colorful icons.
MapifyPro is well-equipped for individuals looking for powerful bespoke picture maps. Map clusters, social media maps, configurable tooltips, map filters, and much more are all supported by the plugin. Additional capabilities, such as routes and visitor location submissions, are available as add-ons to the plugin.

Article Continues Below
The ability to add specific blog articles to your maps is another useful tool. If you create a travel blog, for example, you can link certain posts to specific locations on your map, which will then appear as points of interest.
MapifyPro is responsive and works well on all devices in terms of performance and usability. And, when it comes to SEO, the plugin takes a novel approach: every location you add to your maps is a WordPress post, which might help you enhance your search rankings.
Price
You can try it out for free by downloading Mapify Lite, while the premium version will set you back $ 19 per month.
Mapify Free Version Features
- LIFETIME UPDATES with 100% FREE MAP PLUGIN SUPPORT PLAN
- The Basic Support Plan is included.
- The ideal way to put the software to the test: MapifyLite easily upgrades to MapifyPro when you’re ready for more features.
- By inserting the automatically created shortcode anywhere on your site, you can display your map on a page or a blog post.
- 100% the best free map plugin for WordPress. For proper display on any mobile or tablet device, it must be responsive.
- If you only need one map, this is the way to go.
- To help you tell your tales, you can add more information, videos, and photo galleries to any location.
- To complete the design, add your custom map marker.
MapifyPro Features
- 100% Responsive design for optimal viewing on any smartphone or tablet device.
- Upload all locations in bulk using a CSV file.
- To complete the design, add your custom map marker.
- To help you build your stories, you can add more information, videos, and photo galleries to any location.
- Each map has an infinite number of locations.
- You can add a video to all pinpoint locations.
- You can add a photo gallery to all pinpoint locations.
- A custom pinpoint icon can be utilized on any map.
- Use social media to share map locations.
- Add articles from your blog to your maps.
- Advanced search and filtering options.
- Content for each location’s tooltip is unique.
- Personalization: Mapify has exclusive features that you won’t find anywhere else. It has a rock-solid foundation and the most up-to-date Google API connection.
- Translate your map into any language.
- Locations are nicely organized using map clusters.
- Toggle whether or not you want the zoom feature in Image Mode: This is useful if you’re merely looking for hotspots in your photos. In custom picture mode, the zoom ability enables two levels of zoom.
- Toggle the location pop-ups on and off. You can choose whether or not each place should have a pop-up gallery or only the tooltip when hovered over.
Pros
- Compatible for WordPress 4.9+
- Maps are responsive and can be used in any location
- Hover boxes and pins with tooltips
- The ability to create hotspots
Cons
- The premium version costs more than the majority of other map plugins
Mapify Installation
You’ll want to upload the MapifyPro plugin file to your WordPress admin’s Plugins tab, just like any other WordPress plugin.
- Click “Add New” under the “Plugins” tab, as seen here:

- You will see a list of WordPress plugins at this stage, but you can just ignore them and click ‘Upload Plugin’ as shown below:

- Locate the MapifyPro master.zip file that you downloaded after purchasing MapifyPro by clicking the ‘browse’ option.
- Select the ‘Activate Plugin’ option after the plugin has finished uploading. You’ve completed the MapifyPro installation process and are now ready to activate your API Key.
Activation of API Key License
You’ll see a new tab has been added to your WordPress admin now that you’ve installed MapifyPro. Activate your license after the installation first. Follow the step below:
- A new notice will appear at the top of your dashboard, directing you to where you need to go, but otherwise: In the WordPress admin, go to the ‘Settings tab. You’ll see a new sub-section entitled ‘MapifyPro License Activation’ after installing MapifyPro.
- To get to the page where you’ll enter your activation key, click this tab. This can be found in My Account > API Keys. It’s worth noting that you’ll need to use the same email address you used to make the transaction in the next step.

- If you’re experiencing difficulties activating your license, ensure this option under the License Deactivation tab isn’t chosen. Instead, it should look as follows:

Mapify Settings
MapifyPro makes it simple to create a map library, but it also comes with many options. This section delves into each feature available with MapifyPro, how it works, and how making a map fits into the whole workflow.
To begin, simply click ‘add new’ at the top of the ‘Maps’ page to add your first map. Below this image is the continuation of the tutorial on how to add an actual map:

Basic Settings
In this part, you’ll find all of the items you’ll need to get started with your map, as listed below:

- Mode: This is where you choose between regular maps and custom picture mode.
- Map ID: Your Map ID will appear here after you’ve published or updated your map.
- Shortcode: This is the code you’ll paste anywhere on your site to embed your map.
- Default Pin Image: You’ll want to utilize this little graphic as the default pinpoint/marker for each location. You can add a different pinpoint graphic to each place, but if you don’t specify one in the Location Settings, this will be displayed instead.
- Enable Mouse Zoom: This allows you to zoom in and out using your mouse. Enable Manual Zoom: This enables manual zooming on the map by clicking the +/- icons.
- Enable Clustering: Clusters combine numerous nearby locations into a single icon that, when clicked, zooms in and expands to reveal the locations within. This is very beneficial when there are a lot of locations close together. This functionality changes depending on the zoom level.

- Enable “Use My Location”: This is a new feature available in version 3.0 and higher. It will display the user’s current location when clicked.
- Pop-up Text / Labels.

Change the text that shows in the pop-up once a location is clicked in this area, as shown below:
Article Continues Below


Search and Filter Settings

- Enable Search: On your map, hide or show the search area to allow searching by city or zip/postal codes.
- Enable Filter Dropdown: Allow users to select filters from a dropdown that you’ve allocated to the map. Only those locations labeled with that filter will appear when the user selects a filter. On Mapifypro.com, it appears like this:
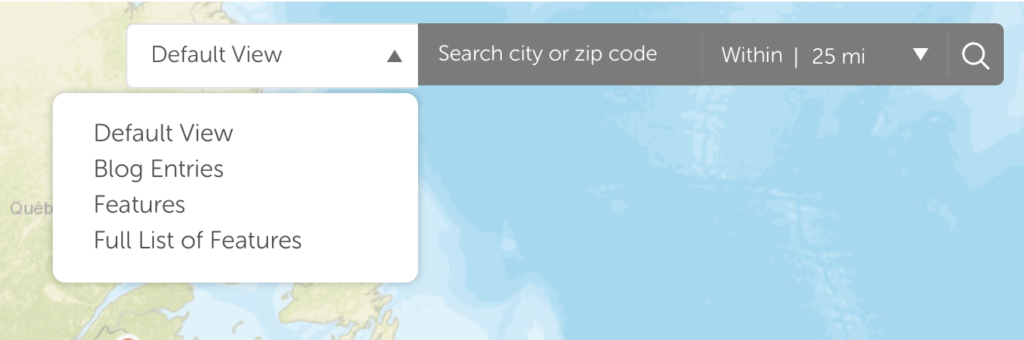
- Enable Filter List: This has the same functionality as the filter dropdown, but it places the list under the map, like a map legend. When shown this manner, you can also apply a graphic to each filter. On Mapifypro.com, it appears like this:

- When this option is selected, the map will concentrate on the location(s) that appear after a user searches. This is highly useful for mobile users, and we recommend that you enable it.
- Filters: Center Map: When selecting filters, do the same as before.
- Text / Labels: Change the text/labels that appear on the front-end maps concerning filters and the search area in this section.
Radius Settings for Search

- Search Radius: This is the default search radius in miles or kilometers. If you don’t enable specific search radius variables on the front-end map, this isn’t relevant (more on that below).
- Search Radius Unit: Choose between miles and kilometers for your search radius. This will change the functionality of the maps and the labels used to search in the right distance unit (miles or kilometers).
- Search Region Bias: If you have many locations in the same country, insert the country code here (i.e., UK, US, CA). In your given country, this will result in more consistent search results. A list of country codes is available by clicking on the link provided there.
- Enable Front-End Search Radius: When using Mapify’s search feature, this setting allows the front-end user to choose the distance in which they’d like to search. If you don’t enable this, the distance will default to the value you selected in the “Search Radius” setting. If you enable it, it will apply default values, but you can override them using the options below.
- Front-End Search Radius Options: Here, you can define the various search distances that users can choose from on the front-end. An example of how it will display on the map is as follows:

Tooltip Marker / Pinpoint Settings
This is where you’ll find all of your tooltips and pinpoint/marker settings.

- How about animated tooltips? Tooltips will fade in with a slight movement when enabled. When disabled, they will appear/hide instantly with no effect.
- Tooltips Orientation: You may now add a featured image to each tooltip in MapifyPro 3.0 and higher (these images are applied in the location settings).
Interactive List of Locations Settings

- Enable: To enable or disable this functionality, select Yes or No.
- Number of Locations in List: This determines how many things will appear in the list before it is paginated. If you set this to 5, but there are 25 total items, the user will view the first five, then just click next to see the rest.
- Hide List By Default: When the map is first loaded, or when “Default View” is selected, the list will be hidden. Then, when a user conducts a search or applies a filter, the list appears under the map, with only the relevant locations displayed.
- Text / Labels: Use these to specify the text that should show on the interactive list’s two buttons. By default, the popup button will read “More Details,” and the button that provides directions to this location will read “Get Directions.”
Color / Design Settings

- Map Background: In picture mode, this is the background that displays behind the image. It only applies to Image Mode and only when a transparent PNG file is used.
- Tooltip Background: The color of the tooltip’s background.
- Tooltip Transparency: Change the tooltip’s transparency.
- Tooltip Text Color: Change the tooltip text’s font color. If you prefer a darker tooltip and lighter text color, or vice versa, this is a good option.
- Popup Background Color: This is the background color of the location popup (default white).
- Popup Header: This refers to the blog article format, which features a colored bar across the top. To alter the color, use this option. For standard location popups, this isn’t required.
- Popup Date Background: This refers to the blog article style, which includes a colored date indicator at the top to show when the blog post was published. To alter the color, use this option. For standard location popups, this isn’t required.
- Popup Accent: This is the color of the “Get Directions” button in the location popup, as well as other minor accent colors.
Settings for the Map / Image Mode
This section contains information on the mode you selected for your map.

- Map Mode Settings > Style: This allows you to customize the map’s appearance. We have several built-in options that allow you to achieve various styles, such as black and white, pastel, and other creative alternatives. Simply choose a style, and the map preview at the bottom of the page will alter to reflect your selection. This only applies to Map Mode.
- Image Mode > Map Image: When you’re in image mode, this is where you’ll submit the map image. This works by uploading the image to our server, rendering it into tiles, and then returning it to you. After this, the map will act similarly to regular maps, with zoom effects and other features.
Zoom Level and Location Settings by Default

- Primary Location: This is the location where you want your map to default to. There are two alternatives available here:
- Manual Center and Zoom: This allows you to choose the center location of the map by just clicking on it.
- Existing Location: This option allows you to focus on one of the locations in your Map Location library.
- Initial Zoom and Style Preview: There are a few advantages to using this preview map: It lets you pick the zoom level, preview the style you selected from the style options, and preview the map’s center placement.
Filter Tags for Publishing and Map Filtering (Right Sidebar)

- Publish/Update: Just like any WordPress page or post, while updating or creating a new map, make sure to click this button to save your changes.
- Tags for Map Filters: The location we’re talking about can be seen in the photograph above. The creation of map filters is a two-step procedure. To begin, go to the map settings and establish the filters. This makes them visible on the map and in any location marked on it. After that, when you’re building a place, you’ll provide it a tag or tags (the same filters you create here). This is a diagram showing how it might function.
That’s all there is to it for your map settings! After you’ve made all of your changes, click “Publish,” and your map will be ready to use on your site!
It’s a Wrap!
Mapify store locator is a great plugin that simplifies the complicated process of adding a map to your WordPress site. We highly recommend this plugin as you can save time and effort a very great deal. Additionally, this is super easy to install and set up.
Give this plugin a try and experience the smooth experience of adding a map to your WordPress site. Good luck!


Thanks for the great write-up! Do you mind if I link to it from my site and my social network pages?
A feature to “Center Map At” is now part of the base plugin for users that want the home icon to be closer to a specific location when performing a search.
Several new add-on packs are about to be release as well, including a “user managed locations” add-on that will let the site admin turn on “manage locations” for select (or all) users.
– LC
Yes please do Lance.
Thanks for the extra info too.
Joe
You can find the Results setting in the “User Experience” tab, then the left sidebar has a row called “Results” that allow you to choose the results you’d like.
Thanks for help John , but i mean , i want to display 6 results on the page . For exemple if i have 60 results , i want to display 6 per page . After 6 results are displayed to click next and display other 6 and so on .
So the problem is how to show only 6 result per page , the search it’s ok if it returns 50 results . Only to be 6 per page , right now i have only 3 per page .
If anyone could help it will be fantastic.
Thanks guys .