WPLift is supported by its audience. When you purchase through links on our site, we may earn an affiliate commission.
WordPress FTP Access Guide: Managing Your WordPress Site’s Files with FTP
When you’re just getting started with WordPress, it’s normal to do everything through the WordPress admin dashboard. But as you start to become more familiar with your website, learning how to set up WordPress FTP access can help you more easily manage your site and solve some issues that you may encounter.
In this article, we will first give you a quick introduction to what FTP is, and why it’s helpful. Then, we’ll show you how to set up WordPress FTP access, and connect to your server.
What Is FTP? Explained For Newbies
FTP, short for file transfer protocol, lets you directly manage the files on your WordPress site’s server.
By connecting your website directly to your server, you can easily transfer files from your computer to your server effortlessly.
In this article, we will first give you a quick introduction to what FTP is, and why it’s helpful. Then, we will show you how to set up WordPress FTP access, and connect to your server.
- Upload files
- Rename files
- Edit files
- Move files around
- Delete files
- Create new files
- …work with files in lots of ways! You get the idea.
While people usually just refer to “FTP”, what you’ll actually want to use is something called SFTP. SFTP, short for SSH file transfer protocol or secure file transfer protocol, is just a more secure way of performing all of those same actions.
FTPS or file transfer protocol secure is another term you must be familiar with. Essentially, FTPS is a file transfer protocol that supports Transport Layer Security (TLS) as well as SSL (Security Sockets Layer).
Obtaining the FTPS will ensure all files are encrypted (called file transfer encryption) during the process of uploading to a site, and are virtually impossible to hack. It works by using various security measures and encryption strategies for connecting with foreign servers and verifying connection, and client-server authenticity.
Unlike the secure shell protocol that relies on a single data connection, FTPS demands a secondary data port, which makes it more difficult to set up a firewall.
FTP software products usually support SFTP and FTPS, so in most cases, you won’t have to worry about data encryption or the security of your files when uploading them to a WordPress site.

Article Continues Below
We will follow the crowd and just call it FTP for the rest of the article, but you really should use SFTP for security if your host allows it (it’s the same idea as for why HTTPS is better than HTTP).
Scenarios in Which WordPress FTP Access Can Help You
As a WordPress user, understanding the answer to the question of ‘what is FTP’ comes in handy for both site management and fixing issues.
On the management front, you can:
- Bulk upload files to your Media Library – though you will need to use a plugin to import them from your server to your Media Library. The free Add From Server plugin is a good option.
- Upload new themes or plugins – this is especially helpful for large themes or plugins because sometimes in-dashboard uploads will time out.
- Edit important files, like wp-config.php or .htaccess – most FTP programs let you edit files on your computer, and then automatically re-upload them.
And, FTP can also help you repair your site when things go wrong. For example, you can:
- Disable plugins or themes even if you’re locked out of your wp-admin dashboard.
- Fix code errors if you accidentally broke your site while using the in-dashboard code editor.
- Manually take your site out of maintenance mode if WordPress gets stuck in maintenance mode for some reason.
- FTP is very useful when it comes to file recovery and management. FTP is essential for uploading backups, restoring earlier versions, and getting back the deleted files from the server.
Basically – WordPress FTP access comes in really handy when you’re managing your WordPress site, so it’s worth taking a few minutes to familiarize yourself with ‘how to use FTP’.
Limitations of Using the WordPress Dashboard
Here are some of the limitations of using the WordPress dashboard.
Restricted File Access: The WordPress dashboard has limited access when it comes to the file system. Hence, it is really difficult to carry out advanced tasks or troubleshoot issues that require direct changes.
Dependency on Plugin Functionality: If you want to extensively manage all the files on your WordPress website, it is not possible. To get this thing done, you need to take the support of the plugins.
Inability to Handle Server-Level Issues: In the case of incorrect file permissions, server misconfigurations, server-side scripts, etc., the WordPress dashboard doesn’t help. You need to rely on FTP to address all of these things.
Prerequisites for Connecting FTP to the WordPress Site
In order to connect to your WordPress site via FTP, you’re going to need a free piece of software as well as some account information. Let’s go through it…
1. FTP Program
The first thing that you need is an FTP program. This is the software that actually lets you connect to your WordPress site’s server and work with files.
There are a lot of great FTP programs out there, but we like FileZilla because:
- It’s free and open source.
- It works on Windows, Mac, and Linux
- It supports SFTP and FTPS for security.
For those reasons, we will use FileZilla for the tutorial. You can pick a different one if you want…you just won’t be able to follow along with the screenshots.
Most FTP programs aren’t cross-platform compatible, as they’re designed to run either on macOS or Windows. Check out Cyberduck if you’re searching for a FileZilla alternative, which is available in both Windows as well as MacOS versions.
Here are some of the best FTP options for Windows:
Consider one of the FTP programs below if you’re a Mac user:
Please note that most of these FTP clients aren’t free, and they’re best suited for users that manage vast quantities of files.
So, you’re probably better off using an open-source FTP for WordPress like Cyberduck or FileZilla if you’re just starting a new website.
2. File Backup
It’s hard to overstate how important it is to create a website’s backup before installing FTP software.
All changes you make to a website’s files with FTP software are permanent. So you won’t be able to access their previous version if something goes wrong unless you have a backup.
Fortunately, you don’t have to back up an entire website before connecting FileZilla to a WordPress site. Instead, you can make a copy of the following files:
- Database
- WP-content folder that contains all plugins, themes, and media you added to your site
- All WordPress core files, such as the wp-admin directory or index.php file
Once you install FileZilla successfully, and make sure it’s working correctly, you can use it to create website backups on a local hard drive since you can download files to your computer.
3. FTP Account Credentials
You’ll need your FTP credentials to install an FTP program. These consist of a:
- Username
- Password
- Port number
- Host
You should have received this information from your host. Usually, it’s either in a welcome email or your dashboard. If you can’t find it, we recommend reaching out to your host’s support.
If your host offers cPanel, it’s also pretty easy to create a new FTP account via your cPanel dashboard.
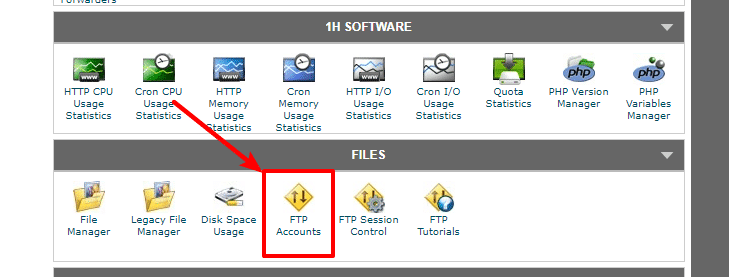
First, find the FTP Accounts option in the main cPanel dashboard:
Then, use the Add FTP Account box to create a new username and password. If desired, you can also use the Directory option to restrict the account’s access to a certain website (leave it blank if you want it to be able to access all of the websites in your hosting account):
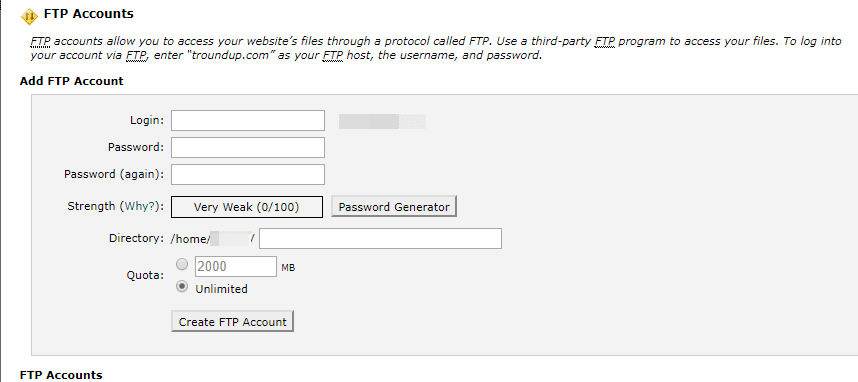
Restricting access is helpful if you need to give someone else FTP access. For example, you might want to give a developer access to help with your site.
How To Connect To Your WordPress Site With FTP
Once you’ve installed your FTP program, and have your credentials ready to go, here’s how to connect to your WordPress site via FTP, and some of the things that you can do once you’re connected.
To get started, go to File → Site Manager in FileZilla:

Then, click New Site.
In the New Site area:
- Choose SFTP for the Protocol if your host supports it (otherwise leave it as FTP)
- Enter the Port (usually, this is 21 for FTP and 22 for SFTP by default, but your host might do it differently. For example, you can see that it’s 2222 for my host in the screenshot below)
- Enter your website’s domain name in the Host box
- Choose Ask for password in the Logon Type drop-down (while FileZilla will let you store your password, that’s a really bad idea from a security perspective)
- Enter your username in the User box
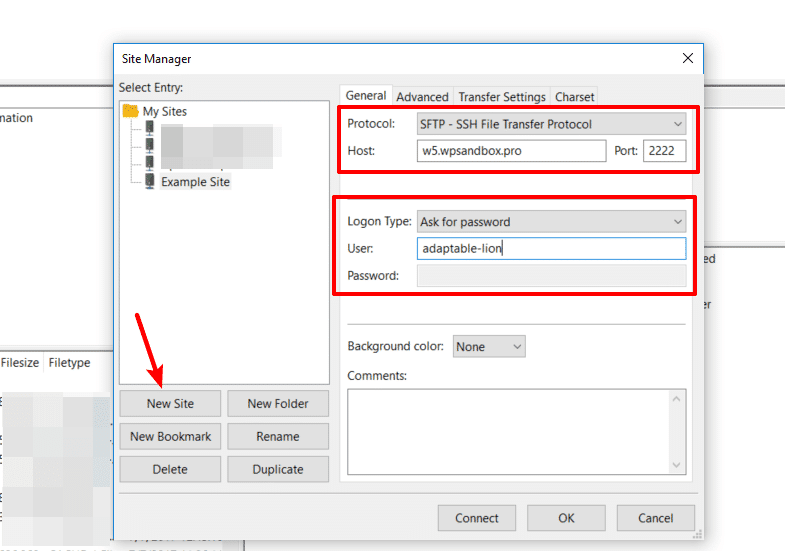
Then, click Connect.
You’ll be prompted to enter your password:
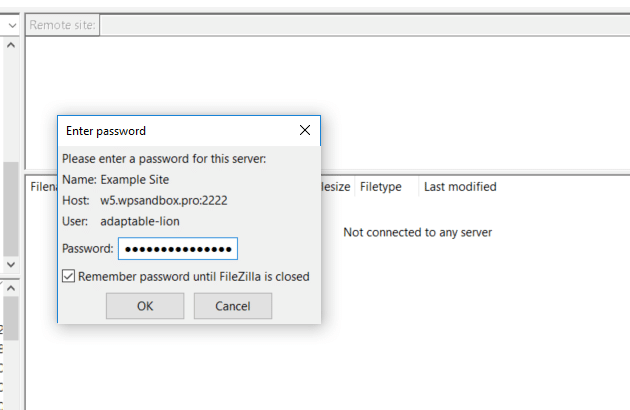
And when you click OK, FileZilla should connect to your server as long as your credentials are accurate.
The Basics Of Working With Files Over FTP
The FileZilla interface is divided into two halves.
The Local site section on the left displays the folders and files on your computer. And on the right, you have the Remote site section with all folders and files on your WordPress site’s server.
Manipulating files is as simple as drag-and-drop – just like you’d do on your desktop.
To re-arrange files on your server, you can drag-and-drop them between different folders. Or, if you want to upload files to your server (or download them to your local computer), you can drag files between the two halves:
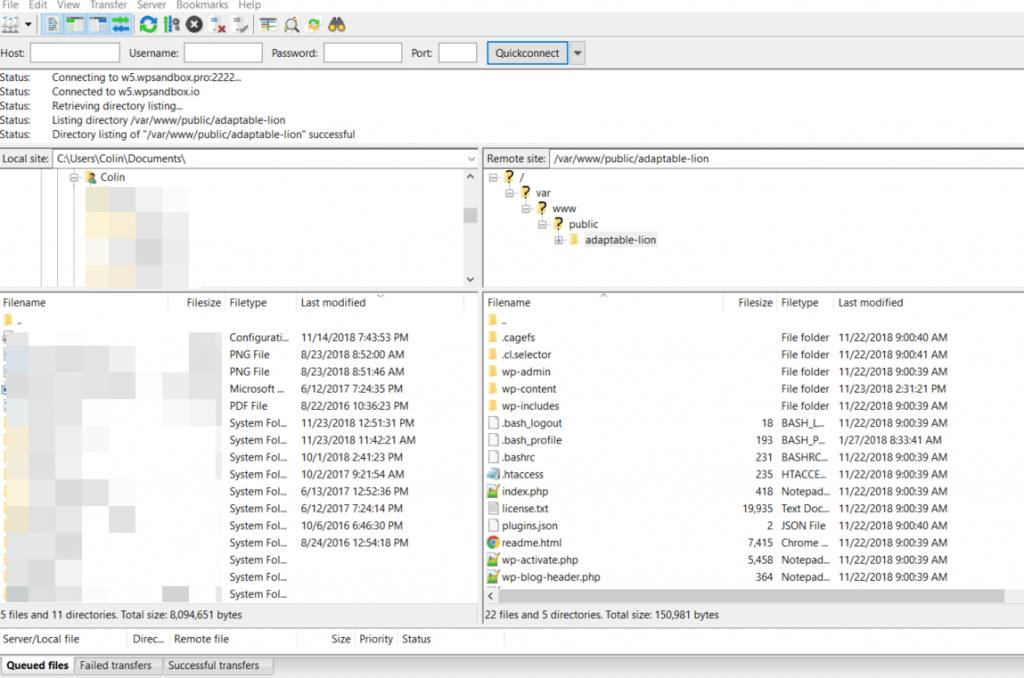
It’s important to note that, unlike your desktop, dragging files between your local computer and your remote site will not move them.
- That is, if you drag a file from your server to your local computer, the file remains on your server.
- On the other hand, if you drag files between folders on your server, then the files will be moved.
Another helpful thing that FileZilla lets you do is edit files. If you right-click a file, you get that option:
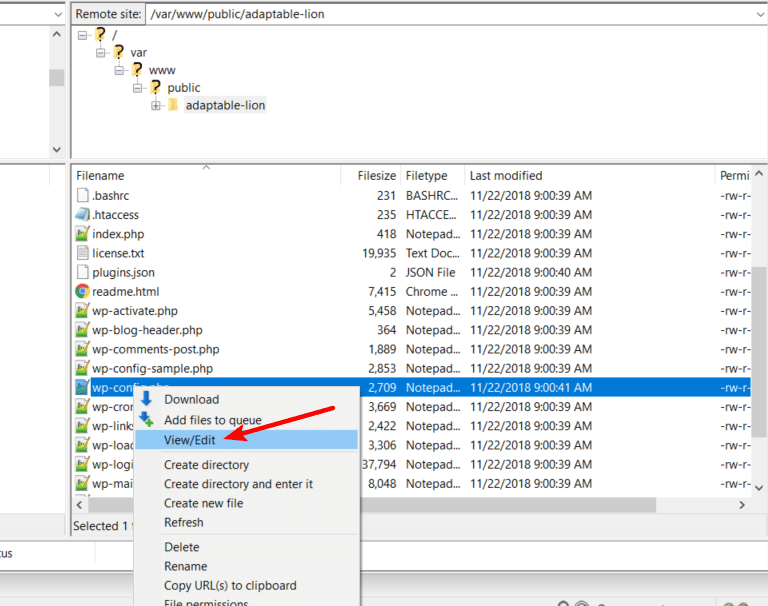
Basically, FileZilla will:
- Download that file
- Open it in a text editor on your computer
- Automatically re-upload it once you’re finished
How to Manage Your WordPress Files with FTP?
After connecting your WordPress files with FTP, you need to manage them effectively to ensure there are seamless operations.
As soon as the FileZilla gets connected with your WordPress server, the files and folders will be divided into four columns.
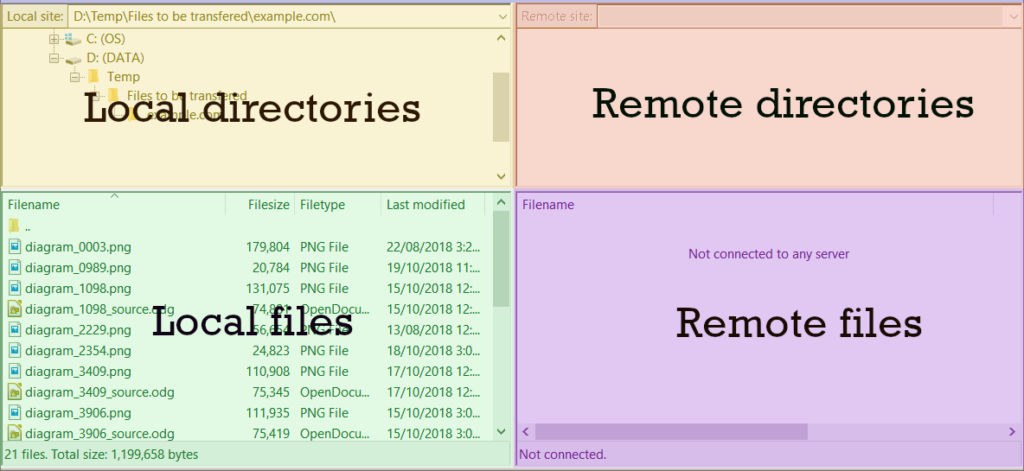
The files in the first two quadrants on the left are on the local computer. However, the files in the next two quadrants, remote directories, and files, are on the server.
In order to copy or move files across any of these locations, you just need to drag and drop them.
Now, on the remote computer, you need to look out for the /public folder which is inside the public_html or WWW.
Here, you will be able to view all the themes and plugins of your website. Now, you have the power to delete files or change any of the permissions.
WordPress FTP Access Will Make Your Life Easier!
We hope you have understood the importance of FTP for your WordPress site. It gives you much control over the site. FTP lets you troubleshoot various issues, take secure backups of files, recover whenever required, and more.
By following the simple steps we have shared in this blog, you can connect FTP with your WordPress server. Further, you can navigate through all the complexities happening on your WordPress site with ease.
Frequently Asked Questions about WordPress FTP Access
How to Setup an FTP Account for WordPress?
It’s important to know that most hosting services include FTP accounts in their hosting plans.
Still, you can create more than one FTP account from the platform’s CPanel. Here’s how to create a new FTP account for your WordPress site.
- Open the hosting service’s CPanel, and find the FTP Accounts option. It should be located in the Files folder.
- Choose the username and password for the account you’re creating. Optionally, you can use the password generator to increase the password strength.
- Adjusting the Quota settings will enable you to set the maximum file size you can transfer. Choosing the Unlimited option will allow you to move as many files as you want, regardless of their size.
- Click the Create button to complete the setup.
How to Update WordPress via FTP?
Updating WordPress manually requires thorough preparation. So, you must create a full website backup, save custom code, and deactivate firewall plugins before initiating the upgrade.
Another thing to note is that a stable Internet connection is vital for a successful upgrade.
- Go to the WordPress repository, and download the most recent version of the WordPress
- Unzip the file on your computer, and open FileZilla or any other FTP program you’re using
- Locate the folder containing the unzipped files in FileZilla’s Local Site section, and drag the files to the folder with the same name in the Remote Site Section.
- Override all folders except the wp-content folder if prompted, and click OK
- Log in to WordPress, click Update WordPress Database, and hit Continue to complete the update
How Do I Upload Files to My Website Using FTP?
Open the FTP client program you connected to your site. If you’re using FileZilla, you’ll see all files stored on your computer in the Local Site section.
Once you locate the file you want to add to your site, you can either drag and drop it to a folder in the Remote Site section or right-click on it and select the Upload option.
Videos and photos are usually stored in the wp-content folder located in the Public. HTML folder. However, you can also add themes and plugins to this folder.
Why is WordPress Asking for FTP Credentials?
You’ll be asked to provide your FTP credentials if WordPress cannot access specific files directly. The issue commonly occurs during the installation of new themes and plugins, but it’s relatively easy to fix.
However, each method requires inserting code into the wp-config.php file via the FTP client.
Choose the Edit option to gain access to the file’s code, and insert the following line at the bottom:
Define (‘FS_METHOD’,direct);
Optionally you can add FTP credentials to this file using this code:
Define (‘FTP_USER’, ‘USERNAME’)
Define (‘FTP_PASS’, ‘PASWORD’)
Define (‘FTP_HOST’, ‘YOURWEBSITEDOMAIN’)




This is pretty helpful, I was recently wondering how to efficiently work with files.. This would save me a lot of time