WPLift is supported by its audience. When you purchase through links on our site, we may earn an affiliate commission.
How To Install WordPress Locally: A Tutorial + 6 Easy Tools For Local WordPress Development
Have you ever wondered if it is possible to install WordPress locally?
While there are some pros and cons to working in a local WordPress development environment, this approach is great because:
- It’s just plain faster because you don’t have to wait on your network connection.
- You can work offline, which is great if you like to develop WordPress sites on-the-go.
- It’s private by default. While it’s certainly possible to make a live development site private, it adds extra steps to the process.
If you’re looking for a way to install WordPress locally, you probably don’t need any more convincing on the benefits of this method.
As someone whose job is to test hundreds of different WordPress themes and plugins, I’m well-aware of the various methods available to install WordPress locally. So in this post, I’m going to share them with you. I will show you step-by-step how to do it with one of the best WordPress-specific local development tools available, plus I will look at five other popular ones.
How To Install WordPress Locally in 5 Easy Steps
There are several local development tools for WordPress available, but In my opinion, one that is particularly good if you are a beginner is DesktopServer.
DesktopServer makes it super simple to install WordPress locally, allowing you to quickly spin up a new WordPress install in just a few seconds. Best of all, you don’t need to manually run a WordPress install, as is the case with many other solutions (more on those later.)

The free version of DesktopServer lets you install up to three local sites at a time with its simple installation wizard.
However, the premium version (which costs $99.95) is where you’ll find most of the productivity-boosting features. These include:
- Create unlimited local sites
- Direct deploy local WordPress sites to a live server
- Quickly create blueprints for sites with certain configurations
- Import sites from many popular backup/cloning plugins
I’ve played around with the free version of DesktopServer and found that it delivered on its promises of ease-of-use and speed. And I’ve seen a ton of WordPress developers who swear by the premium version. So my suggestion is to try the freebie first and upgrade to the premium version when you crave more features.
If you’re interested in using DesktopServer for local development, click below to download the free or premium version.
I’m now going to show you how easy it is to install WordPress locally using DesktopServer. Please note that I used a MacBook for this install, and the installation process may differ a little if using a Windows machine.
Step 1 – Download and Install DesktopServer on Your Computer
Firstly, go to the ServerPress website (or click the button above) and click ‘Free Download.’ A popup will probably appear trying to upsell the premium version, but if you don’t want that, click on ‘No thanks, I just want to download DesktopServer Limited.’
A Zip file of DesktopServer will be placed in the Downloads folder of your machine:

Once you have located the Zip file, double-click it to unpack it. Then, in the popup that appears, click ‘Install’:

A message warning you that you are installing an app from the internet may appear. If that occurs, click ‘Open’:

You may need to enter your computer’s password to permit changes to be made, so do that if prompted.
When the software license agreement popup appears, click ‘Accept’ (once you have read it, of course!):

Next, select the installation type. Assuming you have never installed DesktopServer on your computer before, there will only be one option showing, so click ‘Continue’:

A confirmation message will appear once the software has been installed successfully. Note down the folder where DesktopServer has stored everything (Applications/XAMPP in the below example). You can now click ‘Okay’ to close the popup:

DesktopServer is now installed on your machine, so you can close the installation dialog box by clicking ‘Finish’:

Step 2 – Select Plugins and Start the Apache Web and MySQL Database Services
Locate the folder where XAMPP was stored – it is most likely to be in Applications. Then, in that folder, find the DesktopServer file and double click on it to launch it:

If you get a warning message stating that DesktopServer wants access to control System Events, click ‘OK.’
You can now choose the optional developer plugins to install. You can find full details of what each plugin does here. The DS-CLI plugin is mandatory and selected by default.
Once you have chosen the plugins you need, click ‘Next’:

You will now need to enter the Username and Password that you use to log in to your computer. This is necessary to give the DesktopServer permission to start the web and database services:

Once the activation of the web and database services is complete, you will see this message:

Click ‘Next.’
Step 3 – Create Your New Development Website
Choose ‘create a new development website’ and click next:
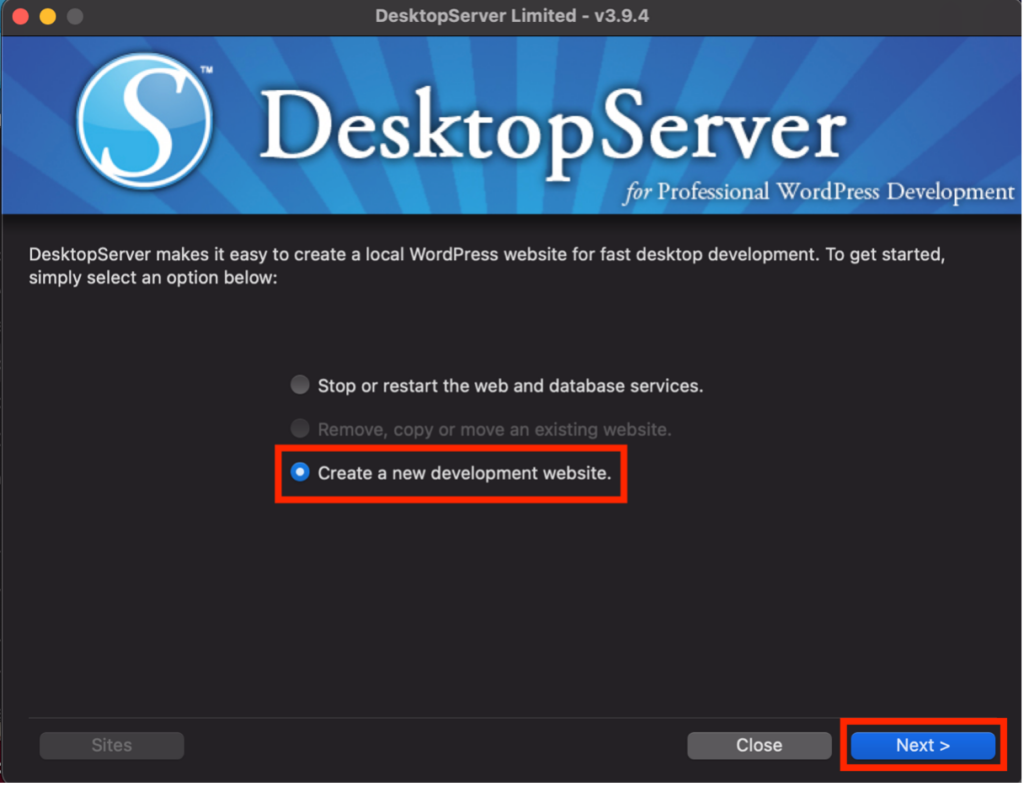
Now you need to give your development site a name. In my example, I have called it ‘simonssite’:

Please note that the .dev.cc extension is added by default.
Use the ‘Blueprint’ dropdown box to select ‘WordPress-5.3.0.zip.’ That will ensure a fresh installation using the latest version of WordPress is created.
If you wish, you can now change the location of the site’s root simply by typing a new one in the ‘Site Root’ field. However, I chose to leave it as the default suggested by DesktopServer.
Clicking ‘Create’ is when the magic happens as DesktopServer will commence with creating your new development site. Once it is complete, you will see this message:

Click on ‘Next.’ You will now see a clickable URL link of your new development site:

Step 4 – Install and Configure WordPress
Click on that URL link. Your web browser will now open and display your new site.
Before continuing, you will need to choose the language you require and hit ‘Continue’:

The WordPress welcome screen will now appear. Here, you will need to enter:
- A title for your site.
- An admin username and password. You will use these to log into the site’s WordPress dashboard.
- Your email address.

Next, click ‘Install WordPress’ to complete the installation process. After a short while, you will then see the following screen:

Your development site is now ready for use.
Step 5 – Start Developing Your Site
Click ‘Log In’ and enter your admin username and password:

That’s it – you’re in!
You can now work on your website just as you would with any other WordPress installation, the only exception being everything is stored locally on your computer rather than your web host’s servers:

Step 6 – Viewing, Creating, Copying, and Deleting Development Sites
You can relaunch the DesktopServer application at any time by double-clicking the DesktopServer app in the XAMPP folder in the Applications directory on your computer (see Step 2 above). That will re-open the application, and from that, you have three options:

Simply choose the option you need, click ‘Next,’ and follow the prompts.
To see a list of all your development sites, simply click on ‘Sites,’ and you will see a screen like this:

From there, you can click on ‘Visit Website’ to view a site or ‘Dashboard’ to go into the WordPress dashboard
If you only need to see the list of development sites (s), it is unnecessary to go via the DesktopServer application each time. Instead, simply type ‘localhost’ in the browser address bar on the machine where it is installed:

5 More Local Development Tools for WordPress
Below, I’ll go through five other popular methods that you can use to install a WordPress development environment locally on your computer.
I’m not going to provide specific instructions for each, but I have provided links to tutorials wherever available.
DevKinsta

DevKinsta is an entirely free local development suite for WordPress sites that makes local site creation and development super easy.
Armed only with some basic details and your text editor of choice, you can design, develop, and deploy WordPress sites from the comfort of your local machine.
DevKinsta is available for macOS, Windows, and Linux/Ubuntu in 10 languages. It is used by developers, designers, freelancers, and agencies to build single or multisite WordPress sites with Nginx, MariaDB, and more.
DevKinsta is powered by Docker, which has a low resource footprint and near-native performance, together with the latest version of WordPress Core. This means your local WordPress sites are isolated and secured through containerization, allowing you to create a secure and fast local WordPress development experience, no matter what host operating system you’re running.
While it’s unnecessary to be a Kinsta hosting customer to use DevKinsta, it’s fully compatible with all Kinsta plans. You can update your sites, create or clone new ones, and test plugins and themes before pushing the changes to a Kinsta staging environment with a single click.
The developers have a video tutorial explaining how to deploy local WordPress sites using DevKinsta.
Furthermore, DevKinsta also has an active community forum where you can get technical help from WordPress experts, provide feedback, and stay abreast of the latest updates.
XAMPP, WAMP, or MAMP

XAMPP is the first in a series of weird acronyms that you’ll see. Essentially, XAMPP installs a stack of the Apache webserver (A), MariaDB (M), PHP (P), and Perl (P). That, combined with the fact that it’s cross-platform (X), is where XAMPP comes from.
Once you install XAMPP on your computer, you’ve basically got a web server running on your own computer. From there, you can install WordPress using the famous 5-minute install and use it immediately.
There is a slight learning curve to XAMPP. However, once you get familiar with how it works, it’s pretty painless to spin up new WordPress installs (though there are a couple of tools on this list that help streamline the process further).
Next, let’s move on to another acronym.
WAMP is a Windows-specific stack of Apache, OpenSSL, and MySQL database (the W is for Windows).
It has a lot of similarities to XAMPP; it’s just not cross-platform, which means that you can only use it with Windows.
And finally, MAMP, as you’d expect from the “M,” is a similar approach that you can use to install WordPress locally on Mac.
Local by Flywheel

Local by Flywheel is a free productivity-boosting WordPress development tool from Flywheel hosting. However, you do NOT need to be a Flywheel hosting customer to use the plugin, although their customers do get some cool extra features specific to the platform.
Local has several advantages over XAMPP because of how much control it gives you over your development environment.
Because it uses Docker images for each site, you can make these sorts of changes on a per-site basis:
- Switch between Apache or NGINX
- Change PHP versions
It also makes it incredibly simple to spin up a new site, and you can clone sites with just a few clicks.
Finally, it has the excellent Blueprint feature. Essentially, a Blueprint is a pre-defined configuration of settings that you can apply to new sites to save time.
And if you are a Flywheel hosting customer, you get the ability to deploy your local development site to a Flywheel server with a single click, which is pretty dang convenient. If you use another host, you’ll have to move your site manually.
You don’t really need a tutorial for this one – simply download Local and start creating sites. It’s that simple. However, if you would rather see how to do it first, check out this video tutorial on the WPLearningLab YouTube channel.
Docker

This one isn’t for casual users, but Docker is a great option to install WordPress locally for more advanced users.
You already saw Docker mentioned with Local. However, if you’re not familiar, Docker is a tool that helps you create isolated ‘containers.’ People use these containers for all sorts of things, including installing WordPress.
Using Docker Compose, you can easily create a new WordPress install in an isolated container. All you need to do is follow this guide.
Docker is a freemium solution, with the ‘Personal’ plan being completely free. For more features, ‘Pro,’ ‘Team,’ and ‘Business’ plans are also available costing $7, $9, and $21 per month, respectively. Annual plans are also available and work out a little cheaper.
Ubuntu Linux

This isn’t a method that I’ve personally used, but if you’re running on Ubuntu, you can install WordPress locally by creating your own LAMP stack on Ubuntu. You can find a detailed tutorial on the Ubuntu website.
Which Method Should You Use To Install WordPress Locally?
The two most streamlined local development solutions for WordPress users are DesktopServer or Local by Flywheel. While the other methods are all generic tools to help you run a web server on your localhost, these two are built specifically for local WordPress development.
If neither of those appeals to you, the next best tool would be XAMPP, although it’s just not quite as slick at creating new sites.
All of the other solutions I have listed attract plenty of praise from developers, so they are all worthy of consideration.
Do you have a question? Or do you know any good tips to install WordPress locally? Please let me know in the comments!




How funny…. I am in the midst of working on 3 different sites with about 20 tabs open. I’m sure you know the story. Anyway, I stopped to take the dogs out and pulled up Google Now to read the news and this was the top article.
Appreciate it! I’m going to try one now!
I’ve been a DesktopServer user for a long time. But the updates were so sparse that I stopped renewing my premium subscription. A new major version with PHP7 compatibility was announced way ahead of being available. I then tried Local by Flywheel and just started to use it in new projects. I’ll probably won’t be going back.
Can’t believe you didn’t add Laragon to this list, I have tried all other solutions and found this to be the best