WPLift is supported by its audience. When you purchase through links on our site, we may earn an affiliate commission.
How To Host Google Fonts Locally On WordPress (Or Other Fonts, Too!)
In the modern era, every successful business presents its style and personality on its website. Also, these businesses invest time in providing the best-in-class experience to the users on the web.
Out of which, text presentation is one thing they consider to ensure that the content is not only valuable but also readable. For the same, they focus on integrating the right set of Google Fonts.
Google Fonts are awesome because they unlock many potential font choices for your WordPress site. However, it can also result in many external requests to Google’s servers, so you should prefer hosting WordPress fonts locally.
If you are also looking for a way to host Google Fonts locally on your WordPress site, you have reached the right place.
Here, we will look at how to add Google fonts to the WordPress site. However, it works for any website.
- Why Bother Hosting Fonts Locally, Anyway?
- How To Host Google Fonts Locally On WordPress: The Manual Method
- How To Host Google Fonts Locally With A Plugin
Let’s discuss these things in detail.
Why Bother Hosting Fonts Locally, Anyway?
By hosting fonts locally, you will get a range of benefits:
- When you host Google fonts locally, you open up the whole world of fonts on the web and don’t worry about legal rights.
- You can experience a performance boost from hosting fonts locally because you’re able to cut out external requests to whatever server is hosting your fonts.
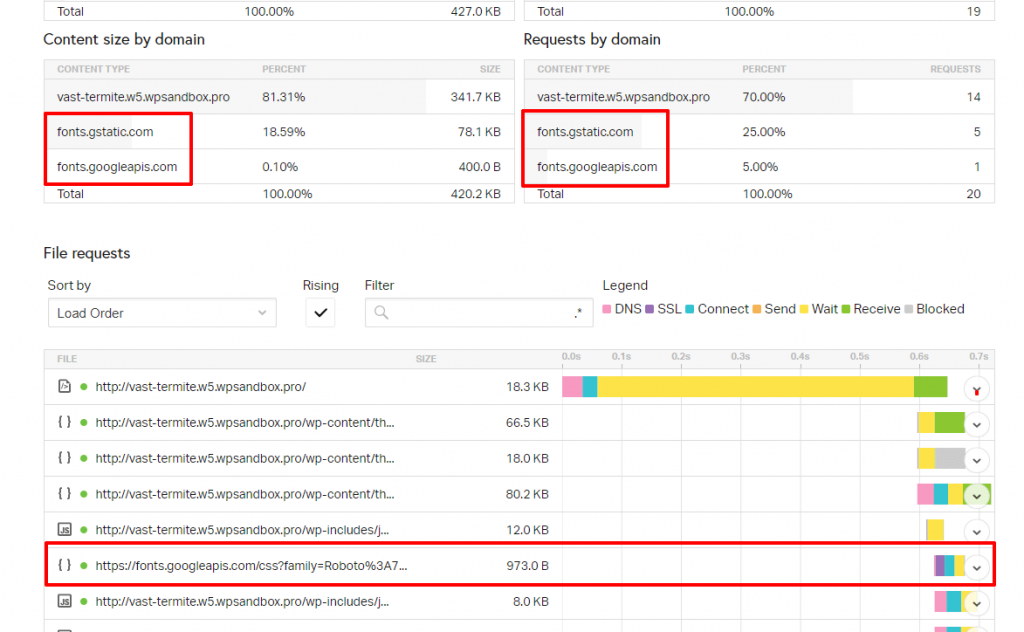
- Regarding Google Fonts, Google’s servers are already pretty fast, and Google Fonts has its own CDN to ensure fast global load times. Additionally, it’s possible that someone’s browser already has the font cached, especially if you’re using a popular font like Lato or Roboto. For example, you can see that external request to Google’s servers for a font in the Pingdom Tools waterfall on my test site
- GDPR compliance is another major reason to host Google Fonts locally.
- Creating the website’s cookie policy will enable you to continue using fonts offered by different providers without having to host them locally.
How To Host Google Fonts Locally On WordPress: The Manual Method
Now, let’s get straight to the point; here, we will explain How to add Google fonts on a WordPress site.
Remember – while we will be using Google Fonts as an example, this manual method will work with any other font, as well.
Step 1: Choose the Right Font for Your Site
First and foremost, you need to visit the Google Fonts official site. On the homepage, you can view a list of all the trending fonts.

Article Continues Below
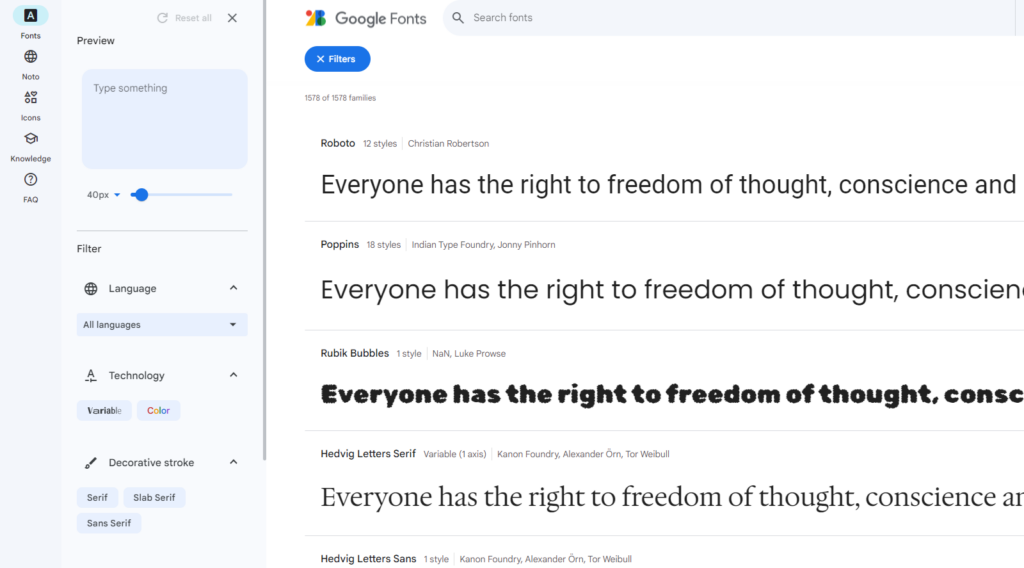
Here, you can apply filters from the left-hand side to find a particular set of fonts. Besides this, you can also directly search for any font you want to utilize on your site.
Step 2: Add Fonts to Your Selection
As soon as you choose any font, you can view the different styles the font offers.
Here, you get an option to customize the size of the fonts. You can adjust the size and then add it to your selection.
Step 3: Download The Font File
After choosing the right font, you’ll need to download the font file you want to use. Here, all of your fonts will appear in the selected family. Now, you get an option to download the font.
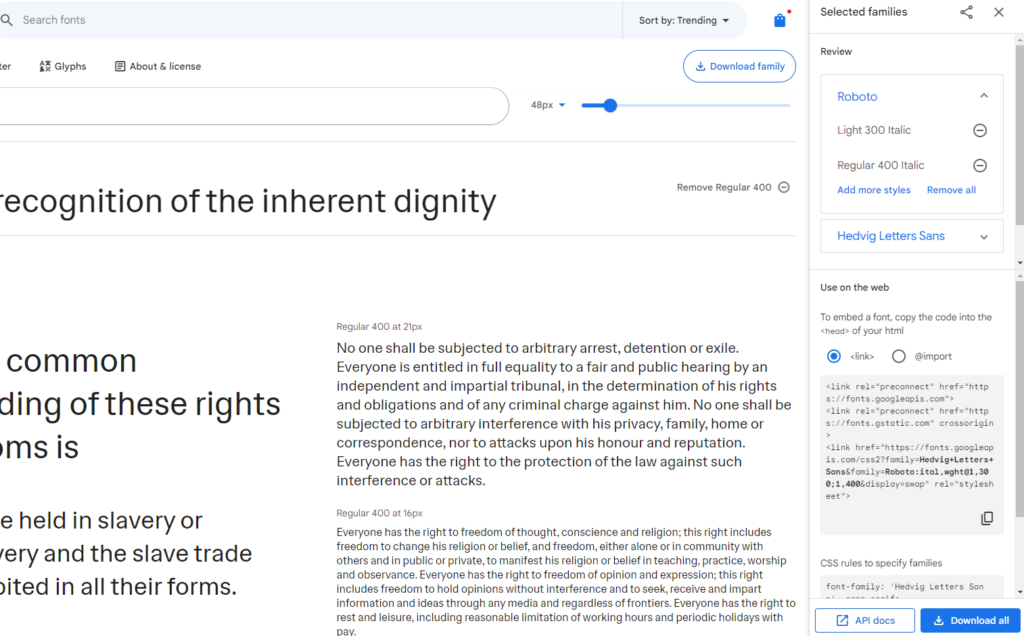
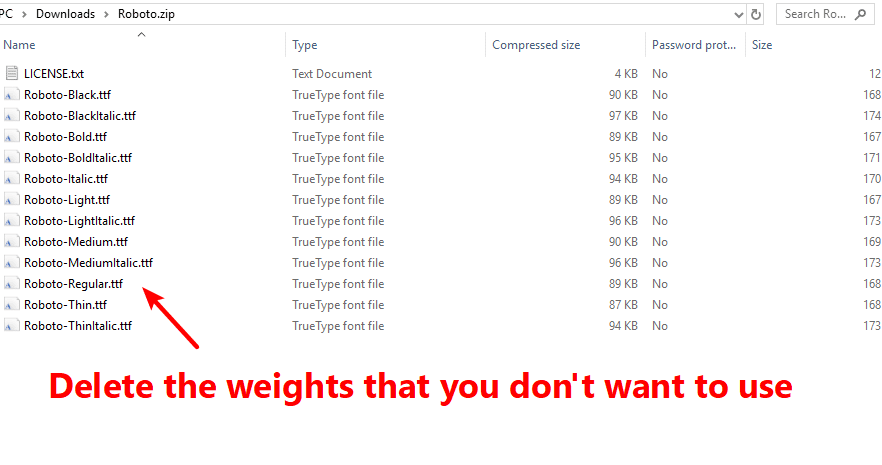
When you click the download button, Google Fonts will give you a ZIP file of all the font’s various weights.
However, I recommend only picking the minimum number of font weights needed – don’t use every single weight. A good stack is one each of:
- Regular
- Italic
- Bold
So, extract the file and delete all the fonts that you don’t want to use:
Step 4: Convert To WOFF Format (If Needed)
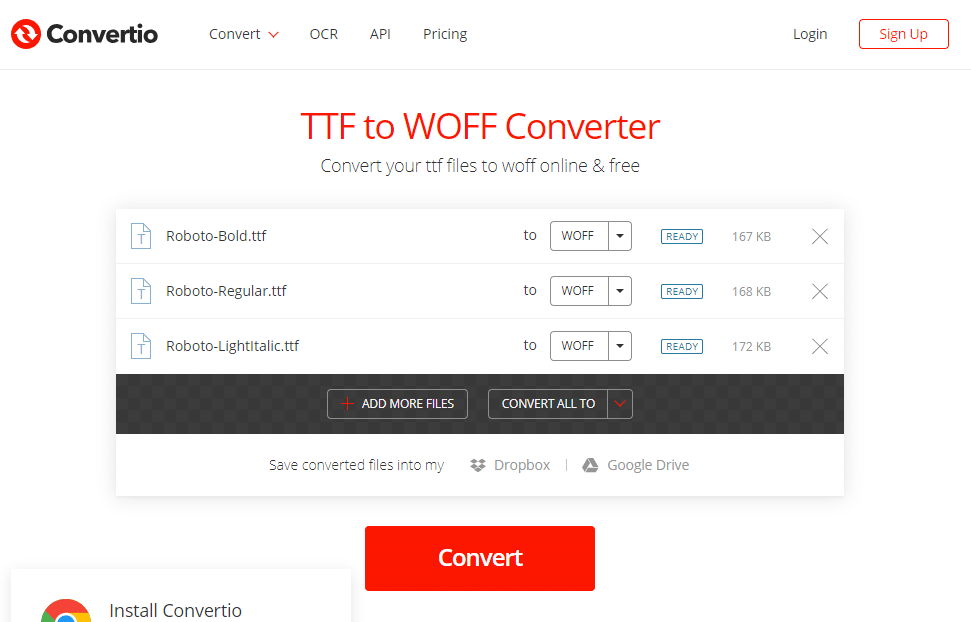
When you download a font from Google Fonts, it gives you the font in TTF format. To ensure cross-browser compatibility, most sources we have read seem to recommend using the WOFF or WOFF 2.0 formats.
So, if your chosen font isn’t already in that format, you can use the free Convertio tool to convert it to WOFF:
Step 5: Upload Font Files To Server
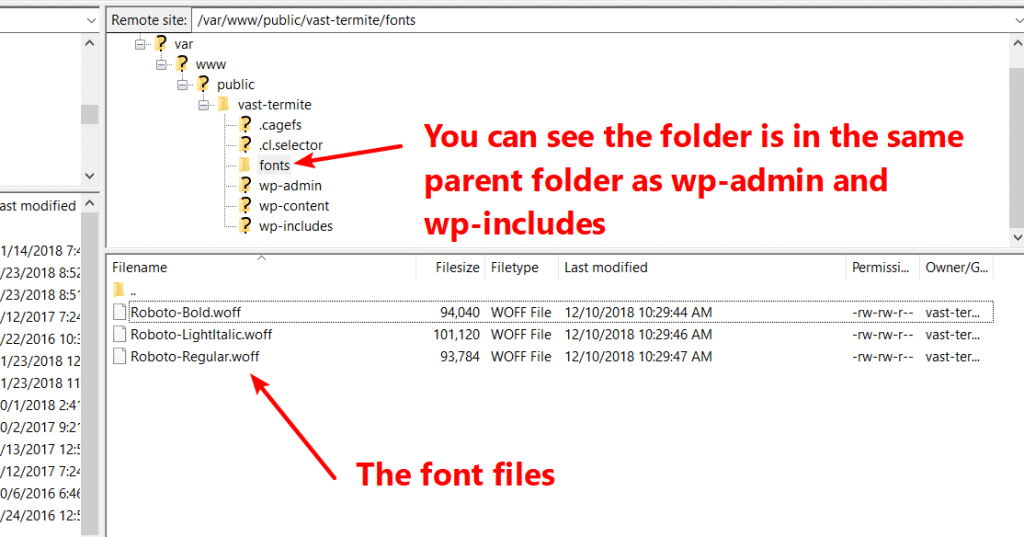
Next, take those font files and upload them to your server using FTP or cPanel File Manager. Check out our guide on how to use FTP on WordPress if you’re not sure how to connect to your server via FTP.
To provide you with an example, we have created the fonts folder in the root folder of our site. You can see what it looks like in the screenshot below:
Step 6: Add CSS For Font Face
Once you’ve uploaded the font files to your server, you need to include those fonts in your site’s CSS by using @font-face.
To do this, you can use the Additional CSS tab of the WordPress Customizer or a plugin like Tom Usborne’s Simple CSS, which we have done for these screenshots. For more, check out our post on how to safely add custom CSS to WordPress.
Once you’ve chosen your method to add custom CSS, here’s the exact CSS that you’ll need:
@font-face {

font-family: 'roboto-regular';

src: url('https://vast-termite.w5.wpsandbox.pro/fonts/Robot-Regular.woff') format('woff');

font-weight: normal;

font-style: normal;

}
For this code snippet:
- Make the font family the name of the actual font family
- Replace the URL with the actual URL to the relevant font file on your server
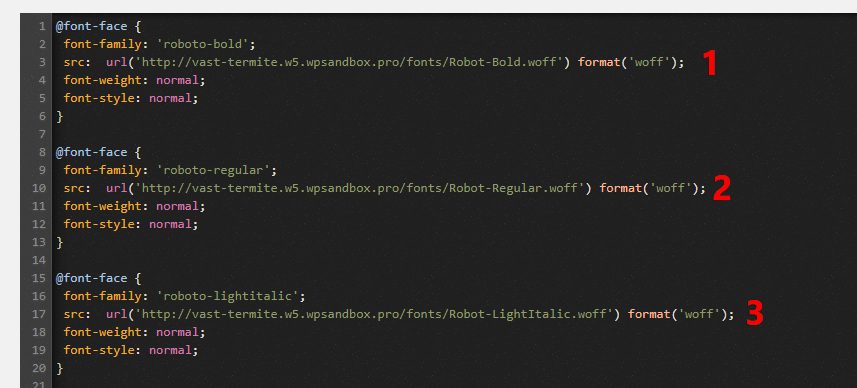
You’ll also want to repeat the code snippet for each separate font file you use. Here’s what it looks like for the three font files on our site:
Step 7: Add CSS For Where To Use Font
Now, all that’s left to do is actually start using your fonts in your CSS!
For example, if we wanted to make all my body text use the Roboto Regular font that we are now self-hosting, we would use this CSS:
body {font-family: 'roboto-regular', Arial, sans-serif;}
You can add this CSS in the same location that you added the CSS code from Step 4.
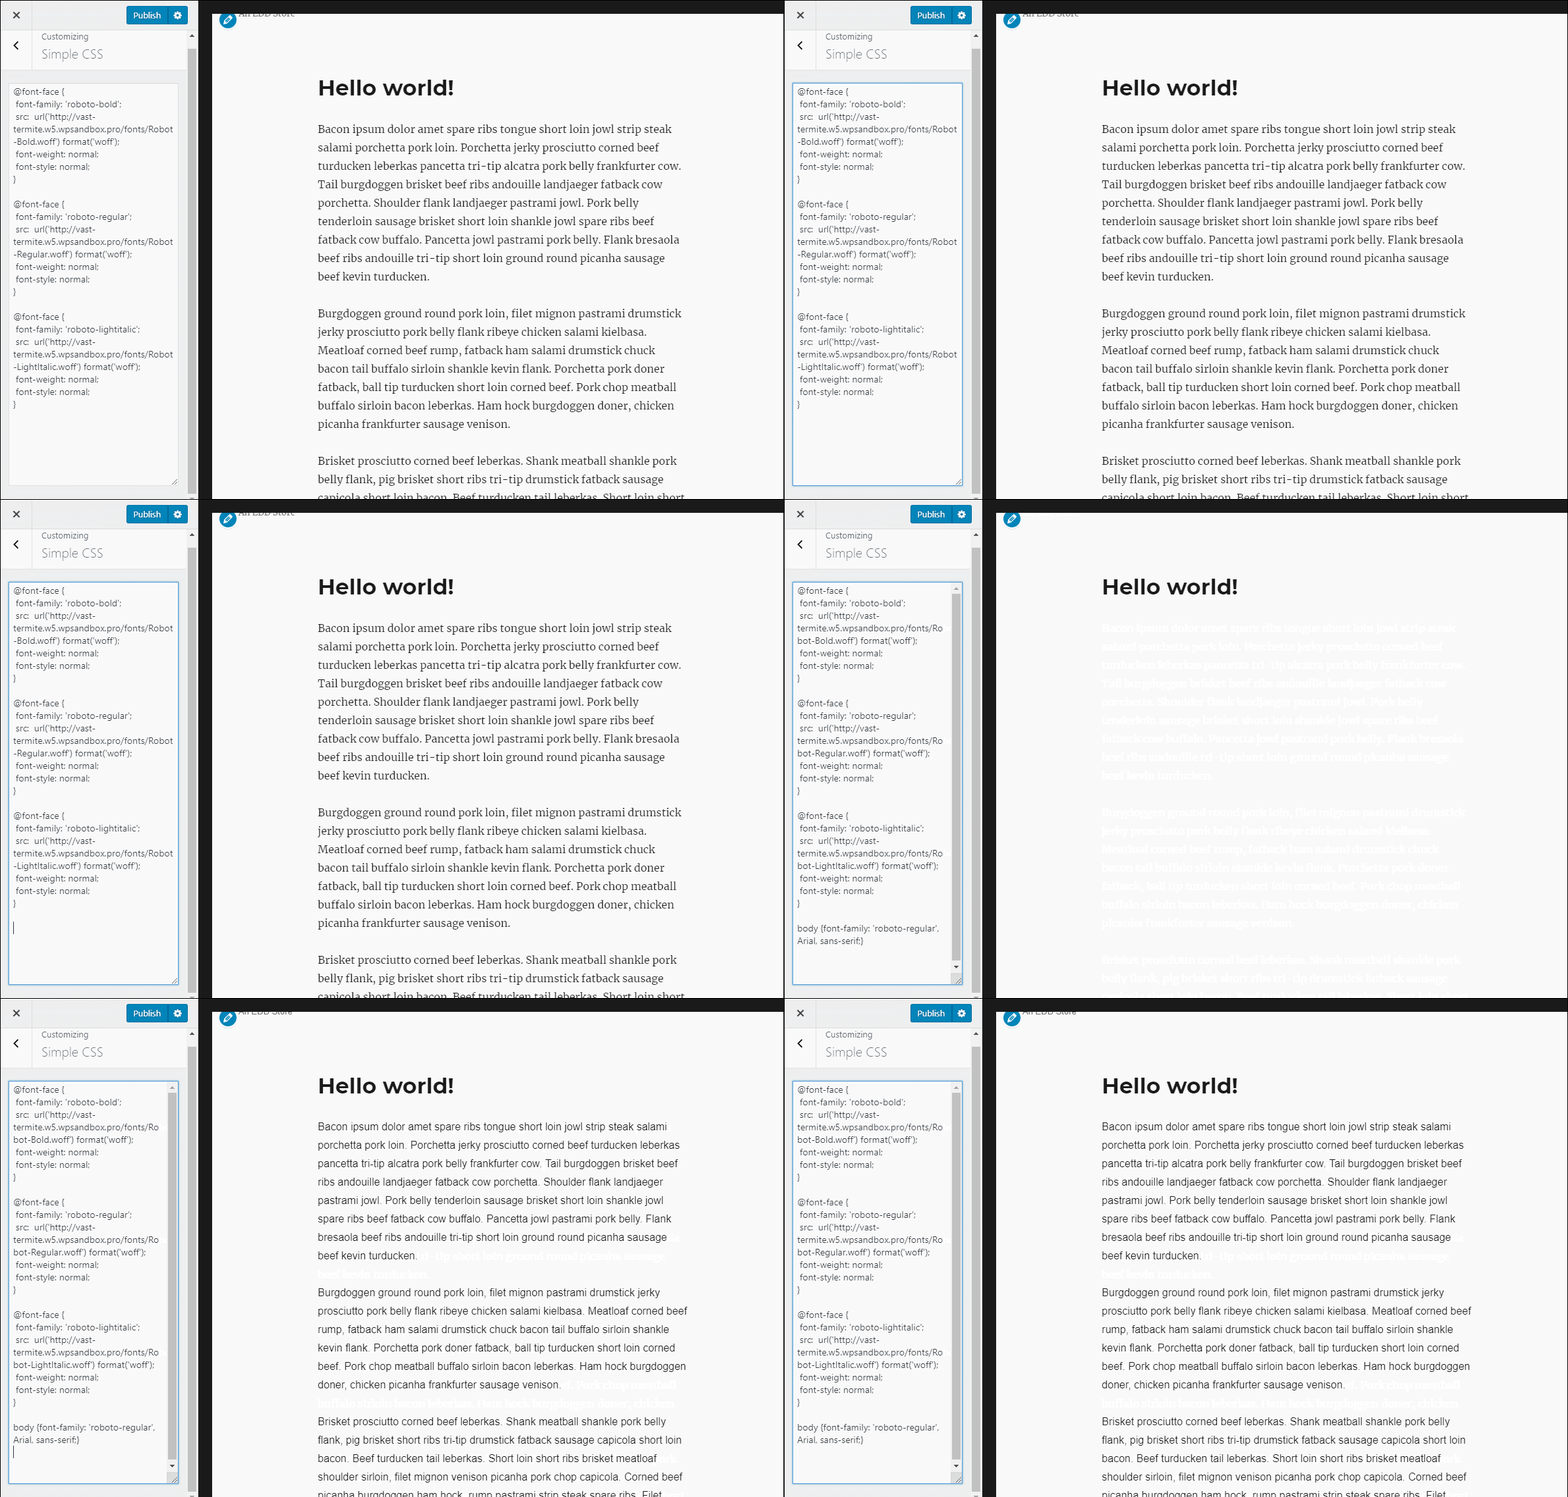
Here, we will show you the difference using a GIF of the WordPress Customizer. Watch the body text as we add the new CSS:
Step 8: Stop Theme From Loading Google Fonts
If your site is still loading fonts from the Google Fonts server, it might be because your theme thinks it still needs to use the fonts hosted on Google Fonts’ servers.
To stop that, you can try setting your theme to use a system font stack (if available). For example, GeneratePress lets me make that choice in the WordPress Customizer:
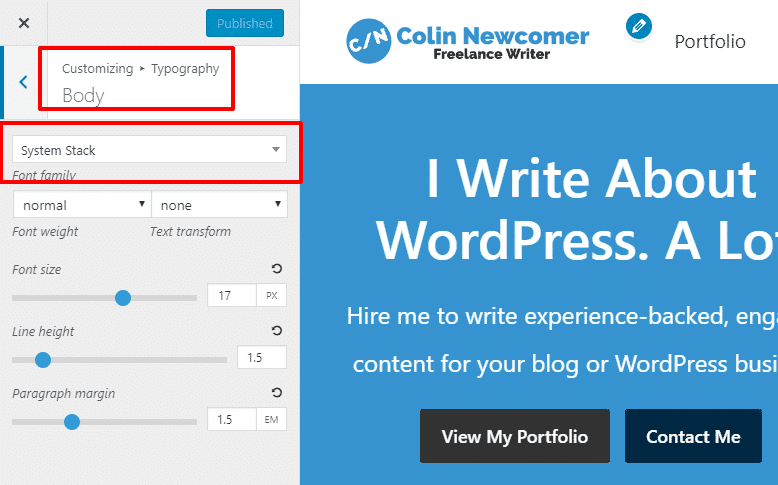
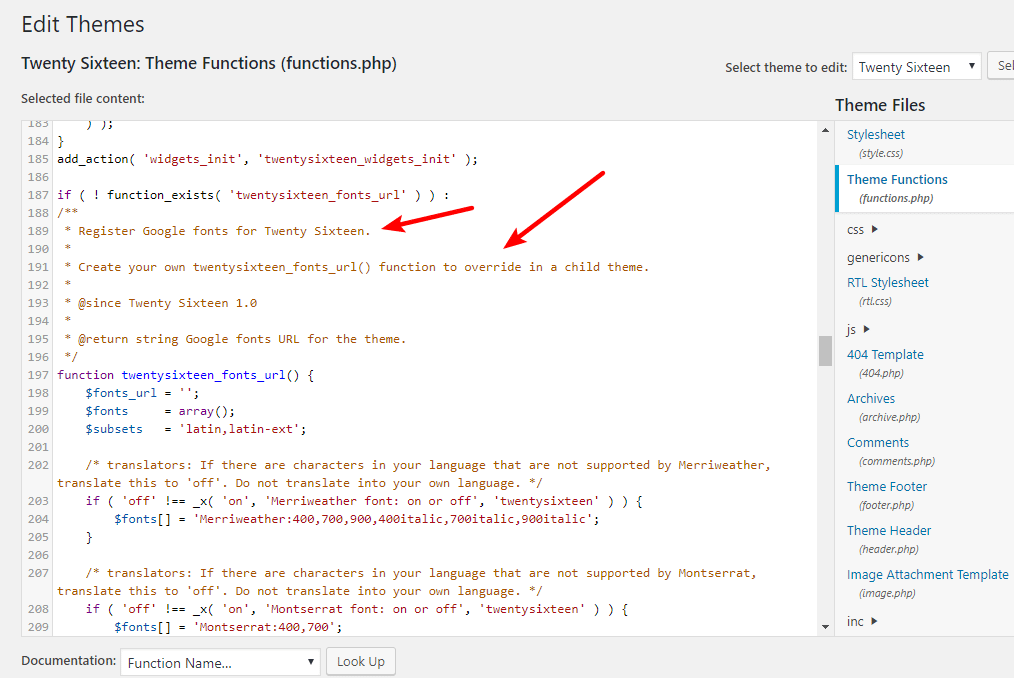
Or, you can also usually remove the relevant portions from your theme’s functions.php file. Or, as the comment indicates, you can use a child theme to override it:
Follow the steps below if you want to stop loading Google Fonts in the Divi theme:
- Go to the WordPress dashboard and open the Divi tab
- Find the Theme Options menu and turn off Use Google Fonts and Google Fonts subsets options.
Stopping Elementor from loading Google Fonts is equally easy as you just have to navigate to the plugin’s Settings menu, open the General tab, and click on the Disable Default Fonts option.
You’ll have to use a code snippet if Elementor continues loading Google Fonts after you activate this option.
You can also try the Disable Google Fonts plugin, though there’s no guarantee that it works for every single theme.
How To Host Google Fonts Locally With A Plugin
If you’re overwhelmed by the manual method, you can add Google fonts to WordPress locally using a WordPress plugin called OMFG from Daan van den Bergh.
Its free version displays Google Fonts in the Optimize Local Fonts section and allows you to lower the Cumulative Layout shift by preloading and unloading fonts you’re not using.
The plugin removes subsets automatically, and continues to display text during the webfront load as it forces the font-display attribute to all Google Fonts on your website. OMFG’s free version supports all Google Fonts.
Upgrading to OMFG Pro will give you access to the following features:
- Easy Access Google Fonts
- Material Icons
- WebFont Loader
- @import Statements
- @font-face statements
Hence, the plugin can help reduce bloats caused by fonts and improve the website’s performance by allowing you to switch from Google Fonts to system fonts.
The plugin is pretty easy to use. All you do is search for the font by name and click Generate Stylesheet:
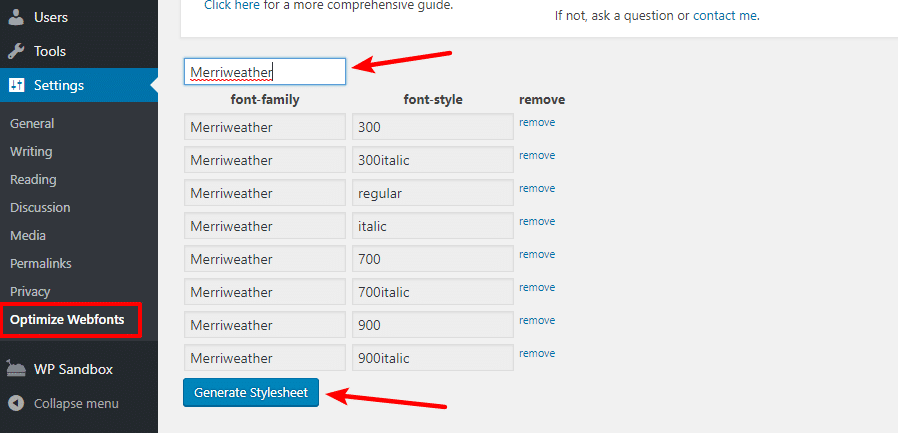
You can also choose exactly which weights to include.
Once the plugin generates the stylesheet, it will add it to your theme’s header.
The Personal OMFG Pro license enables you to use the plugin on one site is €19 per year. If you want to install the plugin on ten websites, you can buy the Business license for €39 per year or opt for the Agency license that gives you permission to use OMFG Pro on a hundred websites.
The license to install the plugin on a thousand websites costs €299.
We suggest trying the Local Google Fonts plugin if you don’t want to spend money on OMFG Pro. You can install it from the Plugins menu in your website’s admin panel.
The plugin will detect all externally hosted Google Fonts on your website automatically. You’ll see the Host Locally button under each font its handle, and the source URL.
The plugin will download the font and store it on your site’s server after you click the Host Locally button and display the ‘Loaded, served from your server‘ message in the Status section. While both of these plugins are super easy to use, they will only work for Google Fonts, whereas the manual method will work for any font.
Final Words
Hosting fonts locally is a great way to open your site to new fonts and possibly speed up your site.
If you’re specifically looking to host Google Fonts locally, some plugins can help you do it, or you can always go the manual route, which will work for any web font.
Finally, as with any significant change to your WordPress site, we would always recommend testing to see whether hosting fonts locally does indeed speed your site up. If you find that you’re not getting the performance benefits that you expected, you might want to look into using a CDN to serve up your font files.
Frequently Asked Questions About Hosting Google Fonts Locally
How Do I Add Google Fonts to WordPress?
You can either embed or enqueue a Google Font if you want to add it to a WordPress site manually. Both options involve altering the site’s CSS, functions.php, or stylesheet files and they’re far too complex for a novice WordPress designer.
Installing WP Google Fonts or Easy Google Fonts plugins and using them to change your website’s typography is an easier option. Both plugins have live previews, allowing you to see how a font looks on your site.
It’s important to note that these plugins don’t store Google Fonts locally, so you must make sure your website is GPDR compliant if you want to use them.
Can You Host Google Fonts Locally?
The benefits of hosting Google Fonts on a local server were miniscule prior to the first court ruling that deemed the use of these fonts stored on Google’s servers a violation of data privacy regulations.
Besides improving the site’s performance, storing Google Fonts on your website’s server will protect you from potential legal complications.
The manual method of storing Google Fonts on a local server can be too complex if you don’t know how to add custom CSS to WordPress. However, you can use different plugins that automatically detect Google Fonts on your website and allow you to load them from the site’s server.
How Do I Host a Google Font on My Own Server?
Hosting a font locally means moving it from Google’s servers to a local server. You can do this manually or with a plugin, but each process involves downloading a font and its weights, uploading it to a server, and applying it to a page element or content.
Using a plugin is easier because you won’t have to add custom CSS to your theme’s CSS.
Moreover, you don’t have to waste time searching for all Google Fonts your site uses as a plugin will list them automatically and allow you to move them to a local server without leaving the WordPress dashboard.


Hello Colin,
We recommend using Transfonter: https://transfonter.org . It generates also the font-face for all the selected files, weights.