WPLift is supported by its audience. When you purchase through links on our site, we may earn an affiliate commission.
5 Best WordPress Two Factor Authentication (2FA) Plugins To Maximize Your Site Protection
To prevent unwelcome intruders from breaking in, you can take a few preventative security measures to harden your WordPress installation, just as you wouldn’t leave your apartment door unlocked. Installing a WordPress two-factor authentication plugin, also known as two-step verification and abbreviated as 2FA, is one of these measures.
An issue that is a ticking time bomb is that many of us reuse passwords across multiple accounts. Therefore, even single-step authentication (i.e., logging in with a password) can be very dangerous. The security of your WordPress site begins the moment you log in to administer it. Make sure the domain name you’re using is correct. Hackers frequently send you an email with a link to use to sign in to a service. And, while it may appear that the service is your own WordPress site, it is actually their malicious website.
Passwords are a reliable way to keep your site safe until a server breach or hack allows them to be exposed. Even if you create strong passwords and change them regularly, they must be stored wherever you log in, making them relatively easy to crack. You can prevent this from happening when you implement two-factor authentication. Even if someone steals your password, they will need to enter a security code from your phone to gain access after this is implemented. This is why two-factor authentication is required for WordPress.
Here, we list the five best WordPress two-factor authentication plugins to help you secure your site.
Shield WordPress Security

The Shield is a plugin that is installed separately from your WordPress installation. It obviously integrates with and protects your WordPress installation, but it does so without changing core files or even .htaccess. If something goes wrong, you’ll have more options, such as locking yourself out of your site. There are built-in recovery options, but if those fail, you can safely delete the plugin via FTP without affecting the integrity of your website.
To keep your WordPress site safe from hackers, it needs to be smarter, more adaptable, and less complicated. Shield’s goal is to free you from tedious and time-consuming security work, allowing you to refocus and devote yourself to the work you enjoy.
How to set it up:
- Sign in to your WordPress administration menu
- From the sidebar, Browse to Plugins -> Add Plugin
- Search: Shield

- Click Install
- Click to Activate
- A Shield Security entry can be found at the bottom of the administration sidebar. To configure the plugin, click it.

- The Shield Dashboard has a number of tabs that can be used to customize your site’s security settings. You can enable or disable the plugin in the Global Options sub-tab, while you can configure notification settings and other site-wide options in the General Options sub-tab.

- Use the Google sub-tab to configure your reCAPTCHA site keys.
- You can set a key to prevent unauthorized access to the Shield Security plugin on the Security Admin tab. It’s a good idea to enable this option, but keep your access key safe. You can further restrict Administrator access to WordPress settings once it’s enabled.

- Shield Security has a Firewall that guards your website against malicious requests. It is enabled by default, and you can configure the firewall rules for your installation using the Firewall Blocking, Firewall Response, and Whitelist subtabs.

- Login Protection comes with several options for hiding your WordPress administration dashboard and securing access. Brute Force Login Protection adds Google reCAPTCHA support to your WordPress login pages, preventing bot access.
- You can also automatically rename the URL of your WordPress login pages to hide them.

- The User Management tab lets you view and manage user sessions, timeouts and be notified when a user logs in to the site, while the Comments SPAM tab has a slew of options for preventing spam from humans and bots.

- Shield Security supports automatic WordPress updates and plugin and theme updates when available, and Hack Protection performs daily scans of your WordPress files, identifying and repairing potentially malicious rogue code.

- Other advanced options include HTTP header configuration, a comprehensive set of security lockdown settings, IP white and blacklisting, and an audit trail, which allows you to track user access and spot security issues.
Price
- There is a free version.
- The pro version starts from $12 per year for 1 site.
Pros
- Users can experiment with multi-factor authentication using two methods of two-factor authentication, namely Email and Yubikey.
- IP Address and Cookie-based authentication are the two methods of email verification available, and they can be configured according to the type of WordPress login.
- The Import & Export option allows you to copy the settings from any Shield Security-enabled website to a new one.
Cons
- You must configure Shield Security correctly to use it; you can’t just install it. And it takes a long time because of this.
- Shield Security doesn’t offer malware removal, which is one of the most important features of a security plugin. If your website is hacked, you’ll need to find another security plugin to clean it up.
Miniorange – Google Authenticator Two-Factor (2FA)

The most advanced WordPress two-factor authentication plugin is Google Authenticator – Two Factor Authentication (2FA). It takes proactive measures to protect users from potential threats and offers multiple backup options in the event of a major attack.
Administrators and users can use this plugin to enable two-factor authentication, configure their own connection options, and connect to their WordPress site using username + password + two-factor authentication or username + two-factor authentication.

Article Continues Below
How to set it up:
- Navigate to the User Stores tab in the miniOrange Admin Console https://auth.miniorange.com/moas.
- Click on Add User Store.
- Select AWS Cognito as Identity Source type.
- Fill in the following information from your Cognito Pool:

- IdP Name: Identifier for the Identity Source.
- AWS Cognito Region.
- Identity Pool ID.
- User Pool ID.
- Client ID.
- Then click Save.
- Configure SAML SP Plugin on the WordPress website.
- Install the SAML SP Plugin in WordPress and use miniOrange credentials to retrieve accounts.
- In the miniOrange Admin Console, go to Integrations > Custom App Integration and write down your Customer Key.
- In the plugin configuration, go to the Service Provider tab.
- Enter the following details:
- Identity Provider Name: Identifier for the IDP.
- IdP Entity ID or Issuer: https://auth.miniorange.com/moas.
- SAML Login URL: https://auth.miniorange.com/moas/broker/login/saml_login/<customer_key> .
- X.509 Certificate: Open the downloaded certificate ( from the Identity Provider tab) in a text editor and paste the contents.
- Then click Save.
- In WordPress, go to Appearance > Widgets. In the sidebar, place the Widget for Login via Widget.
- In the miniOrange Admin Console, add the WordPress app.
- Navigate to Apps > Manage Apps in miniOrange Admin Console.
- Click on Configure Apps.
- Look for WordPress on the internet (SAML). Click Add App after selecting the WordPress App.


- Click Save.
Price
- The free plugin offers 2FA for only one user, but you can upgrade starting at $15 per year.
Pros
- MiniOrange comes with a built-in PIN-Protection feature and encrypts all of the data it stores.
- It also supports device identification, which eliminates the need for the user to log in with two-factor authentication on the same device multiple times.
Cons
- There is a requirement to register on the miniOrange website. The free version is limited to one user and has no support.
- Device identification could result in a security breach if a user loses their device.
Duo Two-Factor Authentication

The goal is to create a simple two-factor authentication login on your website that is simple to use and robust enough to fend off attackers.
Duo Two-Factor Authentication allows you to have complete control over who can use 2FA. It supports various user authentication methods, including one-touch ID, the application’s single password, a unique password (OTP) sent via SMS, a phone call, or a hardware key.
How to set it up:
- Install and activate Duo Two-Factor Authentication on your WordPress.
- After activation, click Settings to configure the plugin.
- From the Duo WordPress application you created earlier, copy and paste your integration key, secret key, and API hostname. You can choose which WordPress user roles require Duo authentication. You could, for example, only require two-factor authentication for users with the “Administrator” role, or you could require it for all roles.

- Then click “Save Changes.”
Price
- The free plugin enables 2FA for up to ten users on your website, but you can increase that limit starting at $3 per user per month.
Pros
- Users can log in using Push Notifications, Security Tokens, SMS Passcodes, Phone Callbacks, TOTP, or a U2F Device because there are multiple ways to generate or receive an authentication passcode.
- It’s simple to set up and use. Because it offers multiple authentication options, Duo does not require the user to have a smartphone.
Cons
- If you use the plugin for more than ten users on your websites, you’ll need to pay.
- It’s a little difficult for users who only want to use Duo Push and don’t want to go through the process of setting up Duo Security for a business.
Wordfence Security

Wordfence includes an endpoint firewall and malware scanner that was built from the ground up to protect WordPress. A Threat Defense Feed arms Wordfence with the newest firewall rules, malware signatures, and malicious IP addresses it needs to keep your website safe. Rounded out by 2FA and a suite of additional features, Wordfence is the most comprehensive WordPress security solution available.
How to set it up:
- The first thing you need to do is install and activate the Wordfence Security plugin.
- When you activate the plugin, a new menu item will be added to your WordPress admin bar called Wordfence. It will take you to the plugin’s settings dashboard if you click on it.
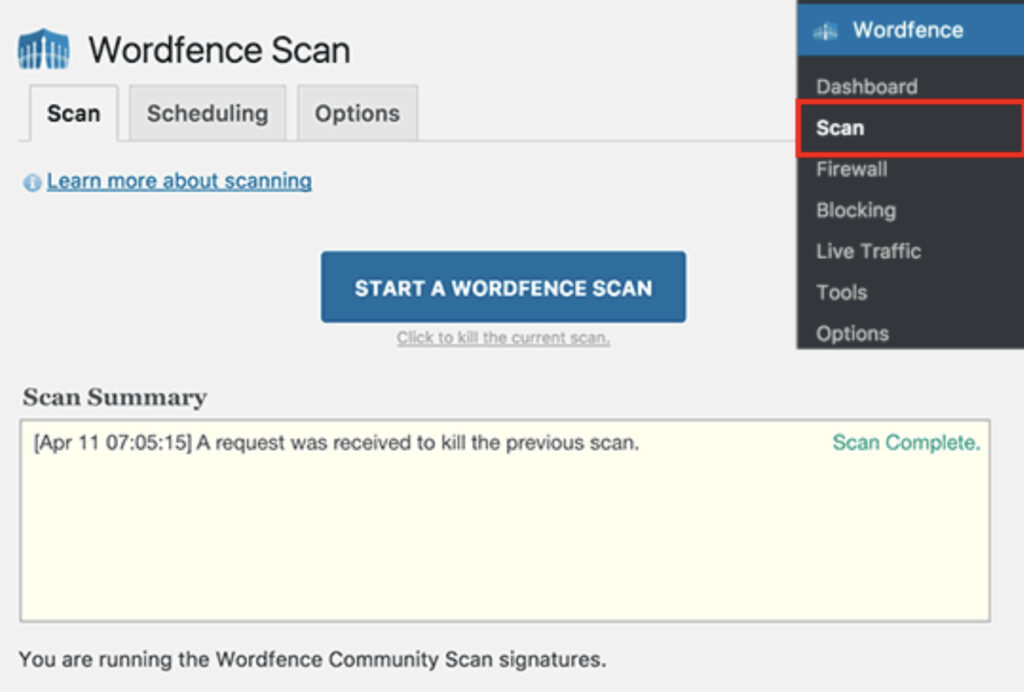
Using Wordfence to scan your WordPress site:
- Go to the Wordfence » Scan page and press the ‘Start a Wordfence Scan’ button.
- Setting up Wordfence Firewall
- Visit Wordfence » Firewall page and click on the Optimize Firewall button.
- Click on the continue button.
- Wordfence will then prompt you to save a backup of your current .htaccess file. Click the ‘Download .htaccess’ button, then the ‘Continue’ button after the backup file has been downloaded.
- You will be redirected to the firewall page, where your protection level will now be set to ‘Extended protection.’
- Then click Save.
Price
- There is a free version.
- The pro version starts from $99 per year for one site.
Pros
- Wordfence two-factor authentication is safe, secure, and simple to use. It aids in the login process and protects against brute force attacks, and verifies the strength of all user and admin passwords.
- It has Live Traffic, a powerful tool that allows users to see your website’s traffic and activities in real-time.
- You can view hacked files with Wordfence and see what changes the hacker made to your original file before the plugin repairs it.
Cons
- The scanning process of Wordfence causes the website to load slowly. It overburdens the site server during scanning, causing the website to load slowly.
- Because the plugin does not guarantee a response time, you may have to wait a long time, during which time your site may be blacklisted or suspended.
- A user must purchase a premium Wordfence key in order to gain access to all of the features, including two-factor authentication.
Article Continues Below

iThemes Security Pro

iThemes Security is a malware scanner that comes in two flavors: free and premium. This plugin checks for and automatically fixes website security issues, blocking bots, spam, and users who have attacked other websites.
There’s also a strong password generator, scheduled malware scans, and a dashboard widget for managing all functions in the premium version.
How to set it up:
- First, install and activate iThemes’ Security in your WordPress.
- In the sidebar, select Security Entry to launch an initial Security Check on your website. It will automatically enable various modules to protect your site.
- You’ll be asked to join the Network Brute Force Protection network, which protects you from newly discovered exploits and notifies iThemes of new attacks on your site. Select Activate Network Brute Force Protection to enable the setting.
- Find the major features of the plugin listed on the page, select “Learn More,” then click the “Enable” button to activate the feature. The Configure Settings button appears, allowing you to personalize the feature.
- Then click Save Settings.
Price
- There is a free version.
- The iThemes Security Pro version starts from $80 per year for one site.
Pros
- Enforce Strong Passwords: iThemes allows you to make strong passwords mandatory.
- Away Mode: The security plugin’s Away Mode allows you to lock down the dashboard.
- Network Brute Force Protection: iThemes uses Network Brute Force Protection to protect the WordPress login page. It takes measures to prevent users from attempting to break into your website.
Cons
- iThemes does not have its own scanner or cleaner. It detects malicious code using Sucuri’s SiteCheck Malware Scanner, and if your site is hacked, you’ll need to contact Sucuri for malware removal.
- Advanced features consume a significant amount of your website’s resources. If your website is hosted on shared hosting, resource-draining could render it inaccessible. However, if your site is hosted on a managed WordPress hosting, you may need to upgrade.
What’s your favorite two-factor authentication plugin?
Now that we’ve gone over the best WordPress security plugins look at our main recommendations below. This allows you to choose one or two plugins without having to test each one individually. Security plugins may not be necessary, depending on what your WordPress host already provides.
These recommendations focus on specific situations where one security plugin may be preferable to another.
- iThemes Security and Shield Security are the most cost-effective options.
- If you’re looking for a free WordPress security plugin, look no further than Wordfence Security.
- Google Authenticator – Two Factor Authentication is a good plugin that focuses on two-factor authentication.
Wrapping Up!
Since vulnerable plugins are the most common way a WordPress site is hacked, understanding plugin vulnerabilities is an important part of WordPress security.
Plugins are one of the things that can lead to serious security vulnerabilities in a WordPress website, despite being a compelling and useful resource. They have a lot more PHP code than themes, and it’s a lot more complicated.
As a result, there are more chances for vulnerabilities to creep into code. It’s important to keep in mind that WordPress isn’t inherently insecure. Simply put, it’s a very popular platform with a large number of plugins. WordPress has over 40,000 plugins (with over one billion downloads), making it a tempting target for cybercriminals.
Understandably, keeping track of your logins and passwords for each website can be difficult. Even if you use a password manager to store your passwords, you can’t secure them completely. When you log in on unsecured connections, such as public Wi-Fi networks, your password can be stolen.
Article Continues Below

Each year, the number of data breaches increases. To keep information secure, every WordPress user must use two-factor authentication.
Let us know how you get on! :)


Hi there. There is also “Trusona” as a further alternative. It works really well!
https://www.trusona.com/wordpress-plugin/
Cheers,
Craig
We just replaced Clef with Trusona on all of our client websites. It’s a fantastic alternative to Clef. I’d go so far to say that it has the easiest install and setup process of all the available two-factor authentication tools.
It’s certainly worth trying, if you haven’t already. You’ll love it and so will your clients.
Have an amazing day!
Orlando
elinestudio.com
hi there im scare now, cuz of shutting clef. :( which one is best clef alternative ? please help