WPLift is supported by its audience. When you purchase through links on our site, we may earn an affiliate commission.
How to Add Alt Text to Images Automatically with AI
In this digital age, images play a vital role in building visually appealing content for websites. However, not every user that visits a website can see images. Therefore, it is essential to add ALT text to your images to improve the accessibility of your website.
You can include ALT text into the images of your WordPress website manually. But this will consume a lot of your time & effort. Then, what is the best way to add ALT text to images?
The best way to include ALT tags in images is through AI ALT text generator plugins. In this blog, we will explain how to automatically add ALT Text to Images with the help of one of the most popular plugins, Sirv.
Whether you’re a blogger, business owner, or website administrator, this guide will help make your website more inclusive and accessible to all users.
Before we look at the process of adding ALT text to images, we will look at some basics.
What is an Alt Text?
Alt text, also known as an ALT attribute, alt description, or alt tag, is a snippet of detailed information describing what an image shows. Alt text is the written copy that appears in place of an image on a webpage if the image fails to load on a user’s screen. This text aids screen-reading software in describing images to visually impaired readers and allows search engines to crawl and rank your website more effectively.
The fundamental principle is that computers and screen readers cannot analyze an image and determine its contents. As web developers, it is crucial to provide text to the user that describes the context and function of the images in the content.
The alternative text refers to the text equivalent of an image, regardless of where that text is located. It doesn’t just refer to the image tag’s alt attribute. When referring to the attribute itself, the alt attribute will refer to the attribute itself, which will often, but not always, contain the alternative text. If you’re using an image as a purchase button for product X, the alt text should say “purchase button for product X.”
Screen readers, which are browsers used by blind and visually impaired people, use the alt tag. By reading the alt tag, these screen readers can determine what is on the image. When you hover over an element, the title attribute appears as a tooltip. For example, in the case of an image button, the image title could include an additional call-to-action. This, however, is not a recommended method. A title attribute is not required. Furthermore, it isn’t necessary to include it most of the time. They are only available to users who use a mouse (or other pointing devices), and the title attribute is only required for accessibility on iframe> and frame> tags.
What if an image serves no purpose?
You’re doing it wrong if you have images in your design solely for aesthetic purposes. Those images should be stored in CSS rather than HTML. If you can’t change the images, put an empty alt attribute on them like this:

Article Continues Below
img src=”image.png” alt=””> img src=”image.png” alt=””>
Screen readers skip over the image if the alt attribute is left blank. You can leave the field for “Alt text” in the Image settings in WordPress blank.
Why is Alt Text Important?
Alternative text has three primary uses, each of which has a wide range of utility, so its importance cannot be overstated:
- Substitute content – If an image file doesn’t load, alt text will be displayed, describing the image to the user.
- Search Engine Optimization (SEO) – Alt tags are used in successful search engine optimization to provide a better definition and contextual explanation of the image, resulting in better search engine results. In internet marketing, SEO is a critical component to achieving solid results.
- Accessibility on the Internet – If you’ve ever done a Google image search, you’ve probably come across many images on a particular subject. The ALT text assigned to these images on the website they’re on is used to rank them. When you click on an image, you’ll see where it’s been published, and you can go to the website from there. People are far more likely to click on the first few images in image search results, just as in regular searches, which means they get more exposure. This is a critical feature of today’s internet.
Not only do these steps help to ensure that your customers or clients feel valued and respected, but they also help to ensure that your web service meets its requirements and standards. While you should encourage your subscribers to allow your emails, you should still provide context for images, as all email clients—webmail and desktop—can disable or enable images by default. Properly descriptive alternative text added to photos, for example, is a useful tool for those who rely on screen readers to understand the context of the image on your web page.
Adding an image description is almost always helpful, but the description isn’t always of good quality. Although technically correct and functional in accomplishing its goal, it lacks quality and context. This type of basic description will always fall flat with the reader, customer, and consumer. In the context of alternative text, the solution is straightforward: explain the picture succinctly and descriptively.
Answering a few simple descriptive questions about the image will give you the rich context to describe it adequately. It would help if you also took advantage of this opportunity to target your keywords, tying the image to the page’s content and making it more relevant to search queries. However, a word of caution: keyword stuffing is obvious, and many search engines will penalize you if you do it. Keep your descriptions relevant to the image while also being imaginative.
How to Add Alt Text to Images Automatically?
The goal of search engine optimization isn’t just to find the best keywords. Making sure your media has the appropriate tags is also a part of the process. However, adding media titles and alt tags to WordPress can take a long time.
What if there was a way to automatically include these elements without spending a lot of time tweaking things?
This tutorial shows you how to automatically add media titles and alt tags to WordPress when you upload images. It saves time and ensures that search engine bots crawl your images correctly.
Adding Alt Text with Sirv
A special meta description field is available for all images hosted on Sirv. It can be used as the source of alt text in various Sirv components.
Article Continues Below

We’ll use Azure Computer Vision, an AI image recognition tool, to automatically add alt tags to images. The data returned by Azure Computer Vision will then populate Sirv image descriptions. Because image descriptions are searchable, this has the added benefit of improving search results in the Sirv app.
We’ll need API keys from Azure and Sirv to get started. You must have a Sirv account, Microsoft Azure Account, and Azure Computer Vision SDK.
1. Sign up for Azure Computer Vision
- Get a free Azure account
- Add computer vision
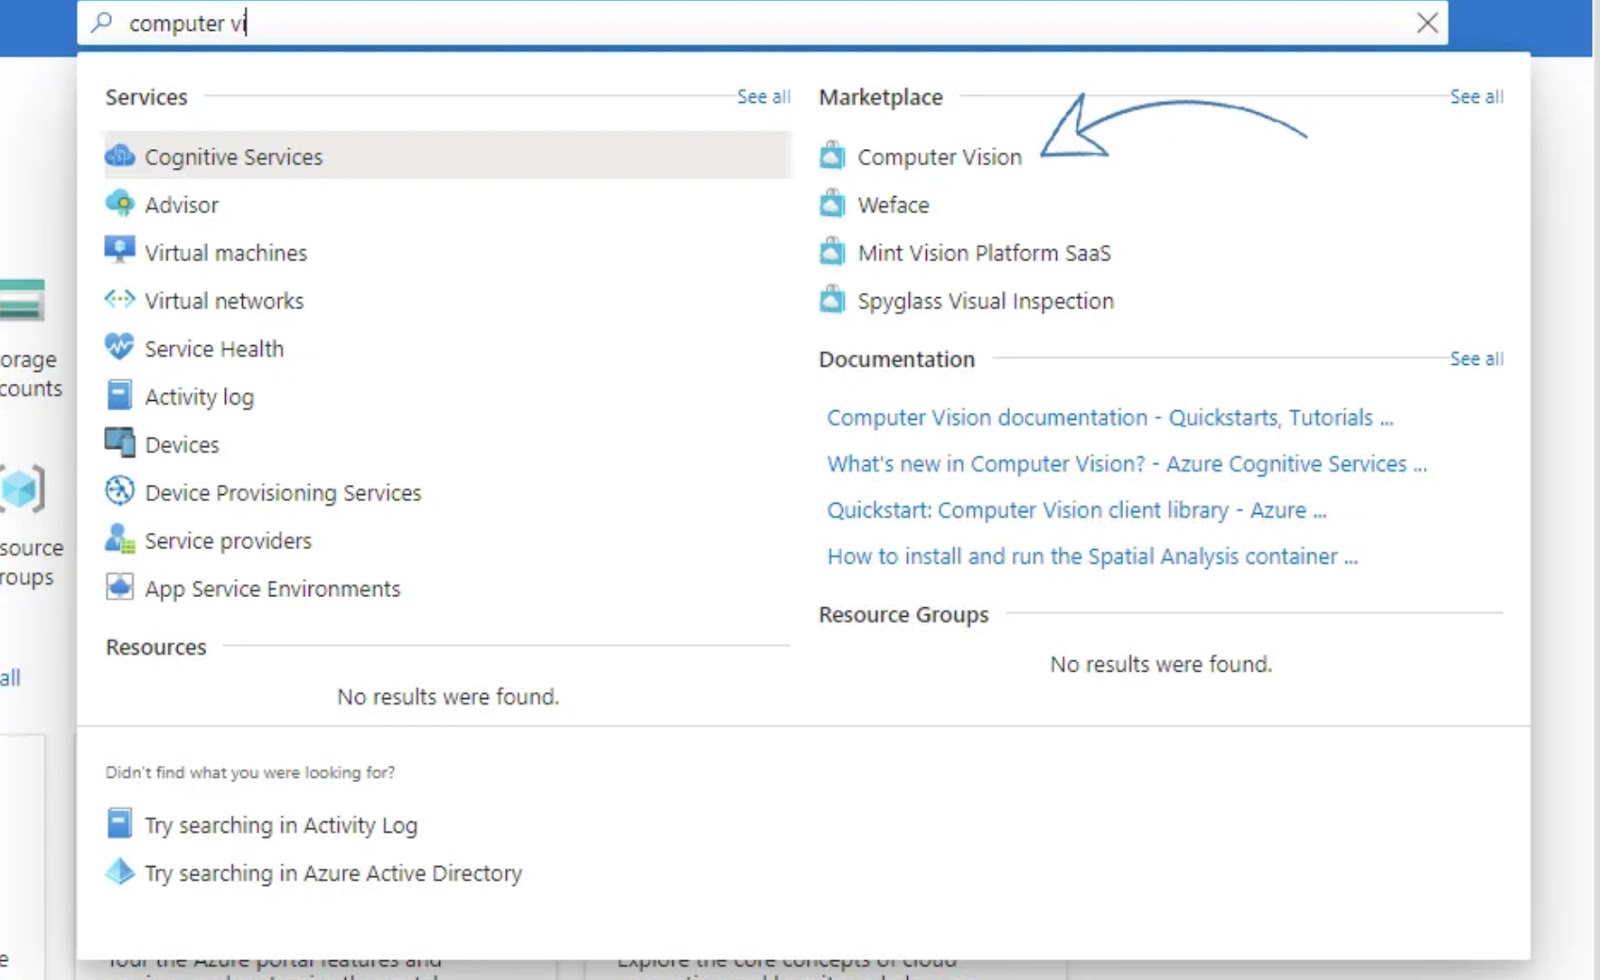
- Create a Computer Vision instance:

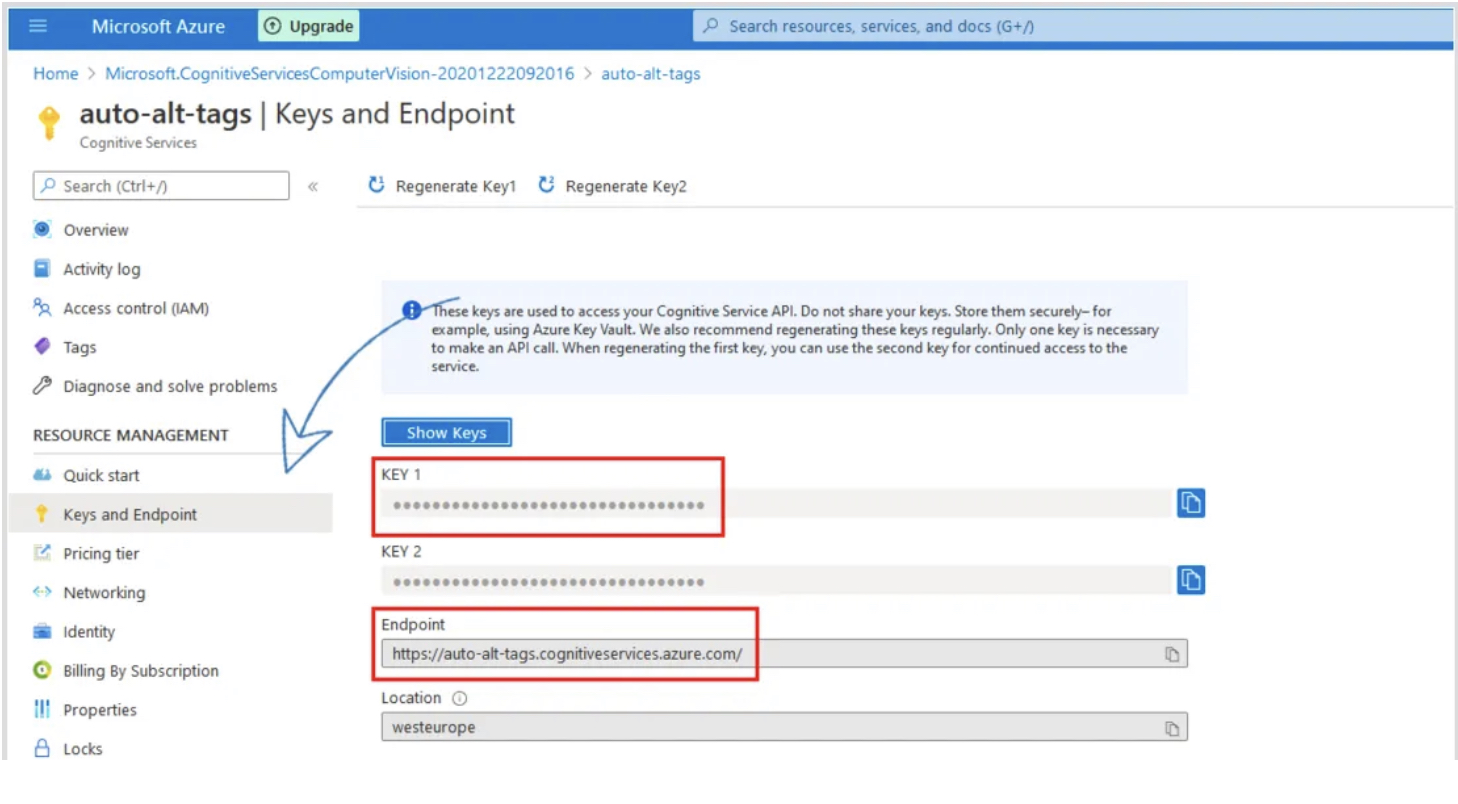
- Save your API key and endpoint address after your deployment is complete: Computer vision in Azure Keys for the API address
- Set up Azure’s Computer Vision SDK in your preferred language.
2. REST API keys for Sirv
- Go to your Sirv account
- Make a brand-new REST API client
- Save your clientId and client secret keys
Adding an Alt Tag to an Image Automatically
It’s time to get down to business now that you’ve installed the Azure Computer Vision SDK and saved all your credentials. For this example, we’ll use Python.
- Include any libraries that are required. Make a new Python file, such as autoalt.py. Then, in your preferred editor, add the following libraries:
from azure.cognitiveservices.vision.computervision import ComputerVisionClient
from azure.cognitiveservices.vision.computervision.models import OperationStatusCodes
from azure.cognitiveservices.vision.computervision.models import VisualFeatureTypes
from msrest.authentication import CognitiveServicesCredentials
from array import array
import os
import json
import requests
from PIL import Image
import sys
import time
from urllib.parse import urlparse- Create variables. Assign the following variables to the Computer Vision and Sirv API keys:
# Your subscription key and endpoint
subscription_key = "YOUR AZURE SUBSCRIPTION KEY"
endpoint = "YOUR AZURE ENDPOINT URL, example - https://we.cognitiveservices.azure.com/"

#Sirv credentials
sirv_id = "YOUR SIRV CLIENT ID HERE"
sirv_secret = "YOUR SIRV CLIENT SECRET HERE"

#The image we're going to get a description for
remote_image_url = "https://demo.sirv.com/leopard.jpg"
In the remote image URL variable, we’ve also included an image URL.
- Verify your identity. Get Sirv’s authentication token by creating a Computer Vision client:
#Create Azure client
computervision_client = ComputerVisionClient(endpoint, CognitiveServicesCredentials(subscription_key))

# Get Sirv auth token. API reference - https://apidocs.sirv.com/#connect-to-sirv-api
payload = {
  'clientId': sirv_id,
  'clientSecret': sirv_secret
}

headers = {'content-type': 'application/json'}
response = requests.request('POST', 'https://api.sirv.com/v2/token', data=json.dumps(payload), headers=headers)
token = response.json()['token']
We can finally interact with both APIs, which is fantastic.
- In Sirv, get the image description and update it. Here’s how we can make a description for an image:
# Create a Computer Vision client
description_results = computervision_client.describe_image(remote_image_url )

# Get the captions (descriptions) from the response, with confidence level
print("Description of remote image: ")
if (len(description_results.captions) == 0):
  print("No description detected.")
else:
  for caption in description_results.captions:
    print("'{}' with confidence {:.2f}%".format(caption.text, caption.confidence * 100))
    description = '{"description": "'+ caption.text + '"}'
    '''
    Update the image description in Sirv.
    API reference - https://apidocs.sirv.com/#set-meta-description
    '''
    # Grabbing the image path as the filename.
    params = {"filename": urlparse(remote_image_url).path}
    headers = {
      'content-type': "application/json",
      'authorization': 'Bearer %s' % token
    }
    response = requests.request('POST', 'https://api.sirv.com/v2/files/meta/description', data=description.encode('utf-8'), headers=headers, params=params)
    print(response)
You can optionally include a confidence check, which will only update the image description if the level of confidence is high enough.
It will appear as follows:
# Create a Computer Vision client
description_results = computervision_client.describe_image(remote_image_url )

# Get the captions (descriptions) from the response, with confidence level
print("Description of remote image: ")
if (len(description_results.captions) == 0):
  print("No description detected.")
else:
  for caption in description_results.captions:
    print("'{}' with confidence {:.2f}%".format(caption.text, caption.confidence * 100))
    description = '{"description": "'+ caption.text + '"}'

    # Change the number 60 here to a desired confidence percentage level.
    if (caption.confidence * 100 > 60):
      '''
      Update the image description in Sirv.
      API reference - https://apidocs.sirv.com/#set-meta-description
      '''
      # Grabbing the image path as the filename.
      params = {"filename": urlparse(remote_image_url).path}
      headers = {
        'content-type': "application/json",
        'authorization': 'Bearer %s' % token
      }
      response = requests.request('POST', 'https://api.sirv.com/v2/files/meta/description', data=description.encode('utf-8'), headers=headers, params=params)
      print(response)
    else:
print("no captions with high enough confidence level detected")- Putting it all together
from azure.cognitiveservices.vision.computervision import ComputerVisionClient
  from azure.cognitiveservices.vision.computervision.models import OperationStatusCodes
  from azure.cognitiveservices.vision.computervision.models import VisualFeatureTypes
  from msrest.authentication import CognitiveServicesCredentials
  from array import array
  import os
  import json
  import requests
  from PIL import Image
  import sys
  import time
  from urllib.parse import urlparse

  # Your subscription key and endpoint
  subscription_key = "YOUR AZURE KEY"
  endpoint = "https://we.cognitiveservices.azure.com/"

  #Sirv credentials
  sirv_id = "Your CLIENT ID"
  sirv_secret = "YOUR CLIENT SECRET"


  #The image we're going to get a description for
  remote_image_url = "https://demo.sirv.com/leopard.jpg"

  #Create Azure client
  computervision_client = ComputerVisionClient(endpoint, CognitiveServicesCredentials(subscription_key))

  # Get Sirv auth token. API reference - https://apidocs.sirv.com/#connect-to-sirv-api
  payload = {
    'clientId': sirv_id,
    'clientSecret': sirv_secret
  }

  headers = {'content-type': 'application/json'}
  response = requests.request('POST', 'https://api.sirv.com/v2/token', data=json.dumps(payload), headers=headers)
  token = response.json()['token']

  # Create a Computer Vision client
  description_results = computervision_client.describe_image(remote_image_url )

  # Get the captions (descriptions) from the response, with confidence level
  print("Description of remote image: ")
  if (len(description_results.captions) == 0):
    print("No description detected.")
  else:
    for caption in description_results.captions:
      print("'{}' with confidence {:.2f}%".format(caption.text, caption.confidence * 100))
      description = '{"description": "'+ caption.text + '"}'
      '''
      Update the image description in Sirv.
      API reference - https://apidocs.sirv.com/#set-meta-description
      '''
      params = {"filename": urlparse(remote_image_url).path}
      headers = {
        'content-type': "application/json",
        'authorization': 'Bearer %s' % token
      }

      response = requests.request('POST', 'https://api.sirv.com/v2/files/meta/description', data=description.encode('utf-8'), headers=headers, params=params)
      print(response)
Adding Image Alt Tags in Bulk
In the real world, you’d want to add alt tags to images in bulk. You’ll need image URLs from your Sirv account to pull this off. There are several ways to do this.
- Export images as a CSV file
Let’s use the web app to export your Sirv images for the sake of simplicity.
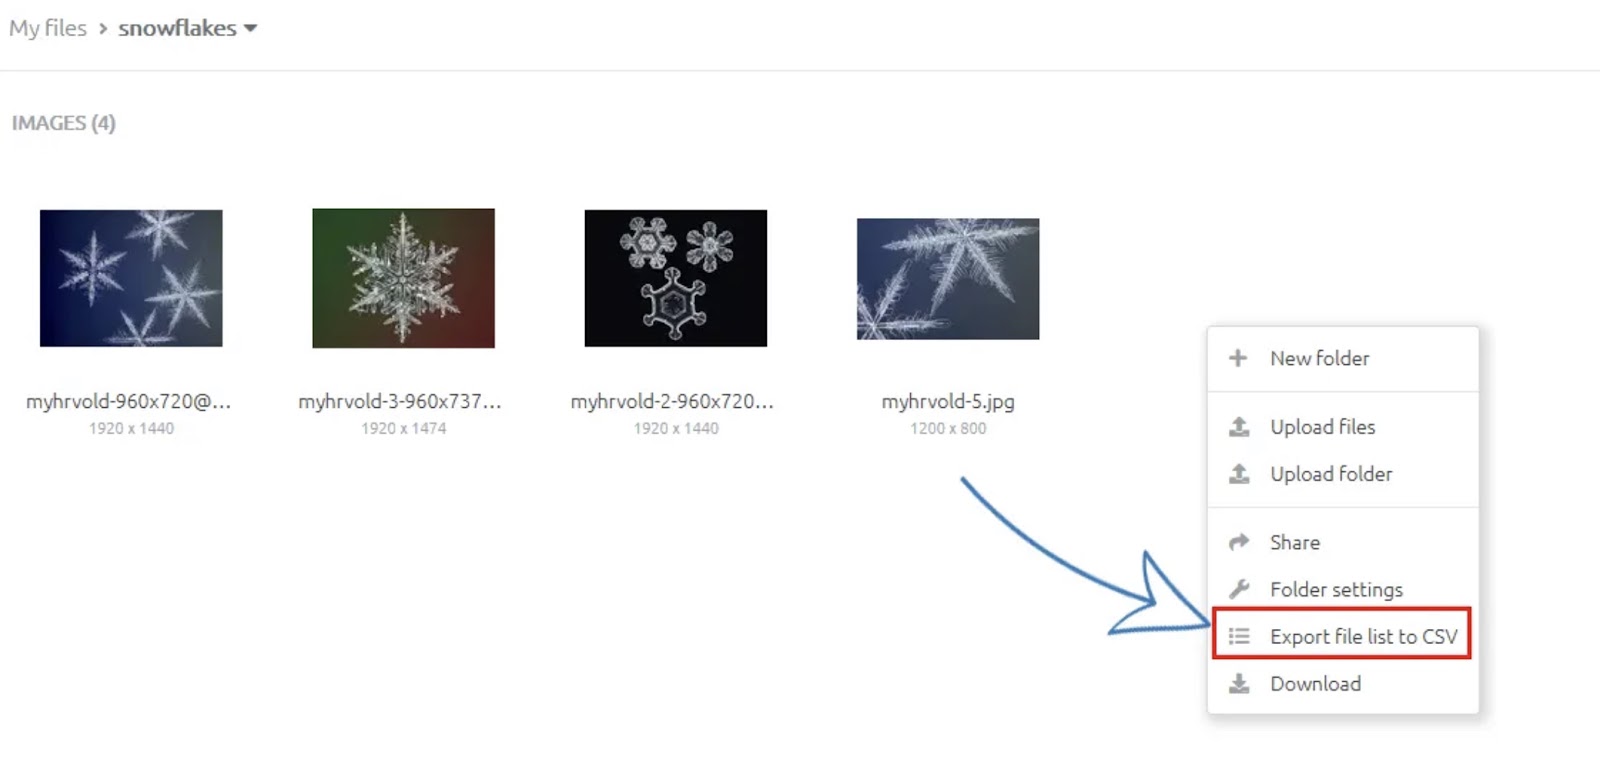
Save the image URLs in a separate text file (call it images.txt) and place it in the same folder as the script.
Article Continues Below

Then we can use a loop to describe each image and populate the Sirv description field.
Here’s the full code:
from azure.cognitiveservices.vision.computervision import ComputerVisionClient
from azure.cognitiveservices.vision.computervision.models import OperationStatusCodes
from azure.cognitiveservices.vision.computervision.models import VisualFeatureTypes
from msrest.authentication import CognitiveServicesCredentials
from array import array
import os
import json
import requests
from PIL import Image
import sys
import time
from urllib.parse import urlparse

# Your subscription key and endpoint
subscription_key = "COMPUTER VISION KEY"
endpoint = "https://we.cognitiveservices.azure.com/"
#Sirv credentials
sirv_id = "YOUR SIRV CLIENT ID"
sirv_secret = "YOUR SIRV CLIENT SECRET"

#Create Azure client
computervision_client = ComputerVisionClient(endpoint, CognitiveServicesCredentials(subscription_key))

# Get Sirv auth token. API reference - https://apidocs.sirv.com/#connect-to-sirv-api
payload = {
  'clientId': sirv_id,
  'clientSecret': sirv_secret
}

#We're opening the csv file and looping through each image in the file
with open('images.txt') as f:
  for image in f:
    headers = {'content-type': 'application/json'}
    response = requests.request('POST', 'https://api.sirv.com/v2/token', data=json.dumps(payload), headers=headers)
    token = response.json()['token']

    # Create a Computer Vision client
    description_results = computervision_client.describe_image(image)

    # Get the captions (descriptions) from the response, with confidence level
    print("Description of remote image: ")
    if (len(description_results.captions) == 0):
      print("No description detected.")
    else:
      for caption in description_results.captions:
        print("'{}' with confidence {:.2f}%".format(caption.text, caption.confidence * 100))
        description = '{"description": "'+ caption.text + '"}'
        '''
        Update the image description in Sirv.
        API reference - https://apidocs.sirv.com/#set-meta-description
        '''
        params = {"filename": urlparse(image).path.replace('n', '')}
        headers = {
          'content-type': "application/json",
          'authorization': 'Bearer %s' % token
        }

        response = requests.request('POST', 'https://api.sirv.com/v2/files/meta/description', data=description.encode('utf-8'), headers=headers, params=params)
        print(response)
        print('4 second pause')
        time.sleep(4)
Final Thoughts
We hope you have understood the basics of ALT text and how to add ALT text to images on your WordPress site. Ultimately, adding ALT text to the websites improves accessibility and makes them more search-engine friendly.
Therefore, it’s time to include the ALT text website. You can add ALT text using the Sirv plugin. Apart from the above plugin, you can leverage other ALT AI generators like Imagga Auto-Tagging, Cloudsight, Clarifai, and more.
You can use any of the ALT AI text generators for images as per your needs. By choosing the right tool, you can enhance website accessibility and offer users an improved experience.
Frequently Asked Questions
What are some benefits of using AI to add alt text to images?
Using an AI ALT text generator to add ALT text to images can save time and improve the accuracy of your alt text descriptions. It ensures your images have alt text, which is crucial for accessibility and SEO.
How do I generate ALT text automatically?
To automatically generate image ALT Text, image recognition technology is used. The technology leverages machine learning and computer vision techniques to find the crucial elements of the image and produce a descriptive summary.
There are many tools available that you can leverage to instantly generate ALT text, along with browser extensions, plugins, and APIs. You can integrate the plugins or tools into your content management systems to ensure all the images have proper ALT text.
When generating ALT text automatically, you need to ensure that the descriptions are concise and descriptive and depict the actual image. The best method is to check ALT text before making it live on your site to ensure it is precise and valuable for all users, along with those with disabilities.


Thank you for sharing!
It’s surely intriguing but will it add relevant alt tags? and what about keywords will it add alt texts with our posts keywords?