WPLift is supported by its audience. When you purchase through links on our site, we may earn an affiliate commission.
How to Create Custom Taxonomies in WordPress: A Detail Guide
Taxonomies are meant to structure and group various things on the page or post for effortless navigation. WordPress comes with built-in taxonomies that you can add to your website. However, at times it is necessary to create custom taxonomies to organize the content in an effective manner.
For instance, if you have a website on books and taxonomies enables you to organize the books based on their genre. Thus, it allows you to provide visitors with an enhanced navigation and user experience.
Do you also want to create a custom taxonomy WordPress? You have reached the right place.
In this blog, we will explain the basics of WordPress taxonomy, how to create taxonomies in WordPress in a streamlined way and display taxonomies in WordPress.
So, let’s start.
What is WordPress Taxonomy?
WordPress taxonomy is a way of organizing content on a website in the form of groups or categories. It ultimately helps the visitors to find the information quickly.
In general, WordPress has built-in two types of taxonomies: categories & tags. You can leverage these taxonomies to organize blog posts.
Types of WordPress Taxonomies
There are a total of four types of taxonomies in WordPress that enable you to group posts. Let us look at them in detail.
- Categories
Category taxonomy in WordPress enables you to group posts in a hierarchical manner. You get two options to group posts on your site using categories. Let us look at them.
The first option is to go to your WordPress Dashabord -> Posts -> Categories. Here you get the option to name and mention the child category.

Article Continues Below
The second option is to go to the Posts and click Add New. You can instantly include as many categories as you want from the panel given after the visual editor.
An example of hierarchical taxonomy is as follows.
- Fruits
- Orange Fruits
- Apricot
- Peach
- Tangerine
- Kumquat
- Orange Fruits
- Tag
These are basically non-hierarchical taxonomies. In other words, tags have a flat taxonomy.
It is a single parameter that lets you keep similar posts together. However, it emphasizes more on the smaller details rather than the whole theme.
In tag, all the things are on the same level. An example of tag taxonomy is as follows.
- Bananas
- Apples
- Lemons
The following two taxonomies are usually not visible to visitors. Moreover, they are not used often, but they are important.
- Link_category
It enables you to categorize your links. If you want to do a lot of linking on your posts, the taxonomy would be beneficial.
- Post_format
With the help of this taxonomy, you can categorize the posts depending on the format, video, audio, etc. The panel for this taxonomy is available after the visual editor.
How to Create WordPress Taxonomies Manually with Code
We know that the word ‘code’ sends shivers down the spines of many people, but honestly, it’s not rocket science, and using code as opposed to plugins keeps the ‘weight’ of your site down considerably.
We will now walk you through a step-by-step process of creating custom taxonomies in WordPress with the help of a code.
Article Continues Below

1. Establish what kind of taxonomy you need
Deciding whether or not your taxonomy needs to be hierarchical or non-hierarchical is necessary, as each requires a different code.
As with categories, a hierarchical taxonomy allows you to have parent and child terms. So, for example, your parent term might be ‘Children,’ and below that would be child terms like ‘Newborn,’ ‘Infants,’ ‘Junior,’ and ‘Adolescents.’
Non-Hierarchical, or multi-faceted taxonomies, on the other hand, are essentially like tags that only allow you to define one term to assign to content. You cannot create any parent-child relationships.
2. Login to WordPress and go to the theme editor
We strongly recommend you make a backup of your site before doing any manual changes, as any errors you make in the PHP code will cause significant issues. Further information on how to create a backup is available here.
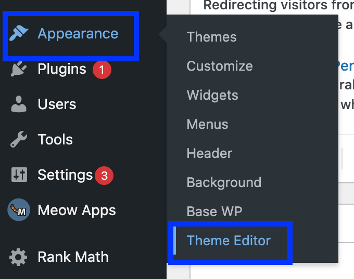
Log into your site’s WordPress admin panel in the usual way. Once you are in, scroll down and hover your cursor over ‘Appearance.’
Click on ‘Theme Editor’ in the dropdown box that appears:
A warning message advising you not to tamper with your theme’s backend may appear, in which case you can click on ‘I understand’:
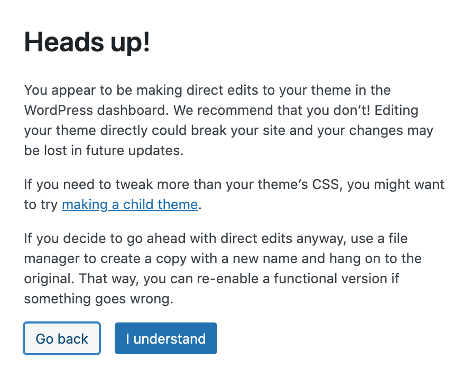
However, if editing your site from the backend does not sit comfortably with you, then we strongly suggest you hit ‘Go back’ and use a plugin to create your custom taxonomies instead
3. Locate the Theme Functions
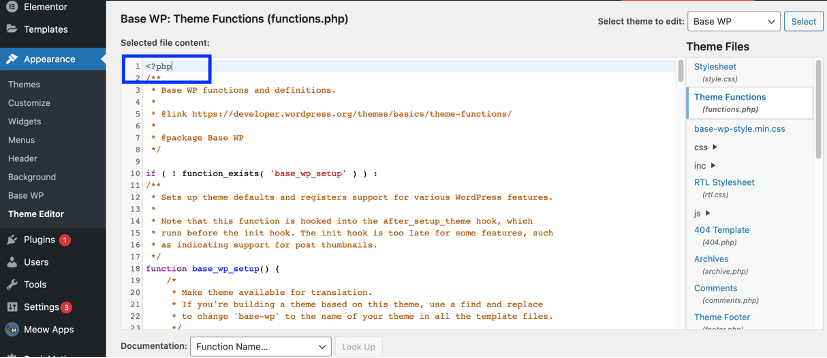
Navigate to the far right-hand side of the screen. Under ‘Theme Files,’ locate and click on ‘Theme Functions (functions.php)’:
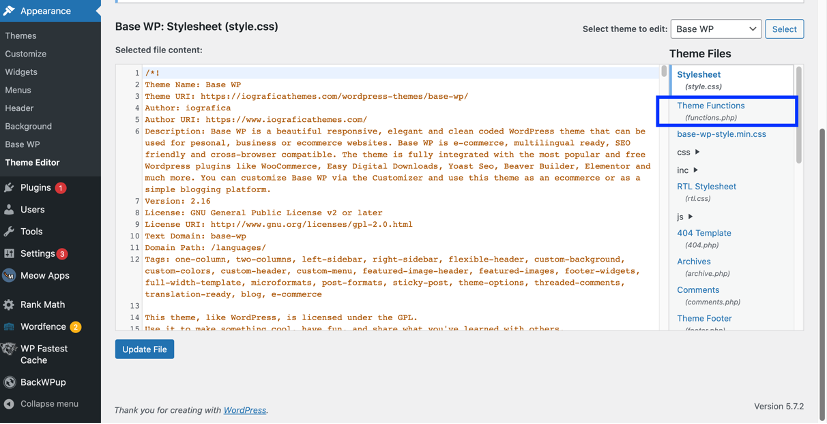
Code will now appear, and at the very top of that, you should see <?php:
Article Continues Below

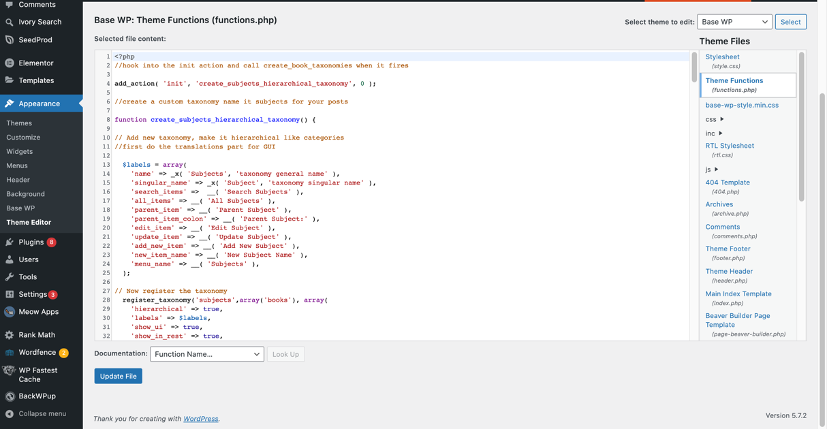
4. Insert the new code
Locate your cursor at the end of this first line. Press enter to add a new line and copy/paste either of the following blocks of code into that new line as applicable:
For Hierarchical Taxonomy
//firstly hook into init action and call create_england_taxonomies when it fires
add_action( 'init', 'create_counties_hierarchical_taxonomy', 0 );
//next create a custom taxonomy name it counties for your posts
function create_counties_hierarchical_taxonomy() {
// add your new taxonomy and make it hierarchical
//firstly do the translations part for GUI
  $labels = array(
    'name' => _x( 'Counties', 'taxonomy general name' ),
    'singular_name' => _x( 'Counties', 'taxonomy singular name' ),
    'search_items' =>  __( 'Search Counties' ),
    'all_items' => __( 'All Counties' ),
    'parent_item' => __( 'Parent County' ),
    'parent_item_colon' => __( 'Parent County:' ),
    'edit_item' => __( 'Edit County' ),
    'update_item' => __( 'Update County' ),
    'add_new_item' => __( 'Add New County' ),
    'new_item_name' => __( 'New County Name' ),
    'menu_name' => __( 'Counties' ),
  );
// register the taxonomy
  register_taxonomy('counties',array('england'), array(
    'hierarchical' => true,
    'labels' => $labels,
    'show_ui' => true,
    'show_in_rest' => true,
    'show_admin_column' => true,
    'query_var' => true,
    'rewrite' => array( 'slug' => 'county' ),
  ));
}
For Non-Hierarchical Taxonomy
//firstly hook into init action and call create_towns_nonhierarchical_taxonomy when it fires
add_action( 'init', 'create_towns_nonhierarchical_taxonomy', 0 );
function create_towns_nonhierarchical_taxonomy() {
// labels part for the GUI
  $labels = array(
    'name' => _x( 'Towns', 'taxonomy general name' ),
    'singular_name' => _x( 'Towns', 'taxonomy singular name' ),
    'search_items' =>  __( 'Search Towns' ),
    'popular_items' => __( 'Popular Towns' ),
    'all_items' => __( 'All Towns' ),
    'parent_item' => null,
    'parent_item_colon' => null,
    'edit_item' => __( 'Edit Town' ),
    'update_item' => __( 'Update Town' ),
    'add_new_item' => __( 'Add New Town' ),
    'new_item_name' => __( 'New Town Name' ),
    'separate_items_with_commas' => __( 'Separate towns with commas' ),
    'add_or_remove_items' => __( 'Add or remove towns' ),
    'choose_from_most_used' => __( 'Choose from the most used towns' ),
    'menu_name' => __( 'Towns' ),
  );
// register the non-hierarchical taxonomy
  register_taxonomy('towns','england',array(
    'hierarchical' => false,
    'labels' => $labels,
    'show_ui' => true,
    'show_in_rest' => true,
    'show_admin_column' => true,
    'update_count_callback' => '_update_post_term_count',
    'query_var' => true,
    'rewrite' => array( 'slug' => 'town' ),
  ));
}
In both the above cases, you will need to substitute the taxonomy name, labels, and post types with the actual ones you wish to use.
Your screen will now hopefully look something like this, in which case you can press the ‘Update File” button to save the code.
How to Create WordPress Taxonomies Using a Plugin
If you are uncomfortable adding code to your WordPress to create custom taxonomies, we strongly suggest using a WordPress custom taxonomy plugin instead.
The main advantage of using a WordPress taxonomy plugin is it simplifies the process, which is ideal for novices, but the downside is plugins can slow your site down. That said, taxonomy plugins are not particularly code-heavy, so you might want to use one for convenience..
Here’s how to create a custom taxonomy in WordPress using a plugin:
1. Install and activate the plugin
There are several plugins for adding custom taxonomies, but the one we will be using to demonstrate the process is the Custom Post Type UI plugin:
This popular plugin is available in the WordPress plugin directory. It is free, very lightweight, and easy to use, so go ahead and download and activate it as usual. Other plugins achieve the same thing, and adding taxonomies should be reasonably similar, whichever you choose.
2. Go into ‘Add/Edit Taxonomies’
A new item titled ‘CPT UI’ should have appeared in the menu to the left of your WordPress admin console. Click on that to make the sub menu drop down and select ‘Add/Edit Taxonomies’:
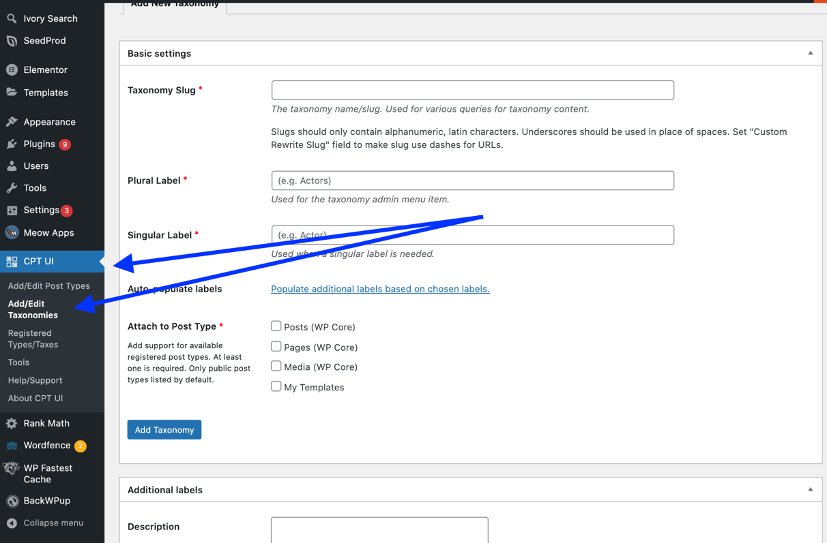
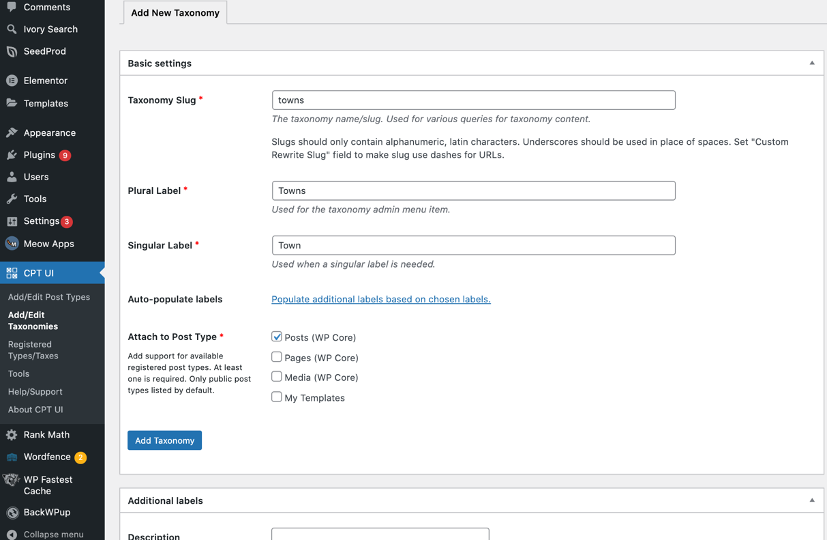
3. Add the details of your new taxonomy
You will now need to type the details of your new taxonomy into the corresponding fields, namely:
- Taxonomy Slug – here, you should enter appropriate wording which will go into the URL. It is best to keep slugs as short as possible and only use alphanumeric, Latin characters. Also, use underscores instead of spaces.
- Plural Label – enter the plural name of your taxonomy (e.g., Towns)
- Singular Label – enter the singular name for your taxonomy (e.g., Town)
- Auto-populate labels – clicking this will automatically fill in various other fields further down the screen. We suggest doing so as it can save time.
- Attach to Post Type – select which post type(s) will use the taxonomy.
For example, your screen will look like this:
4. Add labels to your new taxonomy
Scroll down the page, and you will see a section titled ‘Additional Labels.’ If you hit the ‘Auto-populate Labels’ link, as suggested in step 5 above, most of these fields will have been filled in automatically. You are free to edit these or add your own, and below each field is a description of how WordPress uses the labels:
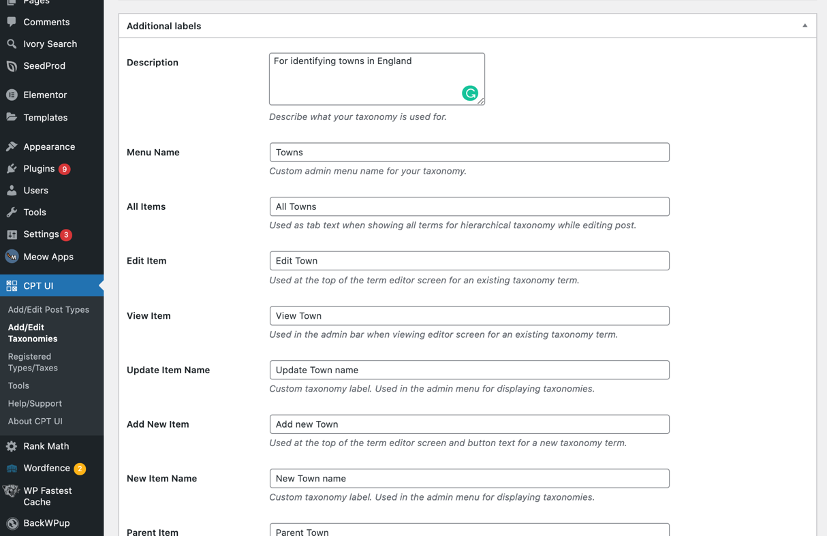
Note that the labels are only used within the WordPress admin panel and will not show on your site.
5. Configure the settings for the taxonomy
Once you have finished inputting the labels, scroll further down the page to the ‘Settings’ area. Here you have many options to configure how your new taxonomy will behave. Again, there is a brief description of what each option does beneath each field.
Unless you are an advanced WordPress user, most settings can be left as they are. However, the most important is “Hierarchical.” That determines if the new taxonomy can be subdivided or not. In our example, if ‘towns’ were made hierarchical, we could have subdivisions such as ‘neighborhood,’ ‘district,’ and the like. On the other hand, if you leave this option as ‘false,’ then the taxonomy cannot have any parent-child relationships and will be multi-faceted.
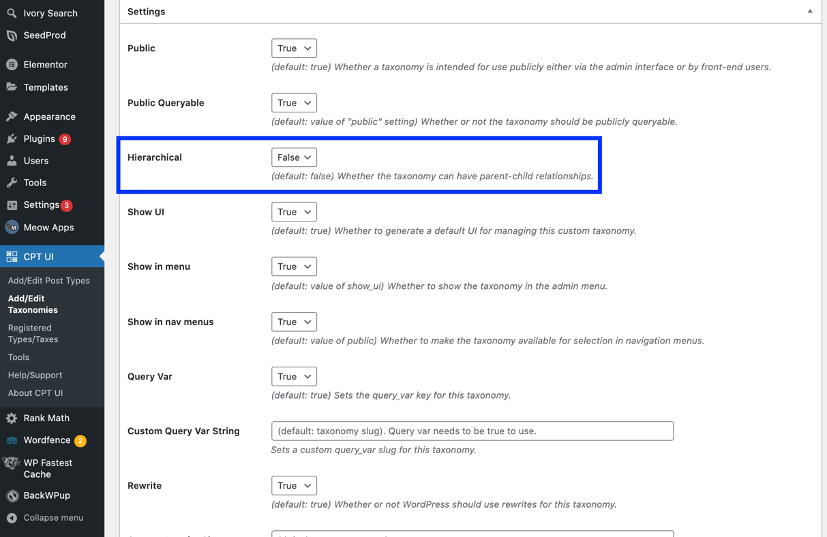
Once you have configured the required settings, scroll to the page’s bottom and hit ‘Add Taxonomy.’
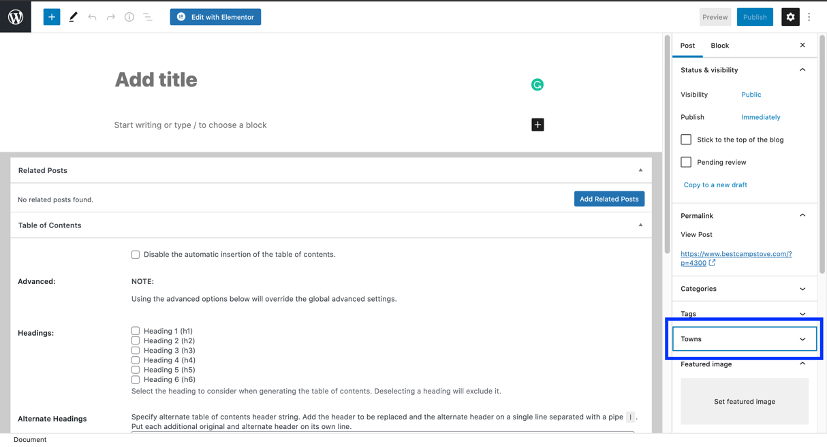
6. Use your new taxonomy
Whenever you now create or edit a post of the type(s) you selected in step 3, your new taxonomy will appear in the righthand menu of the post screen:
As a bonus, the Custom Post Type UI plugin allows you to create custom post types similarly. You can view the full details of all your custom taxonomies and post types by clicking on ‘Registered Type/Taxes’ under ‘CPT UI’ in the menu to the left of your WordPress admin console.
Displaying WordPress Custom Taxonomies
Even though you have added custom taxonomies to your WordPress using code, you must configure where to show them.
1. Establish where you want to display your custom taxonomy
To do this, you will need to get familiar with the template hierarchy in WordPress as we will add some code templates into the theme or child theme where your custom taxonomies are to appear. In most circumstances, it will only be necessary to add code to the single.php, content.php, or possibly another file within the template-parts folder of your theme. However, adding a WP custom taxonomy to any template file is also theoretically feasible.
Suppose you are unsure how to find the template used by a specific page. In that case, we suggest using the Which Template Am I plugin. That will show the template’s name in use for the current page, and you can safely deactivate the plugin once you have pinpointed the template you need to work with.
2. Add the code to where your custom taxonomy is to show
Once you have established where you want to display the new taxonomy, locate the corresponding .php file. These can usually be found in the same way as you located the functions.php file by going into the WordPress Theme Editor and selecting the appropriate file under the ‘Theme Files’ list. Once you have found the correct .php file, paste the following code to it:
<?php the_terms( $post->ID, 'towns', 'Towns: ', ', ', ' ' ); ?>Remember to substitute the elements in red with the taxonomy name you used.
That’s it; you have added all the necessary code to create and display a custom taxonomy within your WordPress. If your new taxonomy is not showing, ensure you have added the code to the correct file. If the problem persists, you might wish to contact the developer of your particular theme for guidance on customizing the display to include your new taxonomy.
In all instances, the WordPress Codex is the go-to for everything relating to your site’s backend, including custom taxonomies and template hierarchy.
It’s a Wrap!
Adding custom taxonomies is a compelling way of organizing the structure of your WordPress site. You are no longer limited to just categories and tags: you can now create the taxonomies according to your need. This thing is especially vital for websites that are not blogs.
If you have doubts about doing anything with codes and messing with .php files, we strongly recommend using a plugin to register taxonomies. Even if you are pretty savvy with coding, a plugin is still a good option as it can create your taxonomies quickly and easily, and you won’t need to create backups each time.
Have you created custom taxonomies for your WordPress site yet? Or do you run a primary blog where tags and categories adequately serve your needs? Please let us know in the comments section below, along with any taxonomy-related tips you may have.
Frequently Asked Questions
How do I add a custom taxonomy filter in WordPress?
Go to Settings in your WordPress dashboard. Here you will view a search filters option. By default, the option will be disabled. You need to enable it by choosing custom. After this, enter the taxonomy slug in the text field. You can add this like tax: [text you want to keep]. For instance, if you desire to include a taxonomy slug as fruits, type tag: fruits.
If you wish to have more slugs, you can add them by using a comma in between.
What is the difference between custom post type and taxonomy in WordPress?
A custom post type is a regular post that you can create & manage in WordPress. It consists of different post_type value in the database. The common post types in WordPress would be posts, pages, attachments, custom CSS, navigation, and more. On the contrary, taxonomies are used to group posts & categorize the content. In short, the main difference between the custom post types and taxonomy is grouping.