WPLift is supported by its audience. When you purchase through links on our site, we may earn an affiliate commission.
WooCommerce Simple Auctions Review: Host Auctions on WordPress
If you’ve ever wished that you could use WooCommerce to power auctions (like eBay), today’s WooCommerce Simple Auctions review is for you.
WooCommerce Simple Auctions is an affordable way to add both normal and reverse auction functionality to your WooCommerce-powered store.
You can either only sell your own products via auction. Or, by combining it with a multivendor plugin like Dokan, you can allow users to register and submit their own auctions, just like eBay.
Keep reading to learn more about all the features and get a hands-on look at how everything works…
WooCommerce Simple Auctions Review: The Feature List
The plugin’s name is a pretty good descriptor for its core functionality. That is, WooCommerce Simple Auctions gives you a simple way to run auctions at your WooCommerce store. Here’s an example from my test site:

You can run two different types of auctions:
- Normal – think eBay. People put in their bid and the price rises accordingly. Other people can see the new price and bid above it if they want.
- Reverse – think of companies bidding for a project. That is, the lowest bid wins.
Beyond that, you get two other options to run your auctions:
- Proxy bidding / Proxy auction – is an auction where a bidder places its max bid and plugin automatically raises user’s bid to the max bid value (like auto bidding on eBay)
- Sealed bidding – people submit their bids without knowing what other people have bid. Whoever enters the highest bid wins (or lowest, in the case of a reverse auction).
So by mixing and matching those various options, you have a lot of flexibility for how your auctions function.

Article Continues Below
You can also set a:
- Starting price
- Minimum bid increment, to avoid people just increasing the auction by a penny
- Reserve price – the product will not sell unless this minimum is met
- Buy it now price – let people skip the auction and just buy a product outright
And you can also set start and end dates for your auctions.
Beyond that, you get plenty of shortcodes and widgets to display your auctions and let visitors browse the auctions they’ve participated in. Along with implemented options, there are code snippets for quick mods like anti-sniping, bid increment price classes, bid confirmation, increase bid by percentage, etc.
And, by integrating with a multivendor plugin, you can even let people sign up and submit their own auctions, to create your own mini version of eBay.
Hands-on With WooCommerce Simple Auctions
I’ve installed WooCommerce Simple Auctions on my test WooCommerce site, so let’s dig into how it works…
Configuring General Auction Settings
After activating WooCommerce Simple Auctions, you’ll get a new Auctions tab in the regular WooCommerce settings area (WooCommerce → Settings).
Here, you can configure how to display your auctions, like the page that lists all of your auctions, as well as whether or not you want to mix in auctions with regular WooCommerce products:

Some other options here let you:
- Configure the AJAX bid check. With this enabled, visitors can always see the latest price even without refreshing the page. This helps avoid people acting on out-of-date information.
- Watchlists so that people can keep track of their auctions
Beyond this area, you’ll also be able to configure auction-related notification emails in the Emails tab. By default, WooCommerce Simple Auctions gives you automatic, customizable emails for:
Article Continues Below

- Auction wins
- When a user gets outbid
- A reminder to pay for an auction
- Failed auctions
- Failed to meet reserve
- Buy it now
- Finished auctions
- Bid notes
- Auction relist (admin notice)
- Auction relist (user notice)
- Customer bid notification
- Auction ending soon reminder

All of these emails are fully customizable, and you can also disable any that you don’t want to use.
For everything else – like the payment gateways people use to pay for their auctions – you’ll use the regular WooCommerce settings.
Creating a New Auction
To create a new auction, you’ll use the normal WooCommerce product interface. That is, you go to Products → Add New.
You can enter your product details like normal. For example, you’ll enter a title, upload images, choose a category, etc.
Only now, when you go to configure the Product data box, you’ll get a new Auction product type that lets you choose:
- The item’s condition
- What type of auction to use (Normal or Reverse)
- Whether to enable proxy bidding or sealed bidding
- Auction start price
- Bid increment
- Reserve price
- Buy it now price
- Auction start and finish dates

Below that, you’ll also get an Automatic relist auction meta box that lets you choose what to do if the auction isn’t successful (e.g. no one bids, the reserve price isn’t met, the winner doesn’t pay, etc.).
If you want, you can automatically relist the auction according to a few different conditions:

Article Continues Below

And once you publish your product, the auction will be live according to the conditions that you set.
People can enter their bids and, if enabled, choose the Buy it Now option:
Using the Built-in Widgets
To help users find auctions, WooCommerce Simple Auctions includes a number of dedicated widgets that you can use to display:
- Auction search
- Ending soon auctions
- Featured auctions
- Future auctions (i.e. auctions that haven’t started yet)
- Auctions in which the user is participating
- Watchlist (auctions that the user has manually added to their watchlist)
- Random auctions
- Recently started auctions
- Recently viewed auctions

For example, here’s what the My Auctions widget looks like:

Using the Built-in Shortcodes
Beyond the widgets, WooCommerce Simple Auctions also includes dedicated shortcodes that you can use to display auction data. You get shortcodes for:
- User’s watchlist
- User’s auction activity
- Ending soon auctions
- Recently added auctions
- Featured auctions
- Specific auctions, by product ID or SKU
- User’s auctions – this lets you create a dedicated page for users to view their own auctions. You can also combine it with the watchlist shortcode so that users can see both
- Future auctions
- Past/finished auctions
I’ll show you an example of one of these below…
How WooCommerce Simple Auctions Works for Shoppers
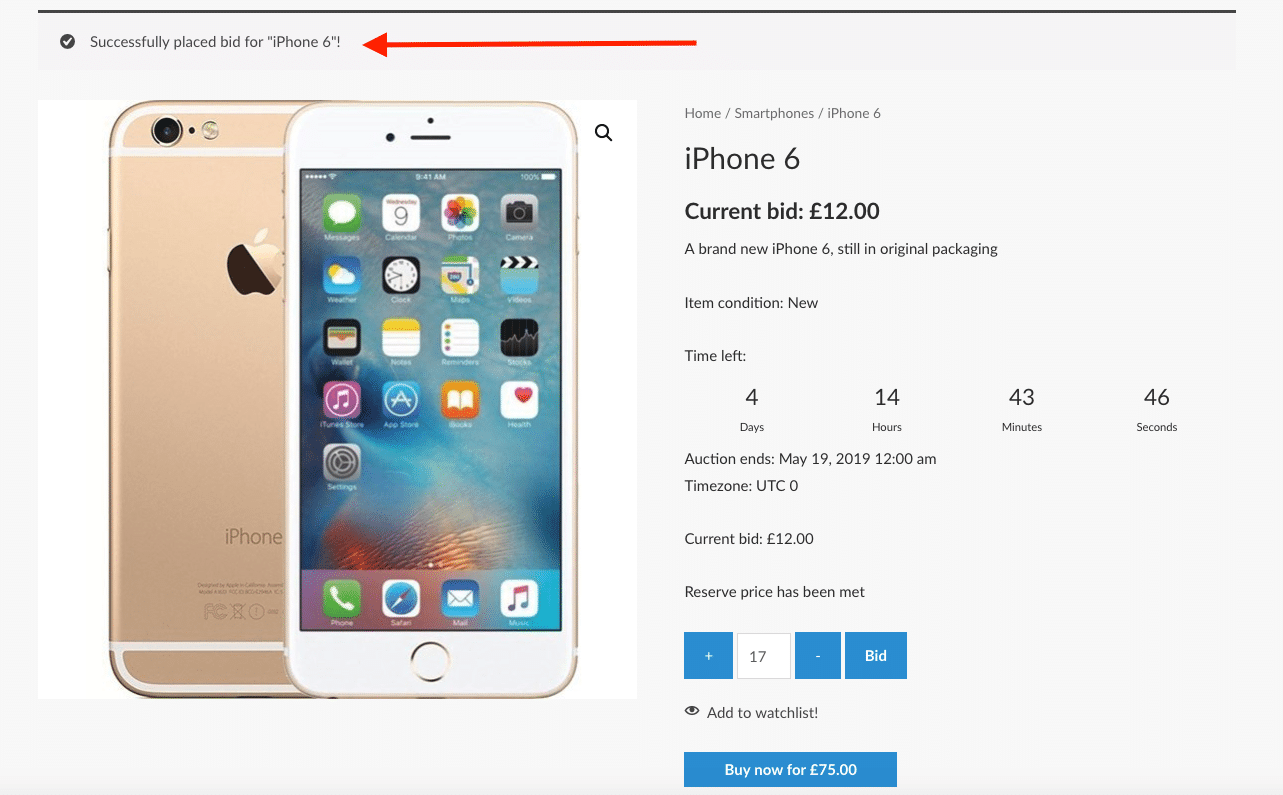
In order for users to participate in auctions, they’ll need to be signed up and logged in.
From there, they can click the Bid button to place a bid. They’ll then get a notice telling them it was successful, as well as whether or not the reserve has been met:
Other options users have are to:
- Add an auction to their watchlist
- See an auction history log to see all the bids that have been placed (if there’s no sealed bidding)
Or, if they opt to use the buy it now option, the product will be added to their cart and they can check out using the normal WooCommerce cart/checkout system.
Once the auction ends, the winner will see a notification and an option to Pay Now:

Clicking that will also take them to the normal WooCommerce checkout system.
Side note – if you want, there’s a code tweak that you can make to require users to verify payment information before they’re able to place a bid.
Using the included shortcodes, you can also create a dedicated page that users can visit to view the auctions they’re participating/interested in.
How You Can Manage Auctions
There are a few ways to check up on your auctions.
First, if you edit an individual product, you’ll get an Auction meta box that shows a log for everything going on with that auction. You can also use this to delete bids if needed:

Or, if you go to WooCommerce → Auctions Activity, you’ll be able to see a more general activity log of all the auctions on your site:

WooCommerce Simple Auctions Pricing
WooCommerce Simple Auctions is sold through CodeCanyon, where it will cost you $29 with standard Envato licensing. That is:
- Lifetime updates
- 6 months of support and updates. Or, you can pay another $9 to extend support to 12 months
At CodeCanyon, WooCommerce Lotteries has been purchased over 4,900 times and has a 4.69-star rating out of 5.
Final Thoughts on WooCommerce Simple Auctions
If you want to allow auctions on your WooCommerce site, WooCommerce Simple Auctions delivers on its promise of making the process quite simple.
In playing around with it, I didn’t hit any snags, and all the functionality worked as you’d expect it to.
All in all, I was up and running with working auctions within just a few minutes of installing the plugin, which is tough to argue with.
Plus, at just $29, it’s quite affordable for what it does.
So, if you need this type of functionality, definitely give this one a look: