WPLift is supported by its audience. When you purchase through links on our site, we may earn an affiliate commission.
A Definitive Guide to Prevent Hotlinking in WordPress
Looking to prevent image hotlinking in WordPress? In this post, we share what hotlinking is, why it occurs, and how you can avoid it.
Some people engage in certain online behaviors that they are unaware are against the rules. Marketers are included in this. Marketers commit internet sins such as keyword stuffing, comment spam, and paid links, to name a few. These methods, known as black hat SEO, attempt to manipulate search engine algorithms to rank higher on SERPs.
Other methods are used to play games with other website operators. Hotlinking is one such technique.
The issue of hotlinking will be discussed in this article. You’ll discover what it is, why it occurs, why it should be avoided, and what steps you may take to avoid it. You’ll learn how to prevent others from utilizing your content and how to avoid engaging in hotlinking yourself.
What is Hotlinking?
Hotlinking, also known as inline linking, is the act of linking to an object on another server. Many people learning to produce a web page, for example, may use a link to an image on another server to make their page easier to construct.
A hotlink is a program-to-program connection that allows users to make changes in one program or document while the computer makes the same changes in the linked file. When someone uses a web link or URL to reference a picture, they may or may not be able to identify the source.
Why Hotlinking is Bad for Your Images
Hotlinking is not recommended because it may infringe on the image’s Copyright and consumes bandwidth on the server hosting the image.
Nothing is wrong if before they embed files they first ask for permission from the owner to hotlink the media files to their website. Unfortunately, this is not always the case.
When other websites use your photographs as a hotlink, they deplete your server’s resources and may even cost you money (if you have to pay for bandwidth). There’s a good chance you’re limited on bandwidth, especially if you’re utilizing managed WordPress hosting.
Despite the fact that the image is on someone else’s site, your web server must nevertheless process the request and transmit the picture to that site. If that site has a lot of traffic, there will be a lot of requests for your server to handle, which may cause your site to slow down.

Article Continues Below
Aside from that, many hosts charge depending on how much bandwidth you use. Hotlinking images consume bandwidth, therefore you may wind up paying more to allow others to utilize your photographs!
Several sites don’t object if people hotlink photos; in fact, some webcomics encourage it. However, unless you gain something from allowing users to hotlink your photographs, you should disable hotlinking on your WordPress site.
How to Know If Someone is Hotlinking Your Images?
Most of the time, you won’t realize someone is hotlinking your images until you see a drop in site performance. Even yet, there is a slew of reasons why a website can slow down. There was no easy method to find it until lately. You needed to examine your server logs or compare them to data from a provider such as Google Analytics. These methods were unreliable, and they took a long time to complete.
It’s now incredibly simple to do, thanks to the wonders of Google Image Search.
You may tell Google to hunt for your site’s photos in other URLs with a simple command:
inurl:yourwebsite.com -site:yourwebsite.com
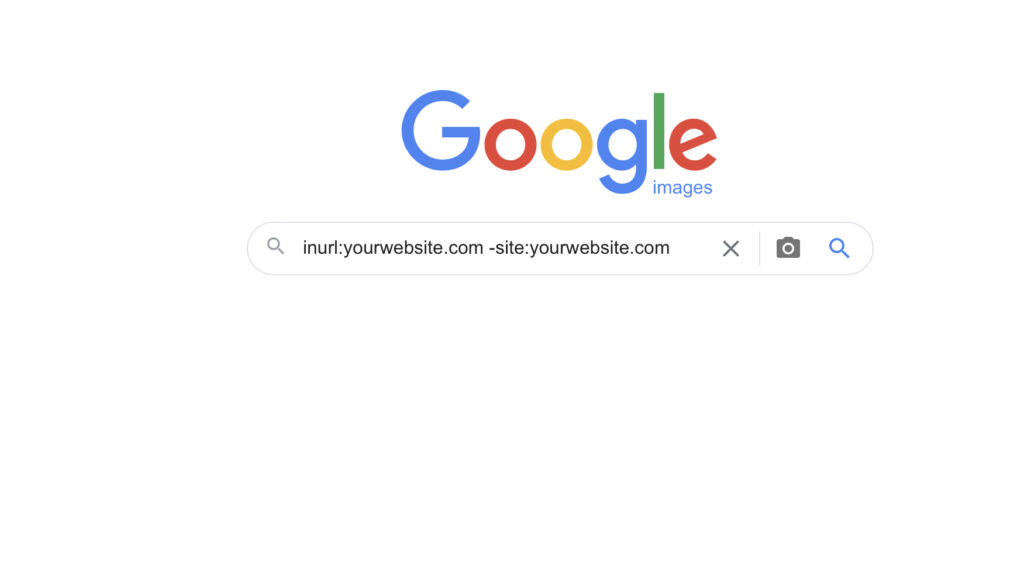
This command searches your website for every image and deletes any entries that include your own URL. Your photos will appear in the remaining results if someone is hotlinking them. You may also utilize the Visit Site option to learn more about the perpetrators by clicking on each image.
It’s possible that you’ll have to click the image to open it, then click “Visit Page” to see where it actually goes.

Note: You might want to install McAfee SiteAdvisor in your browser so that it can notify you if you end up visiting a potentially dangerous website.
How to Prevent Image Hotlinking?
You can take preventative precautions at any moment, whether or not any of your website’s media resources have been hotlinked. With the approach we teach you here, you can easily avoid hotlinking. To prevent hotlinking in WordPress sites, use one of the methods listed below. The sneak peek is followed by the details.
Article Continues Below

Some of these suggestions need you to locate an image of yours that has already been hotlinked, so “prevention” may not be the best word. However, because the majority of the harm caused by hotlinking is due to the continued use of your content, it’s best to catch hotlinking early and eliminate it before it becomes a problem.
Access website .htaccess file
- The first step is to connect to your website via FTP
FTP is a file transfer protocol that allows you to access the files that power your website as well as upload and download data. To connect your computer to your website, you’ll need to use FTP client software, and you’ll need to enter particular credentials (username, password, server address, port) that are specific to your hosting package.
- Download FileZilla
First and foremost, you must obtain an FTP client. There are several FTP programs available, but FileZilla is what we used here.
FileZilla is available for free download here. Click Download FileZilla Client after you’ve arrived at the homepage.
If you use a different operating system than Windows, go to the More download options section and click on your operating system’s logo.
When you click the download link, a pop-up window will open asking you to select which version of Filezilla you want to download. I always go for the free version, so I simply select Download.
- Install and open FileZilla
You’ll need to launch the installer when FileZilla has finished downloading. Fortunately, FileZilla is simple to set up. All you have to do now is follow the setup wizard’s instructions.
After installing just click the finish button then you’re free to go.
- Locate your FTP or SFTP credentials
Now that FileZilla is installed, you can connect to your account using your FTP credentials. You’ll need the following credentials:
- Address of the host/server
- Password Username Port
- Your FTP and SFTP credentials may be extremely similar. The port number is usually different.
“Where can I get my FTP credentials?” you might query. This is entirely dependent on your website’s hosting provider. Your FTP information may be included in one of your host’s welcome emails.
Article Continues Below

If you didn’t receive an email with your FTP credentials when you bought yours, I recommend contacting your host directly or Googling your server’s name followed by “ftp credentials.” You should be able to find several articles explaining how to locate your FTP credentials from this location.
You can always create a new FTP account if you can’t find your FTP credentials but have access to a cPanel account.
Log into your cPanel account, go down to the Files section, and click FTP Accounts.

Scroll down on the FTP Accounts page until you see the Add FTP Account form and fill in the information then hit the create FTP account button.
- Fill your FTP credentials to FileZilla
Return to FileZilla now that you have your FTP credentials. Click File, then Site Manager, to add your FTP credentials to FileZilla. Click New Site to add your website.
A new site will be added to the Select Entry section as a result of this. Begin by naming your new website. You can rename this site at any time by clicking the Rename button in the site manager’s bottom left corner.
You now have the opportunity to input your credentials in the General tab on the right-hand side of the screen.
To begin, you must select a protocol. Leave it as FTP – File Transfer Protocol if you’re using FTP.
You’ll also notice an Encryption option. Require explicit FTP over TLS should be specified here.
The next step is to select your login type. Select “normal” from the dropdown menu.
Now type your login and password into the boxes provided.
Click Connect when you’re ready.
If you were successful in connecting, you should now see your website files on the right side of the screen.
- Go to the root of your WordPress installation
Although some hosts default to www or your site’s name, public_html is the most common moniker.
When you’ve located the correct folder, check for the.htaccess file. Select View/Edit from the context menu by right-clicking on it.
This will immediately open the file in your local text editor, allowing you to make changes. Remember that your.htaccess file instructs your server on how to behave and who has access to certain files and directories. Working with it necessitates caution, which is why you should back up your website beforehand.
Add snippet code to .htaccess
RewriteEngine on
# Remove the following line if you want to block blank referrer too
RewriteCond %{HTTP_REFERER} !^$
RewriteCond %{HTTP_REFERER} !^https?://(.+\.)?example.com [NC]
RewriteRule \.(jpg|jpeg|png|gif|bmp)$ - [NC,F,L]Replace the last rule with if you wish to show a “blocked” image instead of the “hotlinked” image.
https://example.com/blocked.png RewriteRule.(jpg|jpeg|png|gif|bmp) [L,R]How to enable HotLink Protection in cPanel
This guide assumes you’ve already logged into your cPanel account. Follow the steps below to enable hotlink protection in cPanel:
- Go to Security > Hotlink Protection once you’ve authenticated into cPanel.

- Enable should be selected. The Allowed referrers and Protected extension lists will appear on a new page.
- Return to the previous page by clicking the Back button.
- Add their URLs to the URLs to enable the accessibility menu to allow particular sites to hotlink to your website.
- Add the file extensions to the Block direct access for the following extensions text box to prevent direct access to specific types of files.
- Add.jpg to the Ban direct access for the following extensions text box, for example, to block all.jpg pictures.
- Regardless of any other settings, when you ban these file types, others will be unable to hotlink to them from your website.
How to Disable Hotlinking using a CDN?
A CDN (Content Delivery Network) is a widely dispersed network of servers that helps reduce the physical distance between the server and the user, resulting in faster loading of web page content. This allows people all over the world to access the same high-quality content without having to wait for it to load.
You can also enable hotlink prevention if you’re using a CDN (Content Delivery Network). It may be possible to do so using the settings page of your CDN service.
You can, for example, block HTTP referrers for direct linking with KeyCDN. Their Zone Referrer functionality allows you to prevent hotlinking by restricting access to your content to specified websites. To do so, follow these steps:
- Use the KeyCDN dashboard to get started.
- Select Zone Referrer from the drop-down menu.
- Set your Referrer, which is normally the URL of your website.
- Select a Zone to which the referral will be mapped.
- Make sure you save your modifications.
- If you’re utilizing Cloudflare, here are the steps to take:
- Navigate to the dashboard.
- Choose your website as the hotlink protection target.
- The Security option can be found under the Scrape Shield menu.
- Configure the hotlink protection. On
Using Hotlink Protection Plugins, you can disable hotlinks
This is an approach that is suitable for beginners. All you have to do now is install and activate a plugin. Here are a few plugins to consider for hotlink prevention.
SecuPress
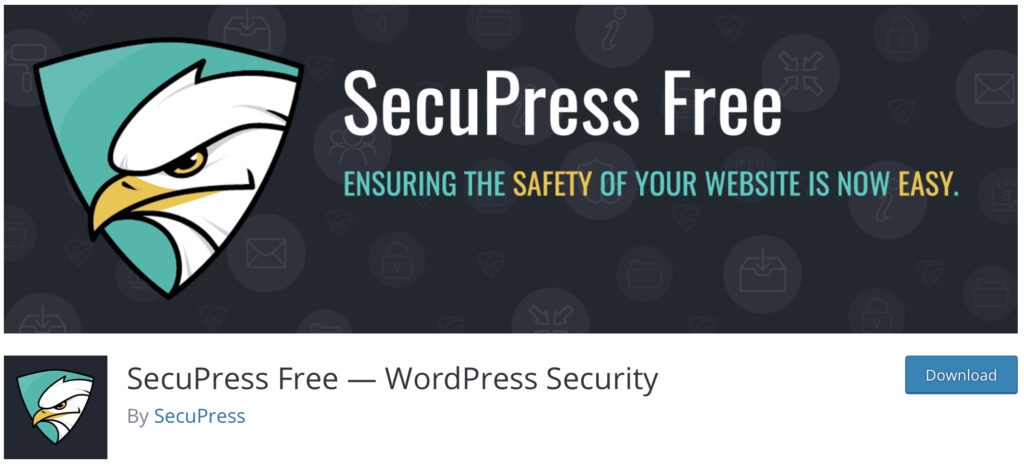
In the area of WordPress security, SecuPress is the new kid on the block. It’s the newest release from WP Media, the company behind the WP Rocket plugin, which has gotten a lot of attention while being in pre-release. The powerful SecuPress Scanner, which checks your website for security vulnerabilities, is the plugin’s key selling feature.
This WordPress security plugin is a one-stop-shop for safeguarding both your website and its content. To do so, click on the Sensitive Data category and enable the Anti Hotlink functionality. It’s a premium plugin that will set you back $66 a year per site.
All in One WP Security and Firewall

First and foremost, with its strong variety of features, All in One WP Security and Firewall provides comprehensive WordPress protection. The plugin focuses heavily on brute force assault defense, assisting you in defending against the most prevalent type of website security breach.
The plugin also adds a firewall to your website, as the name implies. This firewall offers a number of predefined configurations that can be enabled with a single click, allowing you to choose the level of security you require.
It’s a powerful plugin that guards your site against content theft and is available for download for free. By heading to the Prevent Hot Links tab and looking for the Firewall menu, you can quickly activate hotlink protection.
Get All in One WP Security and Firewall
Disable Right Click
While not directly related to hotlink prevention, this WordPress plugin blocks visitors from right-clicking and copying your site’s content.
Use a logo or brand name as a watermark on your images
Another option is to use a watermark on your photographs. This is particularly critical for photographers. Adding your logo or a mark to the top of your photographs may stop others from copying them. And if they do, you get free publicity! Watermarking might also be useful when others post your photos on social media.
As you can see, there are numerous watermark plugins available to assist you in protecting your photographs. Most of them have a free version, so give them a shot and see which one is the best WordPress watermark plugin for you.
You can try Modula Gallery to put a watermark on your images. It is a premium plugin that enables you to create stunning photo galleries. It also comes with a specific Watermark extension for adding picture watermarks to your photos. The watermark can be applied to both previously posted and newly posted photographs on your site. The watermark is applied automatically to any new image you post to the site once you’ve put it up.
Another free watermark plugin that can be downloaded from the official repository is Easy Watermark. The plugin has a 4-star rating and over 40,000 installations. This is a simple plugin that adds a watermark to any current or new photographs you submit to your site. You can use either a text or an image watermark, and you can use both on the same photo. You can customize the watermark’s transparency and opacity.
Wrapping Up!
For many websites, image hotlinking is a major issue, especially if the hotlinking websites do not provide correct attribution. If this happens to you, not only will your website’s performance suffer, but you’ll also lose out on potential visitors while others benefit from your material.
It’s not difficult to avoid hotlinking. To prevent hotlinking, you can use any of the strategies listed above. You will be able to save time, money, and bandwidth by using these approaches. Make careful to visit your site on a frequent basis to see if anything out of the ordinary occurs.
Let us know if you need any help – anything at all! Good luck! :)


Does this htaccess lines work in nginx servers?